Table of Contents
Advertisement
Quick Links
– HALO RAPID INDUCTION AREA HEATER –
Assembly, Safety & Operating Instructions
This appliance is best assembled by two people.
Tools required for assembly:
Phillips Screwdriver.
Additional materials required for assembly:
7.5 KGS of sand and clean water (Sold
separately), to fill the ballast tank.
DÉCOFIRE
FOR OUTDOOR USE ONLY
THIS APPLIANCE IS DESIGNED AND APPROVED FOR
OUTDOOR USE ONLY
DO NOT USE THIS APPLIANCE INDOORS OR IN
AN UNVENTILATED AREA.
WARNING
THE GUARD IS FITTED TO THIS APPLIANCE TO
REDUCE THE RISK OF FIRE OR, INJURY FROM BURNS
AND NO PART OF IT SHALL BE REMOVED.
WARNING
Read instructions carefully. If the information in this
instruction manual is not followed exactly, a fire or
explosion may result causing property damage, personal
injury or loss of life.
Keep instructions in a safe place for future reference.
If you are assembling this unit for someone else, give this
manual to them to read.
WARNING
DO NOT SPRAY AEROSOLS IN THE VICINITY OF THIS
APPLIANCE WHILE IT IS IN OPERATION.
DO NOT USE OR STORE FLAMMABLE MATERIALS
NEAR THIS APPLIANCE.
DO NOT PLACE ARTICLES ON OR AGAINST THIS
APPLIANCE.
DANGER
If you smell gas:
1. Shut off gas to the appliance.
2. Extinguish any open flame or ignition source
3. If odour continues, keep away from the appliance and
immediately call your local fire department
DANGER - CARBON MONOXIDE HAZARD
This appliance can produce carbon
monoxide, which has no odour.
Using it in an enclosed space can kill you.
Never use this appliance in an enclosed
space such as a tent, home, basement or
camper. Do not bring this appliance indoors.
Page 1
Advertisement
Table of Contents

Related Manuals for Decofire Halo Series

Summary of Contents for Decofire Halo Series
- Page 1 DÉCOFIRE – HALO RAPID INDUCTION AREA HEATER – Assembly, Safety & Operating Instructions FOR OUTDOOR USE ONLY THIS APPLIANCE IS DESIGNED AND APPROVED FOR OUTDOOR USE ONLY DO NOT USE THIS APPLIANCE INDOORS OR IN AN UNVENTILATED AREA. WARNING THE GUARD IS FITTED TO THIS APPLIANCE TO REDUCE THE RISK OF FIRE OR, INJURY FROM BURNS AND NO PART OF IT SHALL BE REMOVED.
-
Page 2: Specification
Specifications & Dimensions 535mm Décofire Halo Series Outdoor Heater Specification DF102043 Gas type LPG / Propane Gas consumption 48 MJ/Hr Operating Pressure 2.75kPa Injector Size 2.15mm Certified by the AGA AGA 8717 G 1860mm 40mm UNPACKING & ASSEMBLING THIS APPLIANCE •... -
Page 3: Important Safety Warnings
IMPORTANT SAFETY WARNINGS • THIS APPLIANCE IS DESIGNED AND INTENDED FOR OUTDOOR USE ONLY! • This appliance shall be used outdoors, in a ventilated space and shall not be used in any enclosed area. • This appliance shall not be installed or used indoors, inside buildings, sheds or garages or any other enclosed area. •... - Page 4 OPERATING SAFETY WARNINGS • Always follow lighting instructions carefully. • This appliance is not intended for cooking. • Appliance may be hot while in use, do not attempt to move it while in use. • Always observe any local or state fire warnings. •...
-
Page 5: Minimum Clearances To Combustibles
CHOOSING A LOCATION FOR YOUR AREA HEATER This appliance is designed for outdoor use only We recommend choosing a location that is protected from the elements, while at the same time complying with the requirements of the ‘minimum clearances to combustibles’ and ‘installation guide’ below. •... -
Page 6: Appliance Features
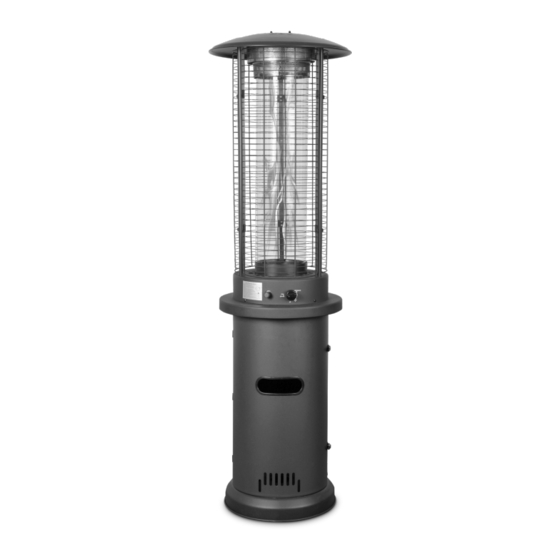
APPLIANCE FEATURES Reflector Protective Cover Glass Flame Tube Guard Burner Starter Flame Control Button Latches Base / Cylinder Enclosure Ballast Tank Page 6... -
Page 7: Components And Hardware
COMPONENTS AND HARDWARE Tools required for assembly: Phillips Screwdriver. Additional materials required for assembly: 7.5 KGS of sand, Clean water. Reflector Protective Safety Assembly x 1 Cover Guard x 3 Glass Glass Tube Tube x 1 Locating Ring x 1 Cylinder Housing Support x1... - Page 8 Step 1. Step 2. Before assembly commences, ballast must be added to Once the sand is placed, then slowly fill the base with the cylinder housing / base. water until it reaches the top of the container rim. Remove the plastic plug at the center of the base, then Reinsert the plug and clean off any spills.
- Page 9 Step 4. Step 6. Note: Before commencing this step, note the correct Remove the 3 pre-assembled screws from the top of the orientation of the upper frame supports (I) for burner assembly (C). assembly. Ensure that the hooks on the upper frame Using the 3 screws removed at the beginning of this step, supports are facing upwards.
- Page 10 Step 9. Step 10. Attach the 3 safety guards (F) onto the hooks at Open the door on the cylinder housing (D) and place the top of the upper frame supports (I). the gas cylinder (not included) into the pre-assembled cylinder support.
-
Page 11: Operation
OPERATION Pre-Start Checks Prior to using the appliance at any time, it is advisable to inspect the appliance using the following checklist. Appliance, Gas Controls and Burner Inspect all major components on the appliance: • Check the burner, glass tube and reflector for any damage or build up of carbon, spider webs or nests etc. •... - Page 12 Operation WARNING: If the lighting instructions are not followed directly a fire or explosion may occur resulting in property damage, personal injury or death. • The glass flame tube may break if it is wet while in use; never use the appliance while it’s raining or wet conditions are present.
-
Page 13: In The Event Of A Fault
IN THE EVENT OF A FAULT Most problems can be easily solved by using the trouble shooting guide below to determine the cause and solution before calling our customer service team. Problem Cause Solution Burner will not light Igniter electrode pin and / or burner Dry off with a soft cloth. -
Page 14: Care And Cleaning
CARE AND CLEANING CLEANING, MAINTENANCE & SERVICING SCHEDULE A few tips... • Never clean this appliance when it is hot - always allow Service Item Recommended the appliance to cool completely before cleaning or Interval maintenance. Major appliance 2 years •... -
Page 15: Protective Cover
PROTECTIVE COVER The protective cover supplied must be used to protect the area heater at all times when it is not in use. The cover provided is designed to provide general protection against dust and moisture only. In areas of extreme hot or cold climates, corrosive environments such as seaside and coastal locations or areas that receive frequent, harsh weather conditions;... -
Page 16: Conditions Of Warranty
WARRANTY Our goods come with guarantees that cannot be excluded under the Australian Consumer Law. You are entitled to a replacement or refund for a major failure and for compensation for any other reasonably foreseeable loss or damage. You are also entitled to have the goods repaired or replaced if the goods fail to be of acceptable quality and the failure does not amount to a major failure.
Need help?
Do you have a question about the Halo Series and is the answer not in the manual?
Questions and answers