
Subscribe to Our Youtube Channel
Related Manuals for MX Atmos Select


Summary of Contents for MX Atmos Select
- Page 1 Atmos Select 3 Way Thermostatic Concentric Mixer Valve with Riser Rail and Overhead Fitting Instructions IMPORTANT! This Step-by-Step guide should be retained after installation.
- Page 2 1. INTRODUCTION This booklet contains all the necessary fitting and pressure. The mixer valve must not be subjected to operating instructions for your MX Thermostatic water temperatures above 80˚C. This mixer valve is mixer shower. also suitable for thermal storage, unvented systems and pumped gravity systems.
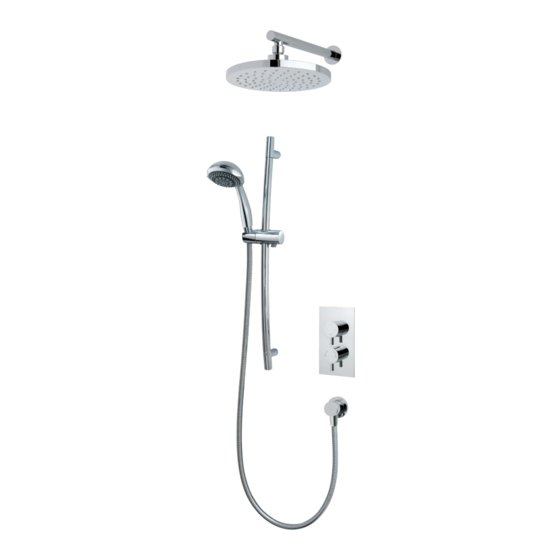
- Page 3 • Overhead Arm 3. PACK CONTENTS (SELECT ROUND) Please make sure ALL components are • Large Fixed Showerhead included before starting the installation. Description Quantity Mixer Valve Trim Plate Valve Cover • Curved Riser Rail Multi Mode Handset • 6-Mode Handset Circular Overhead Circular Overhead Arm •...
- Page 4 3. PACK CONTENTS (SELECT SQUARE) • Overhead Arm Please make sure ALL components are included before starting the installation. • Large Fixed Showerhead Description Quantity Mixer Valve Trim Plate Valve Cover •Single mode Single Mode Handset Handset Square Overhead Square Overhead Arm Riser Rail Riser Rail Fixing Brackets •...
- Page 5 4. PLEASE READ THIS IMPORTANT SAFETY INFORMATION Products manufactured by the MX Group are safe and without risk provided they are installed, used and maintained in good working order in accordance with our instructions and recommendations. Layout and sizing of pipework MUST be such that when other services are used, pressures at the shower control inlets do not fall below the ...
-
Page 6: Site Requirements
5. SITE REQUIREMENTS The installation must be in accordance with Water affected by other taps elsewhere in the house. It is Regulations Advisory Service (www.wras.co.uk). very important that for use in any mains pressure systems an expansion tank and a pressure reducing Minimum running water pressure: 0.1 bar, but will valve has been fitted to ensure the pressure does operate better at a minimum of 0.5 bar. -
Page 7: Important Installation Information
6. IMPORTANT INSTALLATION INFORMATION Before proceeding with the installation check all the n The mixer valve hot water inlet has a red symbol components in the component list are present. next to the inlet and must be on the left hand side. If the mixer valve you are fitting is with a riser rail the WARNING! outlet should point down, if the mixer valve is for an... - Page 8 8. FITTING THE MIXER VALVE 1. A rectangular hole between 200mm and 160mm is connected to the inlet marked hot and cold inlet should be large enough to fit the mixer valve. The marked cold. The valve will not work correctly if valve should be fixed to the wall between 85mm connected the wrong way (Fig 3).
- Page 9 8. FITTING THE MIXER VALVE (CONT.) 8. Pipes must be fitted from the ¾ BSP female outlets of the mixer valve to the location at which you wish to position the wall outlet, overhead or any ½ other fittings. These pipes must end in female connection so the wall outlet and overhead arm can be fitted.
- Page 10 9. PRESSURE BALANCING (IF SUPPLIED) The thermostatic mixer valve is designed to work best when the feed pressures of both hot and cold water are the same. If there is a difference in pressure it will cause the flow of water through the valve to pulse rather than being a steady flow.
- Page 11 Carry out a leak test (Fig18). 3. MX provide an eco flow controller with every handset they sell. This reduces the flow of water at high water pressures. If you require, fit between the handset and the hose.
- Page 12 12. FITTING THE WALL ARM FITTING 1. Establish position of wall arm to suit users requirements (Fig 19). 2. When fitting the wall arm drill a 19mm hole through the wall, you may require a suitable piece of wood to give the arm support behind the tiles or plasterboard.
- Page 13 13. COMMISSIONING AND ANNUAL MAINTENANCE TESTING TEMPERATURE SETTING ADJUSTMENT Before commissioning the following checks and tests need to have taken place: NOTE: Adjustment of the temperature settings is only • All the pipe work has been flushed through before to be carried out by a competent TMV engineer as it is fitting the valve and there are no leaks.
-
Page 14: Troubleshooting And Frequently Asked Questions
14. TROUBLESHOOTING AND FREQUENTLY ASKED QUESTIONS If the performance of your shower deteriorates in service please follow the self help items detailed below before seeking professional advice from the installer. If the actions below fail to restore the shower performance you should initially contact the person or company that installed the shower. - Page 15 7. This guarantee applies only to the product itself and any liability of purchase and good working practice. on behalf of MX Group is limited to the cost of the product. The MX Group at its discretion undertake to repair or replace 8.
-
Page 16: Service Policy
MX. 17. SPARE PARTS In the event that parts or maintenance is needed outside the guarantee MX will endeavour to help with this. Spare parts codes are given in the fitting instructions. By calling the Customer Service Department on 0845 505 2211 with the part number, they will be able to quote you to supply these parts, usually via our spares distributor.
Need help?
Do you have a question about the Atmos Select and is the answer not in the manual?
Questions and answers