Advertisement
Quick Links
For Models
101-VIO2
107-VIO2
Communication
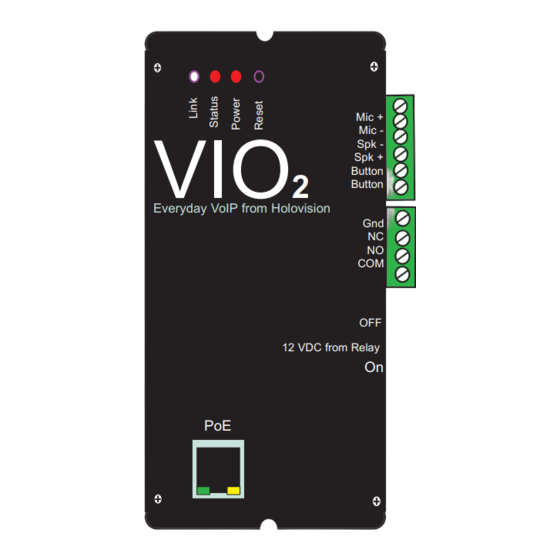
Holovision VIO2 is a SIP enabled intercom module
developed specifically with the custom integrator in
mind. It works with Crestron RAVA/SIP and most SIP
enabled VoIP phone systems and servers.
VIO
Everyday VoIP from Holovision
PoE
PoE+ Switch
Manual Type 1.1.0.10-RF
Holovision VIO2 with Essex 265 Controller
Specifications
Access Control
Essex 5 button keypad
2 relays
5-6 users
16.5 VAC power supply included
Internal rectifier gives optional ''dc out'' for strikes
Mic +
Mic -
Spk -
2
Spk +
Button
Button
Gnd
NC
NO
COM
OFF
12 VDC from Relay
On
Speaker
Microphone
Push Button
INSTALLATION
INSTRUCTIONS
501 E. Goetz Ave.
Santa Ana, Ca 92707
www.eholovision.com
Ph. 714-434-6904
Fax 800-362-0002
HOLOVISION
Advertisement

Related Manuals for HOLOVISION VIO2


Summary of Contents for HOLOVISION VIO2
- Page 1 107-VIO2 Specifications Access Control Communication Essex 5 button keypad Holovision VIO2 is a SIP enabled intercom module 2 relays developed specifically with the custom integrator in 5-6 users mind. It works with Crestron RAVA/SIP and most SIP 16.5 VAC power supply included enabled VoIP phone systems and servers.
- Page 2 Essex Keypad Wiring AC Out for Strike Mic + Mic - Spk - Spk + Button Button 12 VDC from Relay Holovision Entry System with Keypad Essex Model 265 NC 2 NO 2 Gate Strike COM 2 NC 1 NO 1...
- Page 3 Essex Keypad Wiring Contact Closure for Gate Motor Mic + Mic - Spk - Spk + Button Button Everyday VoIP from Holovision Holovision Entry System with Keypad 12 VDC from Relay “Open” Terminals on Gate Motor Essex Model 265 NC 2...
- Page 4 Set Essex Relay Options GOAL: To use jumper pins on circuit board to configure standard relay options. In this configuration, Codes 1 and 2 operate Relay 1. Codes 3, 4, 5 operate Relay 2. Step Action Relay 1 and 2 activate. Only Relay 1 latch* Relay 1 Relay 2 Relay 1...
- Page 5 Programming of Essex Keypad Set Master Code Step Action Press “Program” switch once. (keypad will beep 4 times) Once “Program” switch is pressed, you have 2 minutes to complete Step 5. Press “1119”. (you will hear 3 beeps) Step 5 must be completed within 5 seconds of Step 3. Enter “Master Code”...
- Page 6 Programming of Essex Keypad Set User Code 4 Step Action Enter “Master Code”. Enter 117 (3 beeps). Enter User Code 4. Wait 5 seconds for 3 reset beeps. Set User Code 5 Step Action Enter “Master Code” Enter 119 (3 beeps). Enter User Code 5.
- Page 7 Programming of Essex Keypad Set Activation Time Of Relay 2 (User codes 3, 4& 5 - see note below) Step Action Press “Program” switch (keypad will beep 4 times). Enter 1115 (3 beeps). Enter 1 for every 1 second latch time, and 5 for every 5 seconds. Examples: 6 seconds = 5, 1 8 seconds = 5, 1, 1, 1...
- Page 8 VIO RAVA Quick Start 1. Plug the device into the network. Device will speak it’s IP address. 2. Navigate to device IP on a web browser. 3. Under “Configuration” please enter SIP ID for the name to be displayed, and enter the extension of the Main RAVA Touchscreenunder “Input Call ID 0 Default is CALL:CRESTRON”...
- Page 9 5. Configure the relay setting under “Inbound Calls”. Configure the powered relay and the dry contact closure. Choose any 2 to 4 digit combination Note; By configuring the request to exit feature you can configure for either relay. 6. Once the device has been configured you can initiate the call by pressing the button Page 9 TYPE 1.1.0.10-RF...
- Page 10 & " " " Page 10 TYPE 1.1.0.10-RF...
- Page 11 Page 11 TYPE 1.1.0.10-RF...
- Page 12 501 E. Goetz Ave. Santa Ana, Ca 92707 Ph. 714-434-6904 Fax 800-362-0002 www.eholovision.com...
Need help?
Do you have a question about the VIO2 and is the answer not in the manual?
Questions and answers