Table of Contents
Advertisement
Quick Links
PROFESSIONAL MEDICAL PRODUCTS
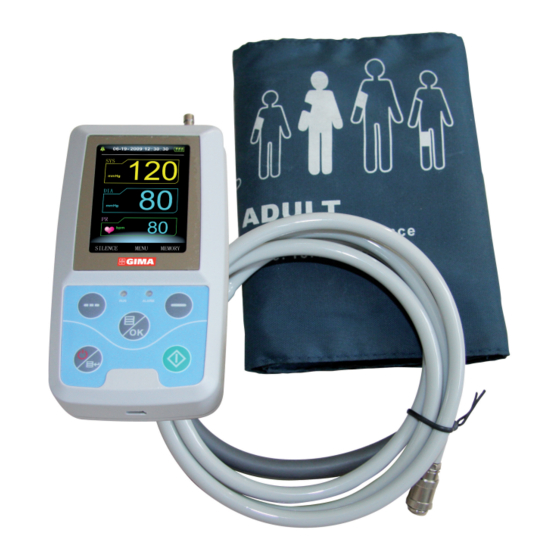
GIMA ABPM PULSE RATE MONITOR
WITH BLUETOOTH
User Manual
ATTENTION: The operators must carefully read and completely understand
the present manual before using the product.
0123
Gima S.p.A. - Via Marconi, 1 - 20060 Gessate (MI) Italy
Italia: tel. 199 400 401 - fax 199 400 403
Export: tel. +39 02 953854209/221/225 - fax +39 02 95380056
gima@gimaitaly.com - export@gimaitaly.com
www.gimaitaly.com
CONTEC MEDICAL SYSTEMS CO., LTD
No.112 Qinhuang West Street, Economic & Technical
Development Zone, Qinhuangdao, Hebei Province,
PEOPLE'S REPUBLIC OF CHINA
Shanghai International Holding Corp. GmbH (Europe)
Eiffestrasse 80, 20537 Hamburg, Germany
Advertisement
Table of Contents

Related Manuals for Gima ABPM PULSE RATE MONITOR WITH BLUETOOTH

Summary of Contents for Gima ABPM PULSE RATE MONITOR WITH BLUETOOTH
- Page 1 Gima S.p.A. - Via Marconi, 1 - 20060 Gessate (MI) Italy Italia: tel. 199 400 401 - fax 199 400 403 Export: tel. +39 02 953854209/221/225 - fax +39 02 95380056 gima@gimaitaly.com - export@gimaitaly.com www.gimaitaly.com PROFESSIONAL MEDICAL PRODUCTS GIMA ABPM PULSE RATE MONITOR...
-
Page 3: Table Of Contents
INDEX Chapter 1 INTRODUCTION ..............5 General Information ............6 Button Functions ..............8 Interfaces ................8 Accessories ................ 9 Chapter 2 GETTING STARTED ............10 Open the Package and Check .......... 10 Dry battery installation ............10 Power on the instrument........... 10 Connect Sensor .............. - Page 4 Delete Case ..............37 Copy Case ................ 38 Edit BP Data ..............39 6.10 Edit Trend Graph .............. 40 6.11 Edit of Diagnose Information ..........42 6.12 Set BP Thresholds ............43 6.13 Histogram ................. 44 6.14 Pie Chart ................44 6.15 Set Print Report ..............
-
Page 5: Chapter 1 Introduction
Chapter 1 INTRODUCTION For an overall introduction to the Blood Pressure Monitor, please refer to General Information. For basic operating instructions, please refer to Button Function. For allocation of interface sockets, please refer to Interfaces. Warning Possible explosion hazard if used in the presence of flammable anesthetics or other flammable substance in combination with air, oxygen-enriched environments, or nitrous oxide. -
Page 6: General Information
Warning When used with Electro-surgery equipment, you must give top priority to the patient safety. Warning It is recommended that you check if there is any damage on the monitor or the accessories regularly, if you find any damage, stop using it, and contact the biomedical engineer of the hospital or our Customer Service immediately. - Page 7 The device has life for 10000 times of BP measure(within 5 years). Safety: This device is defibrillator protected. Note that no precautions specific to the device is required during defibrillation, and defibrillation discharge has no effect on the monitor. The equipment uses the gray silicone airway, in case of the effect to the equipment when defibrillation device was used on the patient.
-
Page 8: Button Functions
1.2 Button Functions All the operations of the Blood Pressure Monitor could be completed with the buttons. The names of button are on them. They are: Press the button for a long time, then the system will start. When turning on and off the monitor, the red light and the blue both flash once to prompt that the on or off operation is successful. -
Page 9: Accessories
Note Cuff is connected to the monitor through the extended gas pipe. 1 Port of extended gas pipe 2 The socket for Gas pipe Figure 1 The top external airway At the bottom is the socket for USB 1 the Socket for USB, connect the data line to upload data Figure 2 Bottom 1.4 Accessories... -
Page 10: Chapter 2 Getting Started
Chapter 2 GETTING STARTED • Open the package and check • Dry battery installation • Power on the instrument • Connect patient sensors 2.1 Open the Package and Check Open the package and take out the equipment and accessories carefully. Keep the package material for possible future transportation or storage. -
Page 11: Connect Sensor
2.4 Connect Sensor Note For information on correct connection of NIBP cuff, refer to Figure 3 Figure 3 CUFF Connection method Connect the sensor between the monitor and the measure part of the patient. Chapter 3 FUNCTION INTERFACE • Main interface •... -
Page 12: Measuring Interface
The boot-strap interface is shown as the follow Figure 4 Common user boot-strap interface 1 Note All interfaces except the trend retain power icon, alarm switch, as well as a small font of the current time. Note After the register overflow, the first record will be overwritten, “Over- flow”... -
Page 13: Measure Result Interface
The measuring interface is shown as the follow: Figure 6 Measuring interface Note In any interface except the measurement, press key to exit current interface and back to the boot-strap interface. 3.3 Measure Result Interface The measure result includes: SYS: systolic blood pressure (mmHg/kPa) DIA: diastolic blood pressure (mmHg/kPa) PR: pulse rate (bpm) Figure 7... -
Page 14: System Menu
If there is an error during the measurement, an error message text will appear on the screen. If the ALARM SOUND is set to be on, the sound would occur. Press the SILENCE key to stop the sound and press it once more to continue. - Page 15 Figure 10 System setup “SYSTEM SETUP” menu includes: “LANGUAGE” Item has three choices: Chinese, English, Italian; “UNIT” item has two choice: mmHg, kPa; “USER PURVIEW” item cannot be operated: all; “MEASURE MODE” item has three options: adult, pediatric, neonatal, “BACKLIGHT TIME(s)”item has four choices: 15, 30, 60, 120. Note “Backlight Time”...
- Page 16 “AWAKE INTERVAL” (min/h) could be options: 15, 30, 60, 120; “ASLEEP INTERVAL” (min/h) could be options: 15, 30, 60, 120, 240; “AWAKE TIME” and “ASLEEP TIME” transformation unit are 30 minutes. 3.4.2 System Time Select “System Time” item in [System Menu], the following menu will pop up: Figure 12 System time Select “Confirm”...
- Page 17 3.4.4 Alarm Setup Select “ALARM SOUND” item in [SYSTEM MENU] to switch on or off the sound of alarm. [refer to Figure 9 system menu]. Select “ALARM SETUP” item in [SYSTEM MENU], the following menu will pop up: Figure 14 Alarm setup “SYS ALARM”...
- Page 18 “Default” includes the main content: Measure mode: adult; Alarm parameter: User High pressure High pressure Low pressure Low pressure mode high limit low limit high limit low limit Adult Pediatric Neonatal Alarm switch: close; Measure unit: mmHg; Ordinary user backlight time: 15s; ABPM switch: close;...
- Page 19 In “ABPM” menu, “ABPM ON-OFF” select “ON”, then prompt message of ABPM of the current user, such as: Figure 16 ABPM prompt menu Press button, clear the ambulatory blood pressure measure data, and enter ambulatory Blood Pressure Mode; Press button, save ambulatory Blood Pressure measure data, and enter ambulatory Blood Pressure Mode;...
- Page 20 3.4.6 ABPM Data Review 3.4.6.1 ABPM “large-print” Data Review Select “ABPM Data” item in “ABPM” menu, the following interface will pop up. Every record is an interface, and display content include: the current user, total of the current user record data, serial number of the record, stored time of the record, high pressure, low pressure, mean pressure, Pulse Rate.
- Page 21 A interface contain 5 records, every record includes time, high pressure, low pressure, mean pressure, Pulse Rate. 3.4.6.3 ABPM Trend Press button to select “trend”, in ABPM large-print data review menu, the following interface will pop up: Figure 19 ABPM “trend” Trend interface can trace 100 record trends, if measuring data are more than 100 items, press buttons can glide trend curve for left and right,...
- Page 22 3.4.7 Ordinary User Data Review 3.4.7.1 Ordinary User “large-print” Data Review Press button to enter the ordinary user “large-print” data review in boot-strap interface, the following interface will pop up: Figure 20 Ordinary user “large-print” Display content is similar to ambulatory blood pressure large-print data review.
-
Page 23: Abpm Working Interface
Display content is similar to ambulatory blood pressure large-print data review. 3.4.7.3 Ordinary User Measure Data Trends Press button to pop up the ordinary user data table in the ordinary user data table, the interface is as shown: Figure 22 Trends Display content is similar to ambulatory blood pressure large-print data review. - Page 24 If alarm sound occurs, press SILENCE key to stop it and press it again to continue. Long press button, the exit ABPM hint interface will pop up: Figure 24 ABPM exiting prompt interface Press button to exit ABPM working environment, and enter the ordinary user working environment, and display the boot-strap interface;...
-
Page 25: Chapter 4 Nibp Measuring
Chapter 4 NIBP MEASURING 4.1 Introduction • The Non-invasive Blood Pressure (NIBP) module measures the blood pressure using the oscillometric method. • There are two modes of measurement available: manual, automatic. • Every mode displays the systolic, mean, diastolic blood pressure and pulse rate. - Page 26 wrapped too tightly around the limb. Excessive tightness may cause discoloration and eventual ischemia of the extremities. Figure 26 Use cuff Note The width of the cuff should be either 40% of the limb circumference (50% for neonates) or 2/3 of the upper arm length. The inflatable part of the cuff should be long enough to encircle 50-80% of the limb.
-
Page 27: Operation Hints
• If the cuff is placed higher than the heart level, add 0.75 mmHg (0.10 kPa) for each inch of difference. • If it is placed lower than the heart level, deduct 0.75 mmHg (0.10 kPa) for each inch of difference. 4. - Page 28 Warning If liquid is inadvertently splashed on the equipment or its accessories, or may enter the conduit or inside the monitor, contact local Customer Service Center. Measurement Limitations To different patient conditions, the oscillometric measurement has certain limitations. The measurement is in search of regular arterial pressure pulse. In those circumstances when the patient’s condition makes it difficult to detect, the measurement becomes unreliable and measuring time increases.
-
Page 29: Nibp Error Message And Explanations
4.4 NIBP Error Message and Explanations Explanation Cause Self-test failure A/D sampling error Loose cuff Cuff is not connected correctly Air leakage Air leakage in the valve or airway Atmospheric pressure error Valve cannot be open. Signal is too weak Object measuring the pulse is too weak or the cuff is loose It is over the range... -
Page 30: Transportation And Storage
Figure 27 Replace Rubber Bag in Cuff To replace the rubber bag in the cuff, first place the bag on top of the cuff so that the rubber tubes line up with the large opening on the long side of the cuff. Now roll the bag lengthwise and insert it into the opening on the long side of the cuff. -
Page 31: Key And Symbols
4.7 Key And Symbols Simbolo Descrizione Refer to Instruction manual/booklet Systolic pressure MAP pressure Diastolic pressure Pulse rate (bpm) Adult Pediatric Neonatal ABPM Ambulatory Blood Pressure Monitor INFO Information Open the alarm sound indication Close the alarm sound indication WEEE (2002/96/EC) Type BF defibrillator proofed applied parts Serial number IPX0... -
Page 32: Installation Of Software
5.2 Installation of software 1 Place the CD-ROM in the CD-ROM compartment located on your computer. 2 If Auto Play for CDs is enabled, place CD in reader and follow instructions when they appear in the screen; otherwise follow install instructions below: a. -
Page 33: Wear
6.2 Wear Click shortcut key , and the “Lead PlaceMent” dialog box will appear.. Figure 29 Wear You can wear the device accroding to the picture above. Please read the “Matters need” before use. 6.3 Set File Path Downloaded case data will be recorded in the case path.If you want to change the case path, you can click menu item “Set file path”. -
Page 34: Set Collection Project
Patient file path: choose patient file path.After downloading data from t he monitor, the case file is saved in this path. If you choose “ Always use default path “ item, the default case file path is program installation file path. 6.4 Set Collection Project Click shortcut key , or click menu bar... - Page 35 interval is 30 minutes, and the asleep collection interval is 60 minute. The asleep time area and awake time area will be display at the right side. When the parameter setting is finished, click “ Okay “ to upload the project to the monitor.
-
Page 36: Download Data
Uploading schedule is as follows: Figure 34 Uploading Schedule 6.5 Download Data Before downloading data, please insure: 1. The monitor is connected with computer accurately. 2. The monitor is on. 3. Ensure that the monitor isn’t connect with patient when the monitor is connected with computer. -
Page 37: Delete Case
In this interface, you can choose the file to save case. If the file has case, the file information will be displayed with list form, including these information:Patient Name,Patient ID, Start Time and File Name.Select the case file to be edited, and click “ Okay “ or double click to open the case file and edit it. -
Page 38: Copy Case
6.8 Copy Case Sometimes before you edit case, you may want to save a copy of originality data.Here you need to copy the case. Our software supplies this function. Choose menu item “ Copy data “, and the interface will appear as follows: Figure 38 Select File to Copy The copying case method is similar to the deleting file method.You can select... -
Page 39: Edit Bp Data
6.9 Edit BP Data You can edit every piece of data.Click shortcut key or select menu item “Edit” to display “BP Data” interface as follows: Figure 40 Editing BP Date Interface In the interface, you can see the particular information of every data. *=0/192(0.0%):192 is total number of data, 0 is the number of deleted data, 0.0% is the percent of deleted data. -
Page 40: Edit Trend Graph
6.10 Edit Trend Graph After selecting case file, the BP trend graph will be shown in the screen automatically. In other interfaces you can click shortcut key to enter the BP trend interface .The “BP Trend” has two graph types: color filler type, dotted line type. - Page 41 You can switch from one graph type to another by the “Graph Type” button. When you move the mouse on the trend graph area, on the top of the screen the detail data information about the mouse points will be shown, including the data serial number, collection time and collection date, high/low blood pressure value, pulse rate, comment, etc.
-
Page 42: Edit Of Diagnose Information
Figure 45 Stretch Trend Graph (Y-Axis) Figure 6.10.6 Shrink Trend Graph (Y-Axis) 6.11 Edit of Diagnose Information. Diagnose information includes following items: Patient information, Current Medications, Diagnose Information and Physician information. Select “Patient information”, and display as follows: Figure 46 Edit Patient’s Information... -
Page 43: Set Bp Thresholds
Click “OK”, and the patient information content will be saved in the case file in order to expediently display next time.At the same time all the information will be displayed in the report. 6.12 Set BP Thresholds After BP Thresholds being set up, the trend graph will renew automatically, statistic data will be recalculated. -
Page 44: Histogram
6.13 Histogram Click shortcut key , and the following interface will appear. Figure 48 Histogram All: Show all BP data statistics. Day: Show only daytime statistics. Night: Show only nighttime statistics. 6.14 Pie Chart Click shortcut key , and the following interface will appear. Figure 49 Pie Chart The interface is divided into four areas. -
Page 45: Set Print Report
is the setting area for pie colour and corresponding value, and the BP value and be set by manual method and real-time displays.The forth area has three options including: All, Day and Night. All: Show all BP data statistics. Day: Show only daytime statistics. Night: Show only nighttime statistics. -
Page 46: Print Report Preview
Demographics: include patient information, current medications, examining result summary and physician diagnosis information. Statistics Page: particular data statistic information. BP Summary Page: include BP benchmark value, BP load value, average value and diagnosis value. Colorized Graph Page: display the colorized graph of BP data. Bar Graph Page: display the bar graph of BP data Histograms Page: display the histograms graph of BP data (Selected data in the histograms interface: All, Day, Night) - Page 47 Figure 52 Demographics Page Preview In measure Data Page, if the time is night, the background is gray, and if the Sys or Dia is beyond threshold, the background is red. Figure 53 Measure Data Page Preview...
-
Page 48: Help
Figure 54 Measure Data Page Preview 6.17 Help Click shortcut key to pop-up help file.It is the brief explanation for program function. 6.18 Exit Click shortcut key to save configuration information and exit application. -
Page 49: Chapter 7 Troubleshooting Guide
Chapter 7 TROUBLESHOOTING GUIDE Cod Description on in Report Editor Solution No signal Check position of cuff, tighten cuff Overreach movement Remain still during BP reading Measurement timeout Check air hose connections and make certain cuff is tight Airway obstructed Check air hose connections and make certain air tubing is not crimped Measurement cancelled... -
Page 50: Specification
SPECIFICATION Name Ambulatory Blood Pressure Monitor Display 2.4’’ color LCD Display NIBP Specifications Measurement Method Oscillometric method Working modes Automatic Measurement Range Pressure adult 0~290mmHg(0~38.6kPa) pediatric 0~235mmHg(0~31.3kPa) neonatal 0~140mmHg(0~18.6kPa) Pulse: 40~240/min Inflation adult 160mmHg pediatric 120mmHg neonatal 70mmHg Alarm Range adult mode SYS ALM: 40~270 mmHg DIA ALM: 10~215 mmHg... -
Page 51: Appendix
APPENDIX Guidance and manufacturer’s declaration – electromagnetic emissionsfor all EQUIPMENT and SYSTEMS Guidance and manufacturer’s declaration – electromagnetic emission The device is intended for use in the electromagnetic environment specified below. The customer of the user of the device should assure that it is used in such and environment. - Page 52 Guidance and manufacturer’s declaration – electromagnetic immunity – for EQUIPMENT and SYSTEMS that are not LIFE-SUPPORTING Guidance and manufacturer’s declaration – electromagnetic immunity The device is intended for use in the electromagnetic environment specified below. The customer or the user of device should assure that it is used in such an environment. Immunity test IEC60601 Compliance...
- Page 53 Recommended separation distances between portable and mobile RF communications equipment and the EQUIPMENT or SYSTEM – for EQUIPMENT or SYSTEM that are not LIFE-SUPPORTING Recommended separation distances between portable and mobile RF communications equipment and the device The device is intended for use in an electromagnetic environment in which radiated RF disturbances are controlled.
- Page 56 Congratulations for purchasing a GIMA product. This product meets high qualitative standards both as regards the material and the production. The warranty is valid for 12 months from the date of supply of GIMA. During the period of validity of the warranty, GIMA will repair and/or replace free of charge all the defected parts due to production reasons.
Need help?
Do you have a question about the ABPM PULSE RATE MONITOR WITH BLUETOOTH and is the answer not in the manual?
Questions and answers