HIKVISION DS-9600NI-ST Quick Start Manual
Hide thumbs
Also See for DS-9600NI-ST:
- Quick operation manual (245 pages) ,
- User manual (236 pages) ,
- Quick start manual (13 pages)
Table of Contents
Advertisement
Quick Links
Advertisement
Table of Contents

Related Manuals for HIKVISION DS-9600NI-ST


Summary of Contents for HIKVISION DS-9600NI-ST
- Page 1 Network Video Recorder Quick Start Guide UD.6L0202B1933A01...
-
Page 2: Table Of Contents
Quick Start Guide of Network Video Recorder TABLE OF CONTENTS NVR Installation .............................. 7 Hard Disk Installation ............................. 8 Front Panel ..............................12 DS-9600NI-ST/RT and DS-9600NI-F8 .................... 12 DS-9600NI-XT ..........................12 DS-8600NI ............................12 DS-7700NI-ST/SP ........................... 15 DS-7600NI-ST/SP ........................... 17 Rear Panel .............................. - Page 3 Quick Start Guide of Network Video Recorder Instant Recording ..........................45 All-day Recording ..........................45 Playback ..............................45 Backup ..............................46 VCA Detection ............................47 VCA Search ............................. 48 Accessing by Web Browser ..........................49 Logging In ..............................49 Live View ..............................50 Recording ..............................
- Page 4 (hereinafter referred to be “the Manual”) cannot be reproduced, changed, translated, or distributed, partially or wholly, by any means, without the prior written permission of Hikvision. Unless otherwise stipulated, Hikvision does not make any warranties, guarantees or representations, express or implied, regarding to the Manual.
- Page 5 Quick Start Guide of Network Video Recorder Regulatory Information FCC Information FCC compliance: This equipment has been tested and found to comply with the limits for a digital device, pursuant to part 15 of the FCC Rules. These limits are designed to provide reasonable protection against harmful interference when the equipment is operated in a commercial environment.
- Page 6 Quick Start Guide of Network Video Recorder Safety Instruction These instructions are intended to ensure that user can use the product correctly to avoid danger or property loss. The precaution measure is divided into “Warnings” and “Cautions” Warnings: Serious injury or death may occur if any of the warnings are neglected. Cautions: Injury or equipment damage may occur if any of the cautions are neglected.
- Page 7 Quick Start Guide of Network Video Recorder Preventive and Cautionary Tips Before connecting and operating your device, please be advised of the following tips: • Ensure unit is installed in a well-ventilated, dust-free environment. • Unit is designed for indoor use only. •...
-
Page 8: Nvr Installation
Quick Start Guide of Network Video Recorder Thank you for purchasing our product. If there is any question or request, please do not hesitate to contact dealer. This manual is applicable to the models listed in the following table. Series Model 9600NI-ST DS-9608NI-ST... -
Page 9: Hard Disk Installation
Tools Required: Screwdriver. Steps (for DS-9600NI-ST/RT/XT): 1. Fasten the hard disk mounting handle to the hard disk with screws. 2. Insert the key and turn in clockwise direction to open the panel lock. - Page 10 Quick Start Guide of Network Video Recorder 5. Repeat the above steps to install other hard disks onto the NVR. After having finished the installation of all hard disks, close the front panel and lock it with the key again. Steps (for DS-8600NI-ST and DS-8600NI-E8/F8): 1.
- Page 11 Quick Start Guide of Network Video Recorder 4. Connect the power cable to the HDD. 5. Re-install the cover of the NVR and fasten screws. Steps (for DS-7600NI-ST/SP and DS-7700NI-ST/SP): Remove the cover from the NVR by unfastening the screws on the rear and side panel. Connect one end of the data cable to the motherboard of NVR and the other end to the HDD.
- Page 12 Quick Start Guide of Network Video Recorder 4. Place the HDD on the bottom of the device and then fasten the screws on the bottom to fix the HDD.
-
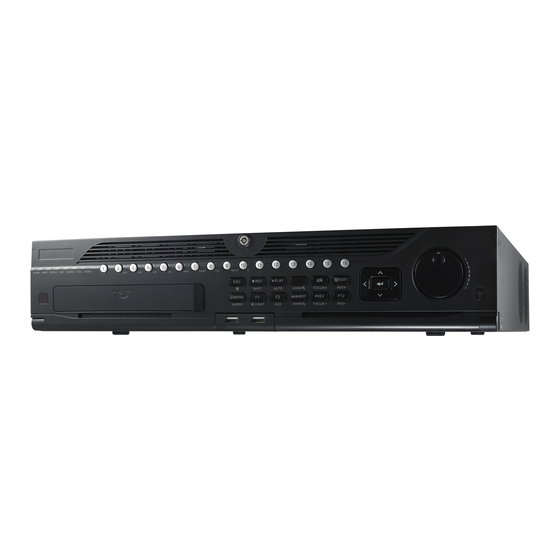
Page 13: Front Panel
Quick Start Guide of Network Video Recorder Front Panel DS-9600NI-ST/RT and DS-9600NI-F8 DS-9600NI-XT DS-8600NI Name Function Description ALARM Turns red when a sensor alarm is detected. Ready LED is normally blue, indicating that the device is READY functioning properly. Turns blue when device is controlled by an IR remote. - Page 14 3 seconds in live view mode. IR Receiver Receiver for IR remote Front Panel Lock You can lock or unlock the panel by the key. (for DS-9600NI-ST/RT/XT series) DVD-R/W Slot for DVD-R/W. Switch to the corresponding channel in Live view or PTZ Control mode.
- Page 15 In Live View mode, it can be used to cycle through different channels. In the Playback mode: For DS-9600NI-ST/RT/XT series, the JOG SHUTTLE Control ring is used to jump 30s forward/backward in video files. For DS-8600NI-ST series, the outer ring is used to speed up or slow down the record files and the inner ring is used to jump 30s forward/backward in records files.
-
Page 16: Ds-7700Ni-St/Sp
Quick Start Guide of Network Video Recorder DS-7700NI-ST/SP Name Function Description POWER Turns green when NVR is powered up. READY The LED is green when the device is running normally. The light is green when the IR remote control is enabled; The light is red when the function of the composite keys (SHIFT) Status STATUS... - Page 17 Quick Start Guide of Network Video Recorder Name Function Description In PTZ Control mode, it will turn on/off PTZ light and when the image is zoomed in, the key is used to zoom out. Enter numeral “3”; Enter letters “DEF”; 3/DEF/F2 The F2 button is used to change the tab pages.
-
Page 18: Ds-7600Ni-St/Sp
Quick Start Guide of Network Video Recorder DS-7600NI-ST/SP Name Function Description USB Interface Connects USB mouse or USB flash memory devices. POWER Turns green when NVR is powered up. READY The LED is green when the device is running normally. The light is green when the IR remote control is enabled;... - Page 19 Quick Start Guide of Network Video Recorder Name Function Description Playback, for direct access to playback interface. Enter numeral “7”; Enter letters “PQRS”; 7/PQRS/REC Open the manual record interface. Enter numeral “8”; Enter letters “TUV”; 8/TUV/PTZ Access PTZ control interface. Enter numeral “9”;...
-
Page 20: Rear Panel
Quick Start Guide of Network Video Recorder Rear Panel DS-9600/8600NI-ST/RT/XT and DS-7700NI DS-9600NI-ST/RT and DS-8600NI-ST DS-9600NI-XT DS-7700NI-ST DS-7708NI-SP DS-7716 / 7732NI-SP... -
Page 21: Ds-7600Ni-St And Ds-7600-Sp
Connects external SATA HDD, CD/DVD-RW. 2 eSATA interfaces for DS-9600NI-XT. LAN Interface 1 network interface provided for DS-7700NI-ST/SP and 2 network interfaces for DS-9600NI-ST/RT/XT and DS-8600NI-ST. Termination Switch RS-485 termination switch. Up position is not terminated. Down position is terminated with 120Ω resistance. -
Page 22: Ds-8600/9600Ni-F8
Quick Start Guide of Network Video Recorder DS-7600NI-SP Item Description VIDEO OUT BNC connector for video output. AUDIO OUT BNC connector for audio output. AUDIO IN BNC connector for audio input. (Also for two-way audio) RS-232 Interface Connector for RS-232 devices. DB9 connector for VGA output. -
Page 23: Ds-8664Ni-E8
Quick Start Guide of Network Video Recorder Item Description mouse and USB Hard Disk Drive (HDD). HDMI1/HDMI2 HDMI video output connector. RS-232 Interface Connector for RS-232 devices. eSATA Connects external SATA HDD, CD/DVD-RM. D+, D- pin connects to Ta, Tb pin of controller. For cascading devices, the first NVR’s D+, D- pin should be connected with the D+, D- pin of Controller Port the next NVR. -
Page 24: Peripheral Connections
Quick Start Guide of Network Video Recorder Peripheral Connections Wiring of Alarm Input The alarm input is an open/closed relay. To connect the alarm input to the device, use the following diagram. If the alarm input is not an open/close relay, please connect an external relay between the alarm input and the device. -
Page 25: Controller Connection
Quick Start Guide of Network Video Recorder Controller Connection To connect a controller to the NVR: 1. Disconnect pluggable block from the KB terminal block. 2. Unfasten stop screws from the KB D+, D- pluggable block, insert signal cables into slots and fasten stop screws. -
Page 26: Specifications
Quick Start Guide of Network Video Recorder Specifications Specifications of DS-9600NI-ST Model DS-9608NI-ST DS-9616NI-ST DS-9632NI-ST DS-9664NI-ST IP video input 8-ch 16-ch 32-ch 64-ch Video/Audio input 1-ch, BNC (2.0 Vp-p, 1kΩ) Two-way audio 50Mbps 100Mbps 200Mbps 200Mbps Incoming bandwidth 50Mbps(when 100Mbps(when RAID is enabled) -
Page 27: Specifications Of Ds-9600Ni-Rt
Quick Start Guide of Network Video Recorder Specifications of DS-9600NI-RT Model DS-9608NI-RT DS-9616NI-RT DS-9632NI-RT DS-9664NI-RT IP video input 8-ch 16-ch 32-ch 64-ch Video/Audio input 1-ch, BNC (2.0 Vp-p, 1kΩ) Two-way audio 50Mbps 100Mbps 200Mbps 200Mbps Incoming bandwidth 50Mbps(when 100Mbps(when RAID is enabled) RAID is enabled) Network 240Mbps... -
Page 28: Specification Of Ds-9600Ni-Xt
Quick Start Guide of Network Video Recorder Specification of DS-9600NI-XT Model DS-9616NI-XT DS-9632NI-XT DS-9664NI-XT IP video input 16-ch 32-ch 64-ch Video/Audio input 1-ch, BNC (2.0 Vp-p, 1kΩ) Two-way audio 100Mbps 200Mbps 200Mbps Incoming bandwidth 100Mbps (when RAID is enabled) 240Mbps 160Mbps 160Mbps Network... -
Page 29: Specifications Of Ds-8600Ni-St
Quick Start Guide of Network Video Recorder Specifications of DS-8600NI-ST Model DS-8608NI-ST DS-8616NI-ST DS-8632NI-ST DS-8664NI-ST IP video input 8-ch 16-ch 32-ch 64-ch Video/Audio input 1-ch, BNC (2.0 Vp-p, 1kΩ) Two-way audio 50Mbps 100Mbps 200Mbps 200Mbps Incoming bandwidth 50Mbps(when 100Mbps(when RAID is enabled) RAID is enabled) Network 240Mbps... -
Page 30: Specification Of Ds-7700Ni-St
Quick Start Guide of Network Video Recorder Specification of DS-7700NI-ST Model DS-7708NI-ST DS-7716NI-ST DS-7732NI-ST DS-7764NI-ST IP video input 8-ch 16-ch 32-ch 64-ch Video/Audio input 1-ch, BNC (2.0 Vp-p, 1kΩ) Two-way audio 50Mbps Incoming bandwidth 100Mbps 200Mbps 200Mbps Network Outgoing bandwidth 240Mbps 240Mbps 160Mbps... -
Page 31: Specification Of Ds-7700Ni-Sp
Quick Start Guide of Network Video Recorder Specification of DS-7700NI-SP Model DS-7708NI-SP DS-7716NI-SP DS-7732NI-SP IP video input 8-ch 16-ch 32-ch Video/Audio input 1-ch, BNC (2.0 Vp-p, 1kΩ) Two-way audio 50Mbps Incoming bandwidth 100Mbps 200Mbps Network Outgoing bandwidth 240Mbps 240Mbps 160Mbps Remote connection Record resolution 6MP /5MP /3MP /1080P /UXGA /720P /VGA /4CIF /DCIF /2CIF /CIF /QCIF... -
Page 32: Specifications Of Ds-7600Ni-St
Quick Start Guide of Network Video Recorder Specifications of DS-7600NI-ST Model DS-7608NI-ST DS-7616NI-ST DS-7632NI-ST IP video input 8-ch 16-ch 32-ch Video/Audio input 1-ch, BNC (2.0 Vp-p, 1kΩ) Two-way audio 50Mbps Incoming bandwidth 100Mbps 200Mbps Network Outgoing bandwidth 240Mbps 240Mbps 160Mbps Remote connection Recording resolution 6MP /5MP /3MP /1080P /UXGA /720P /VGA /4CIF /DCIF /2CIF /CIF /QCIF... -
Page 33: Specifications Of Ds-7600Ni-Sp
Quick Start Guide of Network Video Recorder Specifications of DS-7600NI-SP Model DS-7608NI-SP DS-7616NI-SP DS-7632NI-SP IP video input 8-ch 16-ch 32-ch Video/Audio input 1-ch, BNC (2.0 Vp-p, 1kΩ) Two-way audio 50Mbps Incoming bandwidth 100Mbps 200Mbps Network Outgoing bandwidth 240Mbps 240Mbps 160Mbps Remote connection Recording resolution 6MP /5MP /3MP /1080P /UXGA /720P /VGA /4CIF /DCIF /2CIF /CIF /QCIF... -
Page 34: Specifications Of Ds-9600Ni-F8
256Mbps 256Mbps 256Mbps 256Mbps bandwidth Network Remote connection HIKVISION, ACTi, ARECONT, AXIS, BOSCH, BRICKCOM, CANON, HUNT, Network protocol ONVIF (Version 2.4), PANASONIC, PELCO, PSIA, SAMSUNG, SANYO, SONY, VIVOTEK, ZAVIO Recording 6MP/5MP/3MP/1080P/UXGA/720P/VGA/4CIF/DCIF/2CIF/CIF/QCIF resolution Main stream: 50 fps (P) / 60 fps (N) -
Page 35: Specifications Of Ds-8600Ni-F8
256Mbps 256Mbps 256Mbps 256Mbps Remote connection Network HIKVISION, ACTi, ARECONT, AXIS, BOSCH, BRICKCOM, CANON, HUNT, ONVIF (Version 2.4), PANASONIC, PELCO, PSIA, SAMSUNG, SANYO, SONY, VIVOTEK, Network protocol ZAVIO Recording resolution 6MP/5MP/3MP/1080P/UXGA/720P/VGA/4CIF/DCIF/2CIF/CIF/QCIF Main stream: 50 fps (P) / 60 fps (N) -
Page 36: Specifications Of Ds-8600Ni-E8
256Mbps Incoming bandwidth Outgoing bandwidth 256Mbps Remote connection Network HIKVISION, ACTi, ARECONT, AXIS, BOSCH, BRICKCOM, CANON, HUNT, ONVIF (Version 2.4), PANASONIC, PELCO, PSIA, SAMSUNG, SANYO, SONY, Network protocol VIVOTEK, ZAVIO Recording resolution 6MP/5MP/3MP/1080P/UXGA/720P/VGA/4CIF/DCIF/2CIF/CIF/QCIF Main stream: 50 fps (P) / 60 fps (N) -
Page 37: Hdd Storage Calculation Chart
Quick Start Guide of Network Video Recorder HDD Storage Calculation Chart The following chart shows an estimation of storage space used based on recording at one channel for an hour at a fixed bit rate. Bit Rate Storage Used 128K 160K 192K 224K... -
Page 38: Menu Operation
Quick Start Guide of Network Video Recorder Menu Operation Menu Structure Refer to the following figure for the menu structure: Menu Playback Maintenance Shutdown Export VCA Search Record Camera Configuration Manual Behavior Normal Normal Schedule Camera General System Info Logout Record General Search... -
Page 39: Setting The Admin Password
Quick Start Guide of Network Video Recorder 2. Select the Shutdown button. 3. Click the Yes button. Setting the Admin Password Purpose: For the first-time access, you need to activate the device by setting an admin password. No operation is allowed before activation. -
Page 40: Login And Logout
Quick Start Guide of Network Video Recorder Login and Logout User Login Purpose: If NVR has logged out, you must login the device before operating the menu and other functions. Steps: Select the User Name in the dropdown list. Input Password. Click OK to log in. -
Page 41: Live View
Quick Start Guide of Network Video Recorder Menu > Shutdown Click Logout. After you have logged out the system, menu operation on the screen is invalid. It is required to input a user name and password to unlock the system. Live View Some icons are provided on screen in Live View mode to indicate different camera status. -
Page 42: Adding Ip Cameras
Quick Start Guide of Network Video Recorder Name Description Quick access to the sub-menus which you frequently visit. Up to 5 sub-menu Common Menu options are supported. Enter the main menu of the system by right clicking the mouse. Menu Switch to the single full screen by choosing channel number from the dropdown Single Screen list. - Page 43 Quick Start Guide of Network Video Recorder button to refresh the online IP camera manually. Or you can choose to custom add the IP camera by editing the parameters in the corresponding textfiled and then click the Add button to add it. ...
-
Page 44: One-Touch Raid Configuration
Quick Start Guide of Network Video Recorder If the IP camera to add has not been actiavated, you can activate it from the IP camera list on the camera management interface. 3) (Optional) Check the checkbox of Continue to Add to add other IP cameras. 4) Click Add to add the camera. -
Page 45: Recording
Quick Start Guide of Network Video Recorder configuration interface. Menu > HDD > Advanced 2. Enter the Physical Disk Settings interface. Menu > HDD > RAID 3. Click One-touch Configuration to enter the One-touch Array Configuration interface. 4. Edit the array name in the Array Name text filed and click OK button to start configuring array. If you install 4 HDDs or above for one-touch configuration, a hot spare disk will be set by default. -
Page 46: Instant Recording
Quick Start Guide of Network Video Recorder Instant Recording On the live view window of each channel, there is a quick setting toolbar which shows on the bottom of the window when you click on it. Click the icon to enable the record, and the icon turns to . -
Page 47: Backup
Quick Start Guide of Network Video Recorder 1. Enter the Playback menu. Mouse: right click a channel in live view mode and select Playback from the menu. Front Panel: press PLAY button to play back record files of the channel under single-screen live view. Under multi-screen live view, record files of the selected channel will be played back. -
Page 48: Vca Detection
Quick Start Guide of Network Video Recorder VCA Detection Purpose: The NVR supports the VCA detection alarm (face detection, vehicle detection, line crossing detection and intrusion detection, region entrance detection, region exiting detection, loitering detection, people gathering detection, fast moving detection, parking detection, unattended baggage detection, object removal detection, audio loss exception detection, sudden change of sound intensity detection, and defocus detection) sent by IP camera. -
Page 49: Vca Search
Quick Start Guide of Network Video Recorder VCA Search The NVR supports the VCA search for the behavior analysis, face capture, people counting and heat map. Face Search: Based on the uploaded face picture resources and the defined similarity degree (0~100), fast search the matched face pictures and video files from the face detection results. -
Page 50: Accessing By Web Browser
Quick Start Guide of Network Video Recorder Accessing by Web Browser You shall acknowledge that the use of the product with Internet access might be under network security risks. For avoidance of any network attacks and information leakage, please strengthen your own protection. If the product does not work properly, please contact with your dealer or the nearest service center. -
Page 51: Live View
Quick Start Guide of Network Video Recorder Install the plug-in before viewing the live video and managing the camera. Please follow the installation prompts to install the plug-in. You may have to close the web browser to finish the installation of the plug-in. Live View The live view interface appears by default when you log in the device. -
Page 52: Recording
Quick Start Guide of Network Video Recorder Icon Description Icon Description Select the window-division mode Open/Close audio Start/Stop all live view Start/Stop two-way Audio Capture pictures in the live view mode Adjust volume Start/Stop all recording Enable/Disable digital zoom Previous/Next page Full screen Select different stream type for live view by clicking the icon... -
Page 53: Playback
Quick Start Guide of Network Video Recorder 4. Choose the day in a week configure the recording schedule. Click a day to set the start time and end time for recording. Select the Record Type for the period. The record type can be Schedule, Motion, Alarm, Motion & Alarm, Motion | Alarm and Event. - Page 54 Quick Start Guide of Network Video Recorder Interface Introduction Name Description Channel List Displays the list of channels and the playing status of each channel. Playback Window Displays the image of channel. Play Control Bar Play control operations are supported. Time Line Displays the time bar and the records marked with different colors.
- Page 55 Quick Start Guide of Network Video Recorder Button Description Button Description Transcoded Playback You can drag the progress bar with the mouse to locate the exact playback point. You can also input the time in the textbox and click button to locate the playback point. The color of the video on the progress bar stands for the different video types.
- Page 56 Quick Start Guide of Network Video Recorder...
Need help?
Do you have a question about the DS-9600NI-ST and is the answer not in the manual?
Questions and answers