Table of Contents
Advertisement
Available languages
Available languages
Quick Links
Advertisement
Chapters
Table of Contents

Related Manuals for Toshiba dynadock V3.0


Summary of Contents for Toshiba dynadock V3.0
- Page 1 dynadock™ V3.0 User’s Guide English/Español GMAA00412012 06/13...
-
Page 2: Safety Icons
Safety icons This manual contains safety instructions that must be observed to avoid potential hazards that could result in personal injuries, damage to your equipment, or loss of data. These safety cautions have been classified according to the seriousness of the risk, and icons highlight these instructions as follows: Indicates an imminently hazardous situation which, if not avoided, will result in death or serious injury. -
Page 3: Safety Instructions
Safety instructions Always read the safety instructions carefully: Do not disassemble, modify, tamper with or repair the product ❖ Do not attempt to disassemble, modify, tamper with or repair the product (including the AC adaptor). Disassembly, modification, tampering or repairing the product could cause fire or electric shock, possibly resulting in serious injury. - Page 4 ❖ Always use the TOSHIBA AC adaptor that may have been provided with your product, or use AC adaptors specified by TOSHIBA to avoid any risk of fire or other damage to the product. Use of an incompatible AC adaptor could cause fire or damage to the product, possibly resulting in serious injury.
-
Page 5: Fcc Information
Never place your product in locations with excess heat ❖ Never place your product where it will be exposed to excess heat, such as in direct sunlight, in an unventilated vehicle or near a heater. This may result in a system failure, malfunction, loss of data or damage to the product. - Page 6 Canada. Copyright statement This guide is copyrighted by Toshiba Corporation with all rights reserved. Under the copyright laws, this guide cannot be reproduced in any form without the prior written permission of Toshiba. No patent liability is assumed, however, with respect to the use of the information contained herein.
- Page 7 Trademarks dynadock is a trademark of Toshiba Corporation. AMD, AMD K6, Athlon and Duron are registered trademarks or trademarks of Advanced Micro Devices Incorporated. DisplayLink is a trademark of DisplayLink Corporation. The terms HDMI and HDMI High-Definition Multimedia Interface, and the HDMI Logo are trademarks or registered trademarks of HDMI Licensing LLC in the United States and other countries.
-
Page 8: Table Of Contents
Connecting an HDMI™ display......21 Connecting audio devices .........22 Connecting USB devices ........23 Chapter 2: Using the dynadock™ and Adjusting Settings..24 Using the TOSHIBA dynadock™ V3.0 Utility ...24 Adjusting video settings..........26 Selecting Extended mode or Mirror mode ..26 Supported display modes ........27 Adjusting audio settings .........29... - Page 9 Contents Using standby/sleep/hibernation modes with the dynadock™ ..........32 Chapter 3: Support..............33 Toshiba Support .............33 Before you call ..........33 Contacting Toshiba ..........34 Toshiba’s Technical Support Web Site....34 Toshiba voice contact ........34 Chapter 4: Specifications............35 Specifications ............35 Index.................... 37...
-
Page 10: Introduction
® through a single USB cable to just about any Windows -based computer. We recommend that you keep your dynadock™ up-to-date by visiting support.toshiba.com periodically to download updated software drivers. NOTE ® All instructions in this Guide are for Windows 7 systems unless otherwise noted. -
Page 11: Package Contents
Introduction Package contents Package contents Check to make sure you have all of the following items: ❖ dynadock™ V3.0 ❖ Base ❖ USB 3.0 cable ❖ AC adaptor and power cord ❖ Installation CD (User’s Guide (this document), Standard limited warranty, and drivers) ❖... -
Page 12: Quick Tour
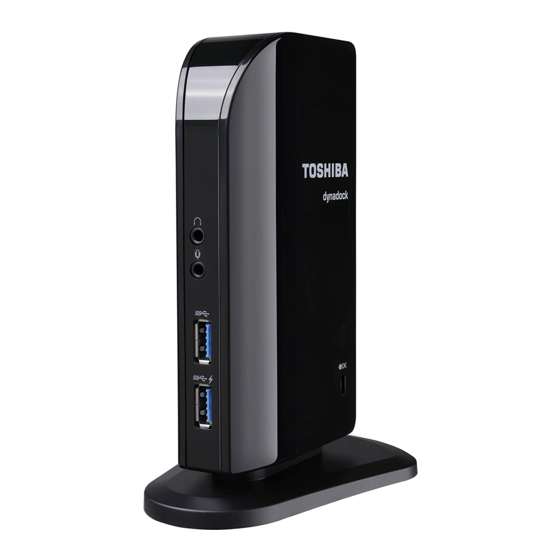
Introduction Quick Tour Quick Tour This section identifies the various components of the dynadock™. For a description of each component, please refer to the corresponding table that follows each illustration. Front view Power light USB activity light Powered USB 3.0 ports (USB Sleep and Charge .....) Headphone jack Microphone jack... - Page 13 For more information, please see “Charging USB devices using Toshiba USB Sleep and Charge” on page Note 1: Some USB devices may not support this feature. Note 2: 5 GBps is the maximum theoretical interface transfer rate per the specifications of the Universal Serial Bus 3.0.
-
Page 14: Back View
Introduction Quick Tour Back view USB 2.0 ports HDMI™ out port USB 3.0 Type B connector DC IN jack Security lock slot (on the side of dynadock™) (Sample Illustration) Connectors on the back of the dynadock™... - Page 15 Note: The dynadock™ requires an external power supply, as it does not draw power from the computer’s USB bus. Security lock Secures the dynadock™ to a heavy object such as your desk. For more information on slot purchasing an optional security lock, visit accessories.toshiba.com.
-
Page 16: Computer Requirements
Introduction Computer requirements Computer requirements Component Description ® 1.8 GHz or higher processor (Intel Core™ 2 Duo, or ® ® Intel Pentium family, or AMD K10 family, or ® compatible processor recommended. Intel Core™ 2 Duo 2.0 GHz or higher processor recommended for optimal video performance) Memory 2 GB memory or higher (4 GB or more... -
Page 17: Peripherals
1) Double-click My Computer on your desktop or click Start, and then Computer. 2) Double-click the DVD/CD drive icon, and then double-click AutoRun.exe. NOTE Installation files with the latest drivers also available for download at support.toshiba.com or dynadock.com. Check periodically for updates. - Page 18 You need administrator privileges to install/uninstall the software. Click Install Driver. (Sample Image) dynadock™ V3.0 Install Menu The following programs are installed during the installation process: ❖ DisplayLink™ Core Software ❖ TOSHIBA USB Display Drivers...
-
Page 19: Assemble The Dynadock
Setting Up the dynadock™ and Connecting Peripherals Setting up the dynadock™ Follow the on-screen instructions to finish the installation. NOTE You will need to read and accept the TOSHIBA software license agreement when prompted, to proceed with the installation. Restart your computer if prompted. NOTE Complete the software installation process before connecting the dynadock™... -
Page 20: Connect The Power Adaptor
Setting Up the dynadock™ and Connecting Peripherals Setting up the dynadock™ Connect the power adaptor Plug the AC adaptor into the DC-IN jack on the back of the dynadock™. U -1 in e 2 .3 r iq in a (Sample Illustration) Connecting the AC adaptor to the dynadock™ Connect the AC adaptor to a live electrical outlet. -
Page 21: Connecting Your Peripherals
Setting Up the dynadock™ and Connecting Peripherals Connecting your peripherals NOTE The dynadock™ should be connected to a USB 3.0 port for optimal performance. The dynadock™ will work when connected to a USB 2.0, but performance may be compromised. NOTE To disconnect the dynadock™... -
Page 22: Connecting Audio Devices
HDMI™ component. Adjust the resolution of the external display until an image appears. For more information, see “Using the TOSHIBA dynadock™ V3.0 Utility” on page You can customize the video settings of the dynadock™. See “Adjusting video settings” on page 26 for more information. -
Page 23: Connecting Usb Devices
USB 3.0 ports on the front of the dynadock™. For more information, see “Charging USB devices using Toshiba USB Sleep and Charge” on page... -
Page 24: Chapter 2: Using The Dynadock™ And Adjusting Settings
Using the dynadock™ and Adjusting Settings Using the TOSHIBA dynadock™ V3.0 Utility Use the TOSHIBA dynadock™ V3.0 utility to adjust video and audio settings for the device(s) connected to the dynadock™. To access the Audio and Video Dock Utility: ❖... - Page 25 Using the dynadock™ and Adjusting Settings Using the TOSHIBA dynadock™ V3.0 Utility Option Use this option to: Check for updates Performs a check to see if you have the latest software installed. dynadock™ V3.0 Screen Resolution: Changes the resolution setting of the external display connected to the dynadock™.
-
Page 26: Adjusting Video Settings
Extended mode, connect an external display to the dynadock™ as described in the section “Connecting an HDMI™ display” on page 21, and then follow the steps below: Click the dynadock V3.0 icon in the system ® tray/notification area of your Windows desktop. -
Page 27: Supported Display Modes
Using the dynadock™ and Adjusting Settings Adjusting video settings Select Extend or Mirror from the menu. NOTE If the icon is not visible in your system tray/notification area, make sure the dynadock™ is connected and docked, and then click the Show Hidden Icons button ( ), if necessary, to display hidden icons. - Page 28 Using the dynadock™ and Adjusting Settings Adjusting video settings The dynadock™ supports the following display modes: Resolution Refresh Rates (Hz) Resolution Refresh Rates (Hz) 640 x 480 60, 72, 75, 85 1280 x 960 60, 85 720 x 400 70, 85, 88 1280 x 1024 60, 75 800 x 600...
-
Page 29: Adjusting Audio Settings
, as described in this section. If you want to use the computer’s audio ports while the computer is docked, you will need to change the default settings. Configuring audio playback ports Click the dynadock V3.0 icon in the system ® tray/notification area of your Windows desktop. - Page 30 If you make any changes to your audio settings, you may need to restart your media player for the audio changes to take effect. Configuring audio recording ports (microphone) Click the dynadock V3.0 icon in the system ® tray/notification area of your Windows desktop.
-
Page 31: Charging Usb Devices Using Toshiba Usb Sleep And Charge
Using the dynadock™ and Adjusting Settings Charging USB devices using Toshiba USB Sleep and Charge NOTE You may need to restart your media player for the audio changes to take effect. Charging USB devices using Toshiba USB Sleep and Charge Your dynadock™... -
Page 32: Using Standby/Sleep/Hibernation Modes With The Dynadock
Using the dynadock™ and Adjusting Settings Using standby/sleep/hibernation modes with the dynadock™ Using standby/sleep/hibernation modes with the dynadock™ When your docked computer enters standby/sleep/hibernation mode, devices connected to the dynadock™ will not function until the computer returns to an active state. In addition, please keep in mind the following important information regarding the affect of standby/sleep/hibernation mode on external displays connected to the dynadock™:... -
Page 33: Chapter 3: Support
Support Toshiba Support If you require additional help or are still having problems operating the dynadock™, you may need to contact Toshiba for additional technical assistance. Before you call Since some problems may be related to software or the operating system, it is important that you investigate other sources of assistance first. -
Page 34: Contacting Toshiba
Toshiba’s Technical Support Web Site For technical support, or to stay current on the most recent software and hardware options for your dynadock™ and for other product information, be sure to regularly check the Toshiba Web site at support.toshiba.com. Toshiba voice contact Before calling Toshiba, make sure you have: ❖... -
Page 35: Chapter 4: Specifications
Appendix A Specifications Specifications This section summarizes the dynadock™ V3.0 technical specifications.* Physical dimensions Weight Approx. 181g/6.4 ounces (including the Base) Size About 58(w) x 86(d) x 157(h) mm (2.3(w) x 3.4(d) x 6.2(h) in.) (including the Base) Environmental requirements Relative humid- Conditions Ambient temperature... - Page 36 Specifications General specifications Computer Interface USB 3.0 or 2.0 Ports and Connectors 4 x USB 2.0 ports on the back 2 x USB 3.0 ports on the front (USB Sleep and icon) Charge (up to DC 5V) with ( 1 x HDMI™ out port 1 x Microphone jack 1 x Headphone jack 1 x DC IN jack...
-
Page 37: Index
22 USB devices 23 audio ports connector configuring 29 USB Type B connector, USB 3.0 audio settings adjusting 29 contacting Toshiba 34 back view DC-IN Quick Tour 14 connection 20 DC-IN port 15 charging display modes USB devices 31... - Page 38 Index physical dimensions 35 power requirements 35 Microphone jack 13 setting up 17 supported display modes 27 package contents 11 dynadock™ V3.0 Install Menu 18 peripherals connecting 21 environmental requirements physical dimensions dynadock™ 35 dynadock™ 35 Extended/Mirror mode port display modes 26 DC-IN 15 external displays HDMI™...
- Page 39 32 supported display modes dynadock™ 27 Toshiba Web site 34 Toshiba support 33 USB 3.0 (USB Sleep and Charge port) USB devices charging 31 connecting 23 Using TOSHIBA dynadock™ V3.0 Utility 24 video settings adjusting 26 Web site Toshiba 34...
- Page 40 Guía del usuario dynadock™ V3.0 English/Español GMAA00412012 06/13...
- Page 41 Íconos de seguridad Este manual contiene instrucciones de seguridad que deben seguirse a fin de evitar posibles peligros que podrían tener como consecuencia lesiones personales, daños al equipo o pérdida de datos. Son advertencias de seguridad que están clasificadas de acuerdo con la gravedad del peligro y están representadas por íconos que distinguen cada instrucción como se muestra abajo: Este ícono indica la presencia de una situación inminentemente...
- Page 42 Instrucciones de seguridad Siempre lea con cuidado las instrucciones de seguridad: No desarme, modifique, altere o repare el producto ❖ No intente desarmar, modificar, alterar o reparar el producto (incluyendo el adaptador de CA). El desarmado, la modificación, la alteración o la reparación del producto puede provocar incendios o descargas eléctricas, ocasionando posiblemente lesiones graves.
- Page 43 Use sólo el adaptador de CA de TOSHIBA ❖ Siempre use el adaptador de CA de TOSHIBA que puede venir incluido con su producto o use los adaptadores de CA recomendados por TOSHIBA para evitar cualquier riesgo de incendio u otro daño al producto.
- Page 44 Nunca coloque el producto en sitios donde haya calor excesivo ❖ Nunca coloque el producto en lugares en los que quede expuesto a calor excesivo, como por ejemplo, a la luz directa del sol, en un vehículo sin ventilación o cerca de un calentador. Esto puede provocar fallas en el sistema, mal funcionamiento, pérdida de datos o daños al producto.
- Page 45 Canada. Declaración de derechos de autor Los derechos de autor de este manual son propiedad de Toshiba Corporation, que se reserva todos los derechos. De acuerdo con las leyes de derechos de autor, este manual no puede reproducirse en forma alguna sin el permiso previo y por escrito de Toshiba.
- Page 46 Marcas comerciales dynadock es una marca registrada de Toshiba Corporation. AMD, AMD K6, Athlon y Duron son marcas registradas o marcas comerciales de Advanced Micro Devices Incorporated. DisplayLink es una marca comercial de DisplayLink Corporation. Los términos HDMI y HDMI High-Definition Multimedia Interface, y el Logotipo HDMI son marcas comerciales o marcas registradas de HDMI Licensing LLC en Estados Unidos y otros países.
- Page 47 Conexión de dispositivos USB ......23 Capítulo 2 Uso del dynadock™ y ajuste de las configuraciones..........24 Uso de la utilidad TOSHIBA dynadock™ V3.0 ..24 Ajuste de las configuraciones de video ....26 Selección del modo Extendido o del modo Espejo .........26...
- Page 48 ......32 Capítulo 3 Asistencia..............33 Asistencia Toshiba ..........33 Antes de contactar a Toshiba ......33 Contacto con Toshiba ..........34 Sitio web de asistencia técnica de Toshiba ..34 Contacto telefónico con Toshiba .......34 Capítulo 4 Especificaciones............35 Especificaciones .............35 Índice................... 37...
-
Page 49: Introducción
V3.0 que le permite conectar sus dispositivos periféricos mediante un ® solo cable USB a casi cualquier computadora basada en Windows Le recomendamos que mantenga su dynadock™ actualizado con los últimos avances tecnológicos: visite el sitio support.toshiba.com con regularidad para descargar actualizaciones de controladores de software. NOTA NOTA Todas las instrucciones en esta Manual son para sistemas ®... -
Page 50: Contenido De La Caja
Introducción Contenido de la caja Contenido de la caja Compruebe que tenga todos los artículos que se enumeran a continuación: ❖ dynadock™ V3.0 ❖ Base ❖ Cable USB 3.0 ❖ Adaptador de CA y cable de alimentación. ❖ CD de instalación (Manual del Usuario (este documento), garantía limitada estándar y controladores) ❖... -
Page 51: Guía Rápida
Introducción Guía rápida Guía rápida En esta sección se identifican los distintos componentes del dynadock™. Para una descripción de cada componente, consulte la tabla correspondiente que sigue a cada ilustración. Vista frontal Luz de encendido Luz de actividad USB Puertos USB 3.0 con alimentación (suspensión y carga USB .....) Conector de audífonos Conector del micrófono... - Page 52 Para obtener información adicional, consulte “Carga de los dispositivos USB mediante la Suspensión y Carga Toshiba USB” en la página Nota 1: Puede que algunos dispositivos USB no sean compatibles con esta función. Nota 2: 5 GBps es la máxima tasa de transferencia teórica de interfaz según las...
-
Page 53: Parte Posterior
Introducción Guía rápida Parte posterior Puertos USB 2.0 Puerto de salida HDMI™ Conector USB 3.0 Tipo B Conector DC IN Ranura para anclaje de seguridad (al lado de dynadock™) (Ilustración de muestra) Conectores en la parte posterior del dynadock™... - Page 54 USB de la computadora Ranura para Asegura el dynadock™ a un objeto pesado como un escritorio. Para obtener bloqueo de información adicional sobre la compra de un seguridad candado de seguridad opcional, visite accessories.toshiba.com.
-
Page 55: Requisitos De La Computadora
Introducción Requisitos de la computadora Requisitos de la computadora Componente Descripción Se recomienda un procesador de 1.8 GHz o superior ® ® ® (Intel Core™ 2 Duo, o Intel familia Pentium o AMD familia K10, o compatible. ® Intel Core™ 2 Duo 2.0 GHz o un procesador superior se recomiendan para el desempeño óptimo del video) 2 GB de memoria o más (se recomiendan 4 GB o más) -
Page 56: Conexión De Periféricos
Capítulo 1 Instalación del dynadock™ y conexión de periféricos Instalación del dynadock™ En esta sección se dan instrucciones para la instalación del dynadock™. Debe seguir los pasos en el orden en el que aparecen a continuación: Instalación del software Montaje del dynadock™ Conexión del adaptador de CA Conexión del dynadock™... - Page 57 Para instalar o desinstalar el software se requieren privilegios de administrador. Haga clic en Instalar Controlador (Install Driver). (Imagen de muestra) Menú de instalación del dynadock™ V3.0 Durante el proceso de instalación se instalan los siguientes programas: ❖ Software DisplayLink™ Core ❖ Controladores de pantalla TOSHIBA USB...
- Page 58 Instalación del dynadock™ y conexión de periféricos Instalación del dynadock™ Para finalizar la instalación siga las instrucciones que aparecen en la pantalla. NOTA NOTA Para proceder con la instalación es necesario leer y aceptar el acuerdo de licencia del software DisplayLink™. Reinicie la computadora cuando se lo soliciten.
- Page 59 Instalación del dynadock™ y conexión de periféricos Instalación del dynadock™ Conexión del adaptador de CA Enchufe el adaptador CA en el conector DC-IN en la parte posterior del dynadock™. U -1 in e 2 .3 r iq in a (Ilustración de muestra) Cómo conectar el adaptador de CA al dynadock™...
-
Page 60: Conexión De Periféricos
Instalación del dynadock™ y conexión de periféricos Conexión de periféricos NOTA NOTA Es necesario conectar el dynadock™ a un puerto USB 3.0. a fin de que su funcionamiento sea óptimo. El dynadock™ funciona cuando está conectado a un puerto USB 2.0, pero se compromete el desempeño. -
Page 61: Conexión De Dispositivos De Audio
Ajuste la resolución de la pantalla externa hasta que aparezca una imagen. Para obtener información adicional consulte “Uso de la utilidad TOSHIBA dynadock™ V3.0” en la página Las configuraciones de video del dynadock™ se pueden personalizar. Para obtener información adicional, consulte “Ajuste... -
Page 62: Conexión De Dispositivos Usb
USB 3.0 energizados de la parte delantera del dynadock™. Para obtener información adicional consulte “Carga de los dispositivos USB mediante la Suspensión y Carga Toshiba USB” en la página... -
Page 63: Uso De La Utilidad Toshiba Dynadock™ V3.0
Para acceder a la utilidad Audio y Video Dock: ❖ Haga clic en el icono dynadock V3.0 en la bandeja del ® sistema/área de notificación del escritorio de Windows (Imagen de muestra) Icono del TOSHIBA dynadock™ V3.0... - Page 64 Uso del dynadock™ y ajuste de las configuraciones Uso de la utilidad TOSHIBA dynadock™ V3.0 Opción Utilice esta opción para: Consultar Realizar una revisión para ver si tiene el último software instalado. actualizaciones dynadock™ V3.0 Resolución de pantalla: Cambia la configuración de resolución de la pantalla externa conectada al dynadock™.
-
Page 65: Ajuste De Las Configuraciones De Video
“Conexión de una pantalla HDMI™” en la página 21, y luego siga los siguientes pasos: Haga clic en el icono dynadock V3.0 en la bandeja del ® sistema/área de notificación del escritorio de Windows... -
Page 66: Modos De Visualización Compatibles
Uso del dynadock™ y ajuste de las configuraciones Ajuste de las configuraciones de video Seleccione Extendido o Espejo en el menú. NOTA NOTA Si el icono no es visible en la bandeja del sistema/área de notificación, asegúrese que el dynadock™ está conectado y acoplado, y luego haga clic en el botón Mostrar Iconos ocultos ( si es necesario, para mostrar iconos ocultos. - Page 67 Uso del dynadock™ y ajuste de las configuraciones Ajuste de las configuraciones de video El dynadock™ admite los siguientes modos de visualización: Frecuencia de Frecuencia de Resolución actualización (Hz) Resolución actualización (Hz) 640 x 480 60, 72, 75, 85 1280 x 960 60, 85 720 x 400 70, 85, 88...
-
Page 68: Ajuste De Las Configuraciones De Audio
Si desea utilizar los puertos de audio de la computadora mientras está acoplada, deberá cambiar la configuración predeterminada. Configuración de los puertos de reproducción de audio Haga clic en el icono dynadock V3.0 en la bandeja del sistema/área de notificación del escritorio de ® Windows (Imagen de muestra) Icono del TOSHIBA dynadock™... - Page 69 Configuración de los puertos de grabación de audio (micrófono) Haga clic en el icono dynadock V3.0 en la bandeja del ® sistema/área de notificación del escritorio de Windows (Imagen de muestra) Icono del TOSHIBA dynadock™ V3.0...
-
Page 70: Carga De Los Dispositivos Usb Mediante La Suspensión Y Carga Toshiba Usb
Puede ser necesario reiniciar el reproductor de medios para que los cambios del audio surtan efecto. Carga de los dispositivos USB mediante la Suspensión y Carga Toshiba USB El dynadock™ puede suministrar potencia de bus USB (5V CC) y puede cargar dispositivos USB seleccionados (como reproductores MP3 y teléfonos móviles) usando los puertos USB 3.0 frontales... -
Page 71: Uso De Los Modos De Espera/Suspensión/Hibernación Con Dynadock
Uso del dynadock™ y ajuste de las configuraciones Uso de los modos de espera/suspensión/hibernación con NOTA NOTA Cuando se produce un desbordamiento actual del dispositivo USB externo conectado al puerto compatible, la fuente de alimentación (CC 5V) del bus USB puede detenerse por motivos de seguridad. Para dejar de cargar el dispositivo USB, desconéctelo del dynadock™. -
Page 72: Asistencia Toshiba
Puesto que algunos problemas pueden estar relacionados con el sistema operativo o con el software, es conveniente que recurra primero a otras fuentes de asistencia técnica. Intente lo siguiente antes de contactar a Toshiba: ❖ Consulte el manual del usuario y/o las secciones sobre la solución de problemas en la documentación suministrada con... -
Page 73: Contacto Con Toshiba
Web de Toshiba en support.toshiba.com Contacto telefónico con Toshiba Antes de llamar a Toshiba, compruebe que dispone de lo siguiente: ❖ El número de serie del dynadock ❖... -
Page 74: Especificaciones
Apéndice A Especificaciones Especificaciones Esta sección resume las especificaciones técnicas del dynadock™ V3.0.* Dimensiones físicas Peso Aprox. 181 g/6.4 onzas (incluyendo la base) Tamaño Aproximadamente 58(w) x 86(d) x 157(h) mm (Anc. x Prof. x Alt.): (2.3(ancho) x 3.4(profundidad) x 6.2(altura) pulgadas.) (incluyendo la base.) Requisitos ambientales Humedad... - Page 75 Especificaciones Especificaciones generales Interfaz de la USB 3.0 o 2.0 computadora Puertos y conectores 4 x puertos USB 2.0 en la parte posterior 2 x puertos USB 3.0 en la parte frontal (USB Sleep and Charge (hasta 5V CC) con el icono ( 1 x puerto de salida HDMI™...
-
Page 76: Índice
USB Tipo B, características USB 3.0 15 dynadock™ 10 Contenido de la caja 11 carga dispositivos USB 31 DC-IN comunicación con Toshiba 34 conexión 20 conecte dimensiones físicas alimentación de CA 20 dynadock™ 35 DC-IN 20 dispositivos de audio dynadock™... - Page 77 Índice dynadock™ modos de pantalla características 10 modo Extendido/Espejo 26 dimensiones físicas 35 modos de visualización compatibles especificaciones generales 36 dynadock™ 27 instalación 17 montaje modos de visualización dynadock™ 19 compatibles 27 montaje 19 pantallas externas requisitos ambientales 35 conexión 21 requisitos de alimentación 35 periféricos conexión 21...
- Page 78 Memoria 16 sistema operativo 16 seguridad íconos 2 instrucciones 3 sitio Web Toshiba 34 software instalación 17 Toshiba sitio Web 34 USB 3.0 (puerto de suspensión y carga USB) 13 Uso de la utilidad TOSHIBA dynadock™ V3.0 24 vista frontal 12...
Need help?
Do you have a question about the dynadock V3.0 and is the answer not in the manual?
Questions and answers