
Related Manuals for Alptop Security AT-A3

Summary of Contents for Alptop Security AT-A3
- Page 1 ALPTOP Wire-Free Rechargeable HD Smart Security Camera AT-A3 Quick User Guide Place it Anywhere, Watch on Phone Anytime...
- Page 2 Warranty Service Thanks for your shopping and trust. If you have a good experience with our product, please leave us a review. We will optimize your purchase experience as much as we can and provide an excellent lifetime online service............................
-
Page 3: Table Of Contents
INDEX PAGE Package Contents..........P1 Product Diagram..........P2 Install CloudEdge APP........P3 Register Account..........P4 How to Add Camera to APP......P4.5.6.7 1.Install Micro SD Card......P4 2.Power on Camera........P4 3.Wi-Fi Setting..........P5 4.APP Setting........P5.6.7 Device Manual..........P8.9 Sharing.............P9 P2P Body Detection Setting........P10 Alarm Notification and Playback....P10.11 Camera Installation.........P11 Notes..........P12 Important Appendix............P13... - Page 4 Package Contents Battery Camera * 1 Iron Ball Wall Mount * 1 Quick User Guide * 1 Double-Sided Adhesive * 2 Screws Set * 1 USB Cable * 1 Free Outdoor Bracket * 1...
-
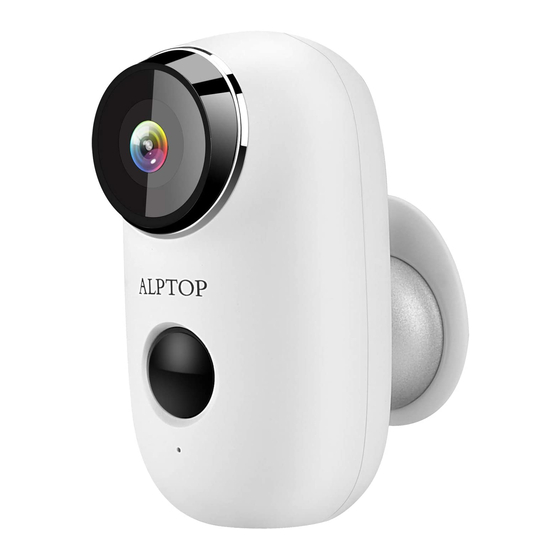
Page 5: Product Diagram
Product Diagram No. Camera key Operation Press and hold for 5 seconds to power Power Key on/off Quick press 1 second to wake up the Power Key camera from standby mode Press and hold for 5 seconds, it will reset Reset Hole and restart... -
Page 6: Install Cloudedge App
Install CloudEdge APP Search “CloudEdge” in App store or Google Play store, or scan below QR Code to download and install on smart phone. For IOS For Android *Tips: Please ALLOW below 2 permissions when use this App at first time . 1. -
Page 7: Register Account
Register Account New users need to register by e-mail, click "Register", follow the steps to complete the registration of the account, and log in. How to Add Camera to APP 1. Install Micro SD card Please insert Micro SD card to record videos when motion detected and playback. -
Page 8: 3.Wi-Fi Setting
3. Wi-Fi Setting Put the camera and smart phone 1 to 3 feet (30 to 100 cm) away from the router to set W-iFi *Tips: Please note camera only works under 2.4G Wi-Fi, not supports 5G Wi-Fi. 4. APP Setting 4.1 Open CloudEdge App, Click and select “Battery Camera”. - Page 9 4.2 Select “The device has flashed red” and tap “Next” for below 3 Steps. 4.3 Select 2.4Ghz Wi-Fi SSID and input password, tap NEXT...
- Page 10 4.4 Put the QR code in front of the camera lens about 15cm. The device lens is aimed at the QR code on the phone screen with a distance of 15 cm. After the device recognizes the QR code, it will sound "Boogu", after heard it, then tap "Hear Tone".
- Page 11 Device Menu 1. Add a camera 16. Bit rate 2. Camera time 17. Network signal strength 3. Live view button 18. Live view options 4. Camera type icon 19. Local playback options 5. Camera name 20. Screen Shot button 6. Alarm information icon red dot indicates alarm 21.Intercom option,long occurs, click to view alarm...
-
Page 12: P2P Sharing
11. Camera settings 26. Calendar option, click on options, such as alarm it to select the date Micro SD Card, etc. 12. Battery capacity 27. Screen shot options 13. Video “SD”, “HD” 28. Recording options options 29. Alarm time point, click to quickly preview the time 14. -
Page 13: Body Detection Setting
Body Detection Setting PIR “Body Detection” default setting is “Mid”, the detecting distance is 6 meters (20ft), it is adjustable in “My Device” -> “Device Settings” -> "Body Detection". Detecting Distance (For moving and Sensitivity living things) Up to 4 meters (13ft) Medium Up to 6 meters (20ft) High... -
Page 14: Camera Installation
Camera Installation You can put it on any flat place: Table, Chair, Floor, etc. How to Install with Wall Mount: Fix the iron ball bracket to the wall with screws or double-sided adhesive, and then magnetize the camera to the iron ball. Installation is very convenient and also easy to adjust the angle. -
Page 15: Important Notes
Important Notes for Reducing False To reduce false alarms, please note that: Do not install the camera facing any objects with bright lights, including sunshine, bright lamp lights, etc. Do not place the camera too close to a place where there frequently moving vehicles. -
Page 16: Appendix
Appendix LED Status Description and Troubleshooting Sheet No. LED Status Camera Status Slow blinking Red Awaiting WiFi Connection Fast blinking Red WiFi Connecting Solid on Red Network is abnormal Solid on Blue WiFi Connected No. Description Solution and operation 1) Check your Wi-Fi name and password 2) Ensure your Wi-Fi is 2.4G, not Unable to connect... -
Page 17: Faq
1, This Wireless Camera does not support PC Browser and Software. 2, This Wireless Camera does not support 5G Wi-Fi. 3, Video Playback works in Cloudedge APP ONLY, it does not support the 3 party player. 4, Manually snapshot and recording files save in Mobile; Events snapshot files save in Cloud;...
Need help?
Do you have a question about the AT-A3 and is the answer not in the manual?
Questions and answers