Table of Contents
Advertisement
Quick Links
Advertisement
Table of Contents

Related Manuals for WalkMed 350VL


Summary of Contents for WalkMed 350VL
- Page 1 WalkMed 350VL Ambulatory Infusion Pump Operation Manual for the Clinician...
- Page 3 Disclaimer The information in this manual is accurate and reliable as of the time of its release for this specific version of the pump. However, WalkMed Infusion LLC reserves the right to change the specifications of the product described in this manual without notice at any time. As such, the descriptions and data included in this document may not be current if a different revision of the manual is used.
-
Page 4: Table Of Contents
Table of Contents INTRODUCTION Features and Controls Pump Unit Accessories Pump Signals Keypad Function Table Technical Specifications Indications and Contraindications Precautions OPERATION INSTRUCTIONS Removing and Attaching the Front Cover Opening and Closing the Reservoir Cover Inserting and Removing the Battery Installing the Reservoir/Tubing Set Programming the Pump Keypad Function Table... -
Page 5: Maintenance
Table of Contents MAINTENANCE Cleaning and Care Functional Test Procedures Functional Verification Test Functional Verification Test Check-Off Form TROUBLESHOOTING Problem-Solving Procedures If a Problem Occurs Problem-Solving Table Obtaining Service Assistance Limited Warranty TECHNICAL SPECIFICATIONS Technical Description Electromagnetic Emissions Electromagnetic Immunity Key to Symbols Index... -
Page 6: Features And Controls
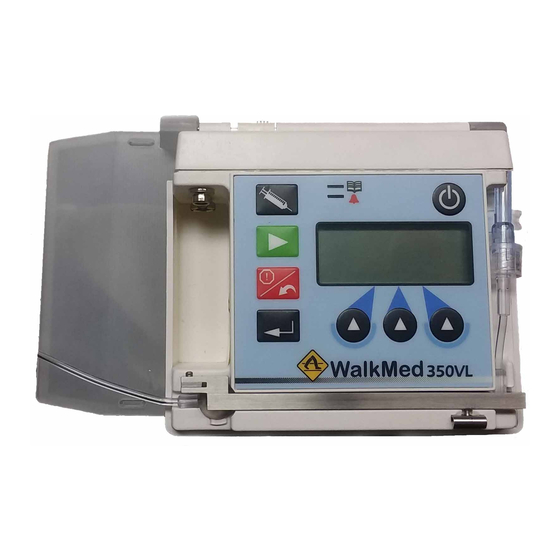
3. Status light. Blinks green, yellow, or red to show pump operating status or system alert conditions. 4. Malfunction light. A continuous red light that shows when a system malfunction occurs, system alarms. 5. Battery compartment. One 9-volt alkaline battery fits here. Front View WalkMed 350VL Bottom... - Page 7 Features and Controls Right Side View 6. Pumping chamber. Applies mechanical pumping action to the tubing in order to deliver medications to the patient. 7. Clamp bar. Secures the elastic segment of the pump tubing into place in the pumping chamber. 8.
-
Page 8: Accessories
Features and Controls Standard Pump Accessories The WalkMed Pump is packaged with the following standard accessories: • WM 350VL Infusion Pump • Front Cover • Small Reservoir Cover • Large Reservoir Cover • Operation Manual (this document) • Carrying Pouch •... -
Page 9: Pump Signals
Features and Controls Pump Signals The WalkMed 350VL pump provides visual and audible information to the user during normal operation and in the event of system problems. The pump communi cates this information by 3 types of signals: 1. Display screen. The front panel screen shows messages describing normal operation functions and alarms. -
Page 10: Keypad Function Table
Features and Controls Control Key Function Power Press to turn pump power on or off. Start Press to start medication delivery. Press to stop medication delivery. Stop/Undo Press to undo a new number setting while in programming mode changing rates. Press to stop prime. -
Page 11: Technical Specifications
- 650 ml at 10 ml/hr - 2.7 Days - 500 ml at 30 ml/hr - 0.7 Days Reservoir bags: Available reservoir sizes include 65, 150 and 250 ml. Tubing sets: Use only dedicated WalkMed pump tubing sets manufactured by WalkMed Infusion LLC. - Page 12 Technical Specifications Occlusion 517 ±155 mmHg / 10 ±3 psi immediately detection: distal to drive mechanism. If the occlusion is cleared while in delivery mode the pump will automatically cancel the alarm and resume delivery. Occlusion Detection Time Basal Rate Maximum Occlusion ml/hr...
-
Page 13: Indications And Contraindications
Indications and Contraindications Indications for Use The WalkMed 350VL pump is indicated for intravenous, subcutaneous, arterial, enteral, and epidural infusion of: • antibiotics • analgesics • chemotherapeutic agents • and other medications or fluids requiring precisely-controlled infusion rates Contraindications for Use The WalkMed 350VL pump is contraindicated for: •... -
Page 14: Precautions
Using the pump in the Prime function while connected to a patient may cause over-infusion of medications. • Do not use the WalkMed 350VL pump in the pres ence of high-intensity magnetic fields (e.g., MRI scanners). Exposure to strong magnetic fields may adversely affect the pump’s infusion accuracy, possibly causing over-... - Page 15 Precautions • The WalkMed 350VL pump clamp bar must be securely closed by fully engaging the clamp bar lock pin so that an audible “click” sound is heard. Before using the pump, confirm secure closure of the clamp bar by pulling up firmly on the end of the bar with a thumb or index finger.
- Page 16 Use only those sets recommended for use with the WalkMed 350VL pump. • A security code may be keyed-in to lock the WalkMed 350VL pump’s infusion programming function. This code is designed to allow programming access to the clinician only, and must not be given to the patient.
- Page 17 350VL pump. Refer all service to an authorized Walk- Med service center. • Do not use the WalkMed 350VL pump if you suspect it may have been damaged or is not operating properly. • Always keep the front cover installed on the WalkMed 350VL pump during use and storage to prevent damage to the battery terminals, clamp bar release, and keypad.
- Page 18 • Do not use sharp objects to depress the control keys on the WalkMed 350VL pump keypad. Doing so may damage the keys, possibly making the pump inoperable or causing it to malfunction.
-
Page 19: Removing And Attaching The Front Cover
Removing and Attaching the Front Cover Removing and Attaching the Front Cover To Remove Front Cover 1. Pull back latch with finger and remove top cover. The cover separates completely from the pump. To Attach Front Cover 1. Orient the cover so that the frosted area of the cover is over the battery. -
Page 20: Opening And Closing The Reservoir Cover
Opening and Closing the Reservoir Cover To Open Reservoir Cover 1. Place fingers on the top of the reservoir cover and pull back on the reservoir cover latch. 2. Open the reservoir cover by lifting up with thumb. To Close Reservoir Cover 1. -
Page 21: Inserting And Removing The Battery
Inserting and Removing the Battery Battery Specification ® Battery life is specified using a Duracell brand MN1604, Medline MPHB 9-volt alkaline battery, or equivalent. To Insert Battery 1. Remove the front cover from the pump. 2. Match the terminals on the battery to the terminals in the pump battery compartment. - Page 22 Inserting and Removing the Battery To Remove Battery 1. Remove the front cover from the pump. 2. Stop medication delivery and then turn the pump power off. 3. Place your thumb on top of the battery, and push down and away from the terminals. Once the battery is disconnected, lift the battery out of the battery compartment.
-
Page 23: Installing The Reservoir/Tubing Set
Installing the Reservoir/Tubing Set To Install Reservoir/Tubing Set 1. Prepare the reservoir and tubing set for installation in the WalkMed 350VL pump. Note: For instructions on preparing the dedicated reservoir and pump tubing set, refer to the instructions on the product packaging. - Page 24 Installing the Reservoir/Tubing Set 5. Leaving the reservoir cover in place, move the pump back onto the cover. Push down until the cover snaps onto the pump. This method is recommended to ensure that the reservoir bag is completely inside the cover and that the bag and tubing are not pinched by the closed cover.
- Page 25 Installing the Reservoir/Tubing Set WalkMed 350VL 7. Insert the right-angle elbow fitting of the tubing into the elbow seat on the pump. 8. Insert the elastic tubing segment into the pumping chamber, and the pressure cell into the pressure cell seat to the left of the chamber, with the pressure cell tab pointing out.
- Page 26 Installing the Reservoir/Tubing Set Closing the clamp bar places the elastic tubing segment in contact with the pumping mechanism. To ensure proper medication delivery, always close the clamp bar until it fully engages the lock pin with an audible “click” sound.
-
Page 27: Programming The Pump
Programming the Pump PROGRAMMING THE PUMP... -
Page 28: Keypad Function Table
Programming the Pump Programming Function Displays Display Function Idle This screen tells the user the pump is not in the delivery or programming modes. Basal Flow Rate Used to set the flow rate. BASAL FLOW RATE Volume Delivered This screen tracks the SCREEN total volume of fluid that has been delivered. - Page 29 Programming the Pump Control Key Function Power Press to turn pump on or off. Start Press to start medication delivery. Press to stop medication delivery. Press to undo a new number setting while Stop/Undo in programming mode changing rates. Press while in programming mode to return to basal flow rate screen.
-
Page 30: Turn Pump Power On
Programming the Pump Turning Pump Power On To Turn Pump Power On: Press and hold the key until the display sequence begins. Power-On Display Sequence Each time the pump power is turned on, information displays automatically, scrolling to the screen. Press the enter key to enter the programming loop. -
Page 31: Enter Programming Mode
Programming the Pump Enter Programming Mode From the Idle display press the key to enter the programming mode. Programming Basal Flow Rate BASAL FLOW RATE Basal Flow Rate screen can be set between 0.1 to 30.0 ml/hr. SCREEN 1. Set the Basal Flow Rate to Zero by pressing any keys together. - Page 32 Programming the Pump 2. Change the decimal point position by pressing any keys together a second time. Note: The pump must be zeroed to change the decimal point position. / HR / HR 3. To set or change the Basal Flow Rate, press each key to increase the value located above that key, until the desired basal flow rate is displayed.
- Page 33 Programming the Pump 4. Press the key to accept the new setting and move to the Volume Delivered display screen. Note: Prior to pressing the key, it is recommended that the clinician scroll through all the program settings to verify pump is programmed properly and meets the desired regimen.
-
Page 34: Resetting Volume Delivered To Zero
Programming the Pump Resetting Volume Delivered To Zero The Volume Delivered screen tracks the infused volume. The Volume Delivered counter should be reset between therapies. 1. Reset the Volume Delivered counter to zero by pressing any 2 value keys together. The pump will display three dashes followed by 0.00. -
Page 35: Programming Total Volume Limit
Programming the Pump Programming Total Volume Limit Enabled Disabled This function can be disabled. When enabled this function sets a limit for the amount of drug infused, followed by a 4 hour KVO infusion at end of delivery. Go to page 39 for KVO information. Note: The pump is programmable from 1 to 1999 ml. - Page 36 Programming the Pump Press the key to undo any entry prior to pressing the key. 2. Press the key to accept the new setting and move to the Lock/Unlocked display screen. Note: Setting the value to OFF disables the Total Volume Limit function.
-
Page 37: Changing The Lock/Unlock
Programming the Pump Lock/Unlock Keys 1. Press any key, the pump will display all zeros. Press each key to increase the number until the Access Code “253” is displayed. ACCESS CODE 2. Press the key and the pump display will momentarily display the Lock/Unlock mode that the pump is currently set to and advance to the Basal Flow Rate screen. -
Page 38: Delivering Medications
Delivering Medications To Prime Tubing Set The prime function is accessed from the program mode and cannot be activated while the pump is locked. Warning: Do not engage the prime function while the pumps connected to a patient. 1. Open the slide clamp on the tubing below the pressure cell. 2. -
Page 39: To Start Delivery
Delivering Medications To Start Delivery 1. Connect the primed tubing set to the patient’s IV access device. 2. Open the clamp on the patient’s IV access device. 3. Press the key to start medication delivery. / HR light will start blinking green. The display will read and alternate between the Programmed Delivery Rate and Volume Delivered screens. -
Page 40: To Stop Delivery
Delivering Medications To Stop Delivery 1. Press the key. This places the pump in Idle mode. In Idle mode the pump does not deliver. The pump will remain in Idle mode until further action is taken. -
Page 41: Total Volume Limit Reached And End Kvo
Delivering Medications Total Volume Limit Reached and End KVO When the Total Volume Limit has been reached the pump will beep 3 times, the blinks yellow and will continue delivery at one of the following End of Infusion KVO rates. If Basal Flow Rate was KVO Flow Rate will be: programmed to:... -
Page 42: Using The Carrying Pouch
Using the Carrying Pouch Using the Carrying Pouch 1. Slip the WalkMed 350VL pump with reservoir bag into the pouch. 2. Close the pouch flap onto the velcro strips on the pouch front. The tubing should come out of the opening on either side of the closed flap. -
Page 43: Discontinuing Use Of The Pump
Discontinuing Use of the Pump Discontinuing Use of the Pump 1. Stop medication delivery. 2. Close the slide clamp on the extension tubing below the pressure cell. 3. Disconnect the reservoir/ tubing set from the patient’s access device. 4. Turn the pump power off. 5. -
Page 44: Cleaning And Care
Avoid using caustic/acidic solvents such as paint thinner or lacquer remover. Use the specially-designed carrying pouch available for the WalkMed pump to help protect the pump during storage and use. Keep the front cover on the pump during storage and use. -
Page 45: Functional Test Procedures
Function Verification Test. If a pump does not pass the Functional Verification Test, it must be returned to your authorized WalkMed service center for repair. This pump contains no user-serviceable parts. -
Page 46: Functional Verification Test
Functional Test Procedures Functional Verification Test Equipment Required: • 60” WalkMed Pump Tubing Set • 65 ml Reservoir Bag • Operation Manual for the pump • 9-volt alkaline battery Equipment Set-Up: 1. Fill the reservoir bag with fluid and connect it to the pump tubing set. - Page 47 Functional Test Procedures 4. Press the key to initiate infusion. Verify that the indicator flashes green approximately every 4 seconds. 5. Allow the pump to run until an occlusion alert is initiated. Verify that “OCC” is displayed and the indicator flashes red and that the audio alert is active.
-
Page 48: Functional Verification Test Check-Off Form
Functional Test Procedures Functional Verification Test Check-Off Form Copy Master – Do Not Remove or Fill-Out. Pump Model: ____________________________________________ Serial No: ____________________________________________ Test Date: ______________ Test Time: _______________ Tested By: ______________ Confirmed by: _______________ Test Specification Pass/ Fail Display verification at start-up All segments present Status indicator illumination Flashes yellow once, then... -
Page 49: Problem-Solving Procedures
Problem-Solving Table, contact your pump supplier for service assistance. For more service information, refer to Chapter 16, “Obtaining Service Assistance. ” Caution: Do not attempt to disassemble or repair the WalkMed 350VL pump. Refer all service to an authorized WalkMed service center. -
Page 50: Problem-Solving Table
Problem Solving Procedures Problem Solving Table Display Sounds/ Condition Corrective Action Message Lights Sounds: Press key to start Slow beeping Delivering delivery. Light: Press key to silence alert for 5 Blinking yellow minutes. Sounds: Low Battery Press key to – + Slow beeping silence alert. - Page 51 Problem Solving Procedures Sounds: System Write down Error Continuous Malfunction message from display. tone Remove battery to 1-8, silence alarm. O or U will Take pump out of appear here. service. Light: Contact support with Continuous red Error message. Scrolling Sounds: Total The pump will continue...
-
Page 52: Obtaining Service Assistance
Obtaining Service Assistance Caution: Do not attempt to disassemble or repair the WalkMed 350VL pump. Refer all service to an authorized WalkMed service center. WalkMed Authorized Service Center WalkMed Infusion, LLC 303-420-9569 Procedure to Return Product 1. Contact your service center. - Page 53 Obtaining Service Assistance Important: Before returning products, you must obtain a Return Goods Authori zation (RGA) number. Products cannot be returned that do not have the assigned Return Goods Authorization (RGA) number clearly printed on the outside of the shipping package. 4.
-
Page 54: Limited Warranty
Customer Support Department, WalkMed Infusion, 6555 South Kenton Street, Suite 304, Centennial, CO 80111, USA. Notice to WalkMed Infusion must include the model and serial number, date of purchase, and description of the defect in sufficient detail to facilitate repairs. - Page 55 Limited Warranty C. Conditions of Warranty. This warranty does not apply to any product, or part thereof, which has been repaired or altered outside of Manufacturer’s facility in a way so as, in Manufacturer’s judgment, to affect its stability or reliability, or which has been subjected to misuse, negligence or accident.
-
Page 56: Technical Specifications
Technical Specifications Electromagnetic Emissions (Table 201, IEC 60601-1-2) WalkMed infusion pumps are intended for use in the electromagnetic environment specified below. The customer or the user of these infusion pumps should assure that it is used in such an environment. -
Page 57: Electromagnetic Immunity
Technical Specifications Electromagnetic Immunity (Table 202 IEC 60601-1-2) The WalkMed infusion pumps are intended for use in the electromagnetic environment specified below. The customer or the user of these infusion pumps should assure that it is used in such an environment. - Page 58 Technical Specifications Immunity IEC 60601 Compliance Electromagnetic Environment - test test level level guidance Voltage <5 % UT Not applicable (>95 % dip dips, short in UT) interruptions for 0,5 cycle and voltage variations on 40 % UT power supply (60 % dip in input lines IEC 61000-...
-
Page 59: Key To Symbols
Key to Symbols Caution Type BF Patient Applied Part IPX- Drip Proof Do Not Re-use Ethylene Oxide Sterilized STERILE EO Use-by Date Lot Number Manufacturer Authorized Representative Refer to Operator’s Manual Do Not Resterilize Do Not Use if Package is Damaged Consult Instructions for Use Non-Pyrogenic Temperature Limits... -
Page 60: Index
Index Blood, infusion of, Access (Code: 253) Accessories, pump, contraindication, Accuracy of infusion, Bloodborne pathogens, Air-in-line detection, OSHA regulation caution, concerning (USA-only), Alarm: conditions, 7, 48-49 Carrying pouch: display messages, 7, 48-49 how to use, lights, 7, 48-49 Changing programmed sounds, 7, 48-49 basal flow rate,... - Page 61 Index Functional test procedures, 43 Delivery of medications: Functional verification indications and test, 43-45 contraindications for, specifications for, precautions for, 12-16 Indications for use, list of, Depleted battery alarm, Infusion: Dimensions of pump, accuracy of, Discontinuing use of pump, 41 arterial, Display screen: continuous,...
- Page 62 Index Lights, signal: Patient instruction, caution, 16 description of, 4, 7 Power key, function, during alarm Power source, conditions, 48-49 Precautions, list of, 12-16 during pump power-on, Pressure cell, of tubing set: See also Status light, Malfunction light insertion into pump, seat, 4-5, 23 Locking the pump...
- Page 63 Index Screen display: Rate of medication delivery: description of, 4, 7 during priming, messages during programmable range of, alarm conditions, 48-49 to change, 29-31 messages during pump to set, 29-31 power-up, Repair of pump: Service, 50-51 caution, Self-test, pump, obtaining service Signals, pump: assistance, 50-51...
- Page 64 Index Technical description electromagnetic emission 54 electromagnetic immunity 55 Temperatures, for pump operation and storage, Test procedures, Tubing set: clamping before opening clamp bar, 13, 41 medication interaction with, caution, preparation of, priming of, recommended set, caution, specification, to install, 21-24 to remove, Uncontrolled fluid flow,...
- Page 66 Manufactured by: WalkMed Infusion LLC 6555 S. Kenton Street, Suite 304 • Centennial, Colorado Telephone: (303) 420-9569 • Fax: (303) 420-4545 • walkmed.net...
Need help?
Do you have a question about the 350VL and is the answer not in the manual?
Questions and answers