Table of Contents
Advertisement
Quick Links
V A N T A G E C O N T R O L S . C O M
1061 South 800 East • Orem, Utah 84097 • Telephone 801 229 2800 • Fax 801 224 0355
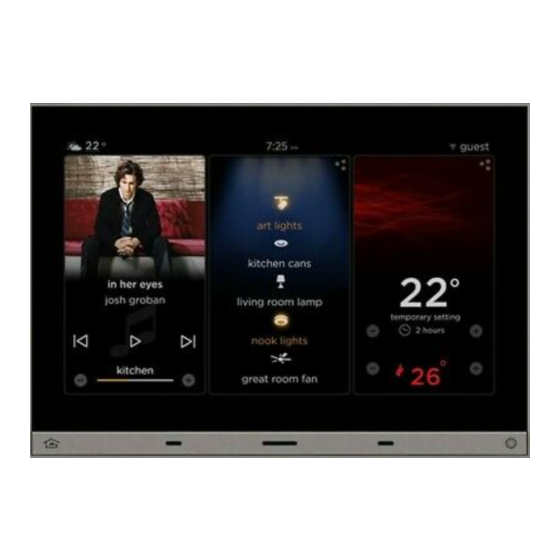
Overview
Vantage's
Equinox
73
active
continues the Vantage commitment to LCD in-wall control
centers. The Equinox 73 LCD Interface is a dedicated system
portal to whole home control. The 7" touchscreen displays
media rich widgets in a dashboard layout. Each widget's
content has been carefully designed to provide the ultimate
user experience. Vantage's Equinox 73 system uses self
discovering technology, eliminating countless hours of tedious
programming. Navigate and control, with real-time feedback,
lighting, audio, video, climate, weather, security, cameras, and
more through a single layer navigation experience. For
additional
personalization
widgets directly right on the touchscreen.
Equinox 73 Features/Operations
Wide screen orientation only.
Equinox platform provides built-in widgets using Vantage
proprietary auto discovery widgets for fast automatic
screen design.
Equinox 73 fully incorporates Vantage's consistent user
experience interface, eliminating learning curves normally
associated with switching interface devices.
Power, 48VDC PoE*/PoE+ or AUX. 12VDC transformer.
o
*Optional, 48VDC, 4 port, PoE Injector, #DA2400.
NOTE: The DA2400 complies with IEEE 802.3
(Ethernet), IEEE 802.3u (Fast Ethernet), IEEE 802.3af
(Power over Ethernet) and 10/100Base-TX Ethernet
standards.
o
AUX. power 12VDC adaptor,
Communicates
over
Vantage
controller and Equinox should be connected to the same
local network)
Firmware upgradable from Design Center over Ethernet.
Built-in ambient light sensor for "active," AUTO mode
screen brightness and off when dark option when
"inactive".
Inactive mode dims or turns screen off in 1 to 10 minutes
(adjustable) if no activity.
Built-in
proximity
activation,
programmed to execute a task with a hand wave across
front of station..
Displays three widgets at a time.
Mechanical buttons, bottom left and right;
o
left navigates to home screen position---
o
right may be assigned to a programmed task---
Profiles; personalize dashboard level and hardware settings:
o
Select dashboard, to arrange order of widgets to
display.
o
Select options to select language, 12/24 hour clock,
and fahrenheit/celsius temperature display.
©Vantage, 41739 / IS-0542-A / InFusion
matrix
LCD
touchscreen
and
control,
select
individual
#VFA-0005.ernet ort.
Ethernet
bus
(InFusion
6"
maximum,
may
Equinox 73 LCD Touchscreen – MODEL: EQ73TB-TI
I N S T A L L A T I O N
Equinox 73 LCD Touchscreen – MODEL: EQ73TB-TI
o
Select device, to view and set hardware settings,
system information, network settings, reset user
settings, and view additional information settings.
o
Select profiles, to create, delete, or rename profiles.
Equinox 73 uses the same widgets as Android tablets and
phones, and iPads, iPhones, and iPods.
Top of screen displays:
o
(left) icon for current weather conditions and
temperature, via Vantage weather service,
o
(center) time of day, and
o
(right) selected profile.
Middle to bottom of screen displays widgets (the order
may be changed within each profile).
o
Widgets (some widgets require specific Vantage
drivers in the Design Center project file):
Scene,
Audio,
Video,
Climate,
Weather
Raise/Lower dimmable loads and volume control via minus
/ plus (-/+) graphical buttons.
Graphical icons and text color track load status, orange =
ON and white = OFF.
Press and release the upper right section
widget for additional control and/or personalization.
Manual reboot of Equinox 73 – press and hold both
mechanical buttons for 3 seconds, then release.
Manual reboot Equinox 73 into service mode – press and
hold both mechanical buttons for 10 seconds, then release.
o
Service mode is automatically used when updating
firmware from Design Center.
o
If the application code is corrupt it may cause the
screen to lock preventing Design Center from
updating or reloading the firmware. Use this option to
reboot the screen to service mode allowing Design
Center to update the corrupted firmware.
o
To manually exit server mode use the manual rebbot
of Equinox 73 (above)
Specifications
Description
Dimensions, HWD
(at wall surface)
Dimensions, HWD
(overall)
Weight
Display
Display Size
Display Resolution
Power
Surge Suppression
Mounting
Sound Option
be
Wiring Connections
Addressing
Finishes
Glass Surface
Ambient Operating
Temperature
Ambient Operating
Humidity
CE & FCC
V A N T A G E I N S T A L L G U I D E S
Lighting,
Security,
Cameras,
Pool & Spa, and
more coming
Specification
4.9" x 6.9" x 0.37"
124mm x 175mm x 9mm
4.9" x 6.9" x 2.1"
124mm x 175mm x 53mm
1.6 lb or 725.75g
Active Matrix Color LCD
7" diagonal
800 x 480 pixels
48VDC via PoE, PoE+,
or aux. power via 12VDC adaptor
(see back panel drawing on the last page)
Yes
See Installation section below
Adjustable volume level - touch interaction
Communication: Ethernet RJ45
Power: PoE/PoE+ or 12VAC adaptor
self addressing through software
TRIM - Titanium
TOUCHSCREEN – Black Glass
Chemically Strengthened
32-95°F -or- 0-35°C
5-95% non-condensing
Yes
on each
or WiFi dongle
page 1 of 4
Advertisement
Table of Contents

Related Manuals for Vantage Hearth Equinox 73 EQ73TB-TI


Summary of Contents for Vantage Hearth Equinox 73 EQ73TB-TI
- Page 1 I N S T A L L A T I O N V A N T A G E C O N T R O L S . C O M V A N T A G E I N S T A L L G U I D E S Equinox 73 LCD Touchscreen –...
- Page 2 I N S T A L L A T I O N System Requirements Connect Equinox 73 to Ethernet PoE and/or other wiring Equinox 73 is compatible with InFusion Design Center version connection options used in the installation. 3.2 software or higher. For new projects it is recommended 2.
- Page 3 I N S T A L L A T I O N 7. Scroll down to the next device screen for: device information – ip address: xxx.xxx.xxx.xxx serial number: xxxxxxx app version – xx.xx.xx (used in diagnostics) ...
- Page 4 I N S T A L L A T I O N Equinox 73 Mounting Ring Adjustment Tool Locate this tool-card shipped with the Equinox 73. Inside the wall box is a rectangular ring that must be parallel with the wall surface and 1” behind the wall surface on the left and right sides. Loosen the two inside screws and use this tool to set the mounting ring depth at 1”.
Need help?
Do you have a question about the Equinox 73 EQ73TB-TI and is the answer not in the manual?
Questions and answers