Table of Contents
Advertisement
Advertisement
Table of Contents

Subscribe to Our Youtube Channel
Related Manuals for RTS DBP 4M


Summary of Contents for RTS DBP 4M
- Page 1 DBP Digital Beltpack DBP 4M | DBP 4F | DBP 5F Technical Manual...
-
Page 3: Table Of Contents
DBP Digital Beltpack Table of contents | en Table of contents Safety Copyright and Disclaimer Notices Important safety instructions Introduction Features Reference view Belt clip removal and replacement Cabling To OMS To OMI To ODIN Install the Bluetooth dongle Create an Intercom connection Connect to OMS using Connect Devices Configure intercom OMNEO ports to make connection offers 6.2.1... - Page 4 en | Table of contents DBP Digital Beltpack 9.1.2 DHCP 9.1.3 IP Address 9.1.4 Netmask 9.1.5 Gateway 9.1.6 DNS Server 9.1.7 Domain 9.1.8 MAC Address Setup | Offers 9.2.1 DBP Offers 9.2.2 Aux Offers Setup | Key Assignments Setup | Service 9.4.1 Tone 9.4.2...
-
Page 5: Table Of Contents | En
DBP Digital Beltpack Table of contents | en 9.13 Call Alerts 9.13.1 Call Beep 9.13.2 Call Vibration 9.14 Information 9.15 Bluetooth 9.15.1 Ready to Pair 9.15.2 Paired Headsets 9.15.3 Paired Aux Devs 9.16 Display 9.16.1 Display Mode 9.16.2 Brightness 9.16.3 Screen Saver 9.16.4 Screen Flip... -
Page 6: Safety
en | Safety DBP Digital Beltpack Safety Copyright and Disclaimer All rights reserved. The product information and design disclosed herein were originated by and are the property of Bosch Security Systems, LLC. Bosch reserves all patent, proprietary design, manufacturing, reproduction, use and sales rights thereto, and to any article disclosed therein, except to the extent rights are expressly granted to others. -
Page 7: Important Safety Instructions
DBP Digital Beltpack Safety | en Warning! To reduce the risk of fire or electric shock, do not expose this apparatus to rain or moisture. Important safety instructions Read these instructions. Keep these instructions. Heed all warnings. Follow all instructions. Do not use this apparatus near water. -
Page 8: Introduction
DBP Digital Beltpack Introduction The DBP (Digital Belt Pack) is one of RTS' initial offerings in the wired digital party line solution space. The DBP provides two modes in which the DBP can operate for up to four configurable audio conferences. There are two modes DBP can operate, KP (Keypanel) mode and PL (Party Line) mode. -
Page 9: Reference View
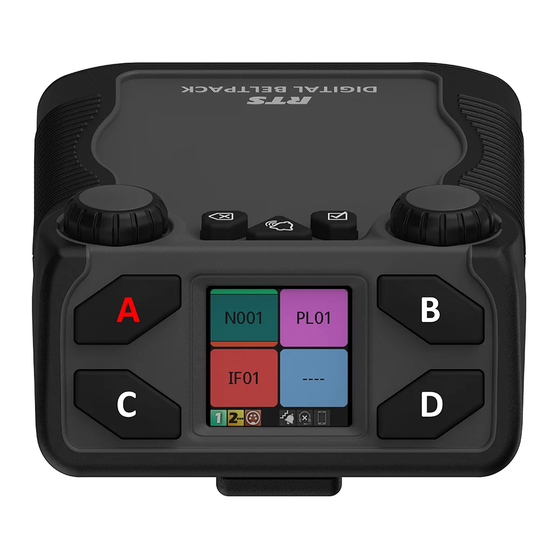
DBP Digital Beltpack Reference view | en Reference view 2 3 4 11 12 Master Volume Control knob / Key A and C Volume knob CLR/BACK button CALL button SEL/MENU button Master Volume Control knob / Key B and D Volume knob Lanyard loop Belt Clip USB Bluetooth dongle connector... -
Page 10: Belt Clip Removal And Replacement
en | Reference view DBP Digital Beltpack Belt clip removal and replacement To remove the belt clip, do the following: Lift the tension clip (1) up. With the tension clip up, slide the belt clip out of the belt clip track (2). To replace the belt clip, do the following: Align and slide the belt clip into the belt clip track (2). -
Page 11: Cabling
DBP Digital Beltpack Cabling | en Cabling To OMS Notice! PoE is not necessary as long as it is on a network that can reach the DBP. To cable the DBP to an OMS main station, do the following: Using a CAT-5e cable, attach one end to the PoE IN connector on the DBP. Connect the other end of the cable to an approved PoE switch. -
Page 12: To Omi
en | Cabling DBP Digital Beltpack For information on connecting the DBP to the OMS, see Configure OMS to make a connection offer, page 16 . To OMI To cable a DBP to an OMI card, do the following: Using a CAT-5e cable, attach one end to the PoE IN connector on the DBP. Connect the other end of the cable to an approved PoE switch. -
Page 13: Poe
The Digital Belt Pack includes a PoE In and PoE Out connector that allows multiple DBPs to be daisy chained from the same switch port. RTS recommends use of an 802.3at compliant PoE switch for daisy chaining. RTS guidance on the number of DBPs that can be daisy chained from an 802.3at port are as follows: –... - Page 14 en | Cabling DBP Digital Beltpack Notice! It is possible to use PoE injectors on the end of a daisy chain to extend the number of DBPs and cable lengths supported Using more than 6 DBPs on the same 802.3at switch port may result in unreliable beltpack operation.
-
Page 15: Install The Bluetooth Dongle
DBP Digital Beltpack Install the Bluetooth dongle | en Install the Bluetooth dongle It is best to install the dongle when there is no power to the device. If you install the dongle while the DBP is on, the belt pack recognizes the dongle and reboots to initialize the hardware properly. -
Page 16: Create An Intercom Connection
en | Create an Intercom connection DBP Digital Beltpack Create an Intercom connection Connect to OMS using Connect Devices To connect OMNEO devices via the OMS front panel UI, do the following: Navigate to Connect Devices menu itemmenu item (Configuration | Ports | Connect Devices). -
Page 17: Configure Odin To Make A Connection Offer
DBP Digital Beltpack Create an Intercom connection | en Notice! If you are connecting a DBP or Keypanel in order to power it up on this port, choose Channel 1. Any other port is an Aux port and the DBP has only two channels. Enter the device name of the partner device to connect to this port. -
Page 18: Accept A Connection Offer On Dbp
en | Create an Intercom connection DBP Digital Beltpack 13. (Optional) Select the latency to use for this connection. (1 ms is recommended for best quality). 14. Click the left encoder knob to exit the screen. A Changes Made confirmation message displays. 15. -
Page 19: Configure An Omneo Channel For Dbp Using Ipedit
DBP Digital Beltpack Create an Intercom connection | en Select one or more available devices. The Add button becomes active. Click the Add button. The device catalog displays the selected devices. Click the Done button. The screen closes. 6.4.2 Configure an OMNEO channel for DBP using IPedit To configure an OMNEO channel for DBP using IPedit, do the following: Notice! The Destination Type does not need to be selected if using the Browse window to select the... - Page 20 en | Create an Intercom connection DBP Digital Beltpack In the Destination Device Name field, click the … button. The Discovered Devices screen displays. Expand the tree to view the destination devices available. Select the desired device for the destination. Click OK.
-
Page 21: Configure The Dbp To Accept An Omneo Offer Using Ipedit
DBP Digital Beltpack Create an Intercom connection | en 6.4.3 Configure the DBP to accept an OMNEO offer using IPedit As an alternative to accepting offers through the DBP user interface, use IPedit to configure the DBP to accept connection offers from ODIN. For information on using the DBP user interface to accept connection offers, refer to Accept a connection offer on DBP, page 18 . -
Page 22: Create Connections Using Azedit
en | Create an Intercom connection DBP Digital Beltpack Expand the tree to view the destination devices available. Select the desired device for the destination. Click OK. The screen closes. Select the channel to which the device connects. Notice! Be sure to configure the DBP channel to the configured ODIN channel. For example, if ODIN channel 5 is configured for DBP channel 1, then DBP channel 1 should be configured to ODIN channel 5. -
Page 23: Configure An Omi Card To Make A Connection Offer
DBP Digital Beltpack Create an Intercom connection | en Enter the Device Name of the device to which you want to connect. Use the browse button to open the available devices screen to select a device. The IP Address of the device automatically populates the IP Address field. Select the Device Type to which you want to connect. - Page 24 en | Create an Intercom connection DBP Digital Beltpack From the Local Channel drop down menu, select the channel to use to communicate across the network. Notice! Available channels appear with an asterisk next to them. Enter the name of the device to which you want to make a connection. Select the Browse button to select from a list of devices.
-
Page 25: Modes Of Operation
DBP Digital Beltpack Modes of operation | en Modes of operation DBP has two modes of operation, PL (Party Line) mode and Keypanel mode. When the belt pack connects to an OMS, it runs in PL mode. When it connects to an ODIN or an OMI card in an ADAM or ADAM M frame, it runs in Keypanel mode. -
Page 26: Basic Operation
en | Basic Operation DBP Digital Beltpack Basic Operation Main screen icons The main screen icons help you get a snapshot of connection states of the DBP. DBP connected to intercom DBP connected to intercom, but muted DBP expecting a connection DBP has offers Aux connected to the intercom Aux connected to the intercom, but muted... -
Page 27: Navigation Basics
DBP Digital Beltpack Basic Operation | en Bluetooth headset paired, present, and selected Bluetooth headset paired, selected, not present Bluetooth device, nothing paired Bluetooth device paired, not present Bluetooth device paired, present, not selected Bluetooth device paired, present, and selected Bluetooth device paired, selected, not present New CWW entries are present Existing CWW entries are present... -
Page 28: Hot Keys
en | Basic Operation DBP Digital Beltpack Enters a sub-menu, activates a menu item, or saves changes to an activated menu item (applies to the shaft encoder as a push button). SEL/MENU button Enters the menu from the home screen. Selects a sub-menu from the main menu. - Page 29 DBP Digital Beltpack Basic Operation | en Press and hold the CALL Acts as SHIFT. Press any TALK keys while button (in Keypanel holding the SHIFT key toggles the key to a Mode) LISTEN state. Release the Call key to exit SHIFT mode. Press and hold the CLR/ Displays the Connection status.
- Page 30 en | Basic Operation DBP Digital Beltpack Receiving an incoming call signal: Pressing the TALK key If the TALK key is on, it stays on when you cancels the CALL beep release the TALK button. and vibration. If the TALK key is not on, it turns on and stays on if you let go within the latching period.
-
Page 31: Ui Controls
DBP Digital Beltpack Basic Operation | en For a few widget types, the A/C shaft encoder and the B/D shaft encoder do different actions. For example, while editing an IP address or a text field (like the device name or domain), the A/C shaft encoder moves the “cursor”... -
Page 32: Volume Adjustment
en | Basic Operation DBP Digital Beltpack Volume adjustment There are two volume adjustments available on the belt pack: Master Volume and key Listen volume. Master volume adjustment To adjust the master volume, do the following: Click or rotate either shaft encoder. A volume bar appears on the display screen. - Page 33 DBP Digital Beltpack Basic Operation | en Rotate the A/C shaft encoder to adjust the volume. The volume bar increases or decreases depending on the adjustment made. The belt pack exits volume adjustment mode after five seconds of inactivity. Notice! To adjust the volume for key B and D, follow the same instructions for key A and C, except use the B/D shaft encoder.
-
Page 34: Call Signaling (Pl Mode Only)
en | Basic Operation DBP Digital Beltpack Click the A/C shaft encoder once for key A and twice for key C. The listen volume adjustment for the key activates and a volume bar appears on the key. Click and hold the A/C shaft encoder until Muted disappears from the individual PL key assignment. -
Page 35: Call Waiting Window
DBP Digital Beltpack Basic Operation | en Call waiting window Notice! Do not confuse call signaling with incoming calls. Party lines use call signaling to notify users that someone is trying to get their attention. Incoming calls are direct point-to-point calls from another panel to the belt pack. - Page 36 en | Basic Operation DBP Digital Beltpack Remove an entry from the CWW To remove an entry from the CWW, do the following: While the CWW is open, press CLEAR (Key C). The CLEAR button lights red and the call disappears from the list. Show the CWW To show the CWW, do the following: On the home screen, press the CLR/BACK button.
-
Page 37: Bluetooth
DBP Digital Beltpack Basic Operation | en Bluetooth The DBP supports Bluetooth technology allowing connections to Bluetooth enabled devices, if desired. To use Bluetooth on the DBP, the device must have an approved Bluetooth dongle installed. For more information, see Install the Bluetooth dongle, page 15 . The Bluetooth menu item appears grey when the dongle is not present in the device. - Page 38 en | Basic Operation DBP Digital Beltpack Press the SEL/MENU button to answer the call or press the CLR/BACK button to ignore the call. A Call Connected popup notification appears. Press the SEL/MENU button again to display the call management screen. Press the SEL/MENU button to hang up.
-
Page 39: Phone Call Management Window
DBP Digital Beltpack Basic Operation | en 8.9.2 Phone call management window Use the Phone Call Management window to patch incoming calls through to the intercom or hang up the phone. Figure 8.3: Call Management Screen 8.9.3 Patch a phone call to the Intercom To patch a phone call to the intercom, do the following: When a phone call comes into the belt pack via a Bluetooth device, a popup screen appears. -
Page 40: Upgrade Firmware
en | Basic Operation DBP Digital Beltpack Rotate either shaft encoder to navigate to To Intercom. Press the SEL/MENU. The audio routes to the intercom. Notice! To Intercom is a toggled state. Turn it on and off by pressing the SEL/MENU button while on this item. - Page 41 DBP Digital Beltpack Basic Operation | en 6.7.0 or later AZedit 5.6.0 or later IPedit 3.7.0 or later FWUT 6.20 or later (Firmware Upload Tool) Tab. 8.2: Software requirement To upgrade the firmware using the Firmware Upload Tool, do the following: Open the Firmware Upload Tool.
- Page 42 en | Basic Operation DBP Digital Beltpack Click the Upload button. The Select firmware for upload window opens. 2021-06 | 01 | F.01U.380.825 Bosch Security Systems, LLC Technical Manual...
- Page 43 DBP Digital Beltpack Basic Operation | en Select the firmware to upload. 10. Click the Start button. The Select firmware for upload window closes. The progression bar next to the device shows the download progress. Once the update is complete, the device reboots automatically.
-
Page 44: Download Screen Saver Images Or Splash Screen Images
en | Basic Operation DBP Digital Beltpack To upgrade the firmware using AZedit, do the following: Open AZedit. From the Status menu, select Software Versions | Port. Select the port to update. Select multiple ports by holding the CTRL key down while making selections. Right-click the highlighted selections. - Page 45 DBP Digital Beltpack Basic Operation | en Right-click the highlighted selections. A popup menu displays. Select Download screen saver… or Download splash screen… . A Windows explorer screen appears. Navigate to the desired file. Click Open. The Download Screen Saver File screen opens. Select the DBP radio button from the Panel Size group box.
-
Page 46: Menu Structure
en | Menu Structure DBP Digital Beltpack Menu Structure The main DBP menu structure has six sub-menus, two of which (Setup and Audio) are also main menus with sub-menus: Figure 9.1: Main Menu – Setup - Use to configure the network, connection offers, key assignments, service items (such as enabling tone, entering test mode, and performing resets), setting authentication, and configuring key modes. -
Page 47: Device Name
DBP Digital Beltpack Menu Structure | en Figure 9.2: Network Menu Notice! Any changes made to the network information are not active until leaving the Network menu. A Save prompt appears so that all change approvals occur at the same time. 9.1.1 Device Name Use the Device Name menu item to configure the name of the device. -
Page 48: Dhcp
en | Menu Structure DBP Digital Beltpack Notice! If you press and hold the A/C shaft encoder, the highlighted character turns red, and then deletes after a couple of seconds. If you release the encoder while it is red, but before it deletes, then nothing happens. -
Page 49: Netmask
DBP Digital Beltpack Menu Structure | en Press the SEL/MENU button. The first octet highlights. Rotate the B/D shaft encoder to make changes. Rotate the A/C shaft encoder to move to the next octet. Repeat step 3 until the address is complete. Press the SEL/MENU button to confirm the change, or press the CLR/BACK button to abort changes. -
Page 50: Gateway
en | Menu Structure DBP Digital Beltpack Notice! Navigation between octets is automatic depending on which way you rotate the shaft encoder. Rotating the encoder counterclockwise expands the address range, while rotating the encoder clockwise shrinks the address range. Rotate either shaft encoder clockwise to expand the address range or counterclockwise to shrink the address range. -
Page 51: Dns Server
DBP Digital Beltpack Menu Structure | en Rotate the B/D shaft encoder to make changes. Rotate the A/C shaft encoder to move to the next octet. Repeat step 3 until the address is complete. Press the SEL/MENU button to confirm the change, or press the CLR/BACK button to abort changes. -
Page 52: Domain
en | Menu Structure DBP Digital Beltpack Rotate the B/D shaft encoder to make changes. Rotate the A/C shaft encoder to move to the next octet. Repeat step 3 until the address is complete. Press the SEL/MENU button to confirm the change, or press the CLR/BACK button to abort changes. -
Page 53: Mac Address
DBP Digital Beltpack Menu Structure | en Notice! If you press and hold the A/C shaft encoder, the highlighted character turns red, and then deletes after a couple of seconds. If you release the encoder while it is red, but before it deletes, then nothing happens. -
Page 54: Aux Offers
en | Menu Structure DBP Digital Beltpack Press the SEL/MENU button to confirm the change, or press the CLR/BACK button to abort changes. The DBP disconnects from the current offer and reconnects to the newly selected offer. 9.2.2 Aux Offers Use the Aux Offers menu item to configure the DBP to communicate via an intercom port. - Page 55 DBP Digital Beltpack Menu Structure | en Notice! You only need to press SEL/MENU if you use the shaft encoder to select the key. If you press A-D to select the key, it enters the edit mode directly. Press the SEL/MENU button. The talk key LED turns red and the display shows the talk key as scrollable.
-
Page 56: Setup | Service
en | Menu Structure DBP Digital Beltpack Notice! To remove an assignment from a key, assign NULL to the key. To change the assignment type of a key in keypanel mode, do the following: While changing the assignment of a key, press and hold the assignment type key. This moves the scroll highlight to the assignment type. -
Page 57: Test Mode
DBP Digital Beltpack Menu Structure | en Rotate either shaft encoder to toggle between choices. Press the SEL/MENU button to confirm the change, or press the CLR/BACK button to abort changes. 9.4.2 Test Mode Use the Test Mode menu item to check the operation of all keys and displays on the belt pack. To enter test mode, do the following: Navigate to the Test Mode menu item (Setup | Service | Test Mode). -
Page 58: User Reset
en | Menu Structure DBP Digital Beltpack Press each A through D key, CLR/BACK, CALL, and SEL/MENU buttons to check operation. The A through D letters light in white and then in red, each time you press the button, and the corresponding LEDs on the physical buttons light in the same color. The icons on the CLR/BACK, CALL, and SEL/MENU keys light white when pressed and the corresponding LEDs on the physical buttons light as well. -
Page 59: Factory Reset
DBP Digital Beltpack Menu Structure | en Press and hold the SEL/MENU button for 3 seconds. A three-second countdown screen appears and then the configuration resets. The DBP does not reboot after a User Reset. 9.4.4 Factory Reset Use the Factory Reset menu item to set the device back to its original factory settings. The factory reset differs from a user reset in that the factory reset deletes all paired Bluetooth devices, any user splash screen or screen saver, any selected offers/partners, and restores the original factory network settings, which includes the device name. - Page 60 en | Menu Structure DBP Digital Beltpack To perform a factory reset, do the following: Navigate to the Factory Reset menu item (Setup | Service | Factory Reset). Press the SEL/MENU button. The field becomes active. Press the SEL/MENU button. The Factory Reset confirmation message appears.
-
Page 61: Setup | Authentication
DBP Digital Beltpack Menu Structure | en Setup | Authentication Use the Authentication menu to enable or disable PIN entry and set the PIN entry security. When authentication is active, entry of a PIN code is necessary to access the menu structure. Notice! Confirmation of the PIN, if Authentication is enabled, occurs upon exiting the menu or the PIN is changed. -
Page 62: Set Pin
en | Menu Structure DBP Digital Beltpack Notice! If a PIN already exists, you are able to enable or disable the PIN entry. However, after enabling the PIN entry when there is an existing PIN, when exiting the menu a prompt asks for the PIN before enabling authentication. -
Page 63: Setup | Key Modes
DBP Digital Beltpack Menu Structure | en Setup | Key Modes Use the Key Modes menu item to configure the behavior of the DBP talk buttons. Available options Latching - Tap the talk key on, and then tap the talk key off. However, if you press and hold, the talk key turns on, but then turns off when you let the key go. -
Page 64: Echo Canceller
en | Menu Structure DBP Digital Beltpack The range for this field is Disabled, -30 dB to 0 dB The default setting is -20 dB To set the sidetone, do the following: Navigate to the Sidetone menu item (Audio | Headset | Sidetone). Press the SEL/MENU button. -
Page 65: Audio | Microphone
DBP Digital Beltpack Menu Structure | en Rotate either shaft encoder to toggle between choices. Press the SEL/MENU button to confirm the change, or press the CLR/BACK button to abort changes. Audio | Microphone Use the Microphone menu item to select the active mic, adjust mic gain for the active mic, enable the hot mic, set the noise gate for the active mic, select the XLR mic type, allow/ disallow mic kill signals, and to send a mic kill signal. -
Page 66: Hot Mic
en | Menu Structure DBP Digital Beltpack Notice! Although the default Mic Gain is 0 dB for all mic selections, transmission levels of 3.5mm electret microphone vary significantly between different manufacturers and models. The adjustment range of ±10 dB is provided to allow these 3.5mm microphones to be normalized to desired network levels. -
Page 67: Noise Gate
DBP Digital Beltpack Menu Structure | en Rotate either shaft encoder to toggle between choices. Press the SEL/MENU button to confirm the change, or press the CLR/BACK button to abort changes. 9.8.4 Noise Gate The Noise Gate menu item adjusts the noise gate for the active mic. The Mic Select menu item selects the active mic. -
Page 68: Xlr Mic Type
en | Menu Structure DBP Digital Beltpack 9.8.5 XLR Mic Type Use the XLR Mic Type menu item to select the type of XLR mic. Notice! The XLR Mic Type menu item is only visible if the Mic Select is used to select the XLR mic. The available options for this field are: A = automatic detection of the XLR microphone type (either Electret or Dynamic) E = Electret microphones... -
Page 69: Send Mic Kill
DBP Digital Beltpack Menu Structure | en Press the SEL/MENU button. The field becomes active. Rotate either shaft encoder to toggle the selections. Press the SEL/MENU button to confirm the change, or press the CLR/BACK button to abort changes. 9.8.7 Send Mic Kill Use the Send Mic Kill menu item to send an inaudible signal that forces all devices on the affected party lines to stop talking. -
Page 70: Audio | 3.5Mm Aux
en | Menu Structure DBP Digital Beltpack Press the SEL/MENU button to send the signal. A Sent confirmation message appears. Press the CLR/BACK button to cancel the send. Audio | 3.5mm Aux Use the 3.5mm Aux menu items to select the Aux mode and adjust the Aux input and output gain levels. -
Page 71: Input Gain
DBP Digital Beltpack Menu Structure | en Rotate either shaft encoder to scroll through the selections. Press the SEL/MENU button to confirm the change, or press the CLR/BACK button to abort changes. 9.9.2 Input Gain Use the Input Gain menu item to adjust the volume of the Aux Input. To adjust the input gain, do the following: Navigate to the Input Gain menu item (Audio | Aux Levels | Input Gain). -
Page 72: Audio | Bt Aux Levels
en | Menu Structure DBP Digital Beltpack Rotate either shaft encoder to adjust the level. Press the SEL/MENU button to confirm the change, or press the CLR/BACK button to abort changes. 9.10 Audio | BT Aux Levels 9.10.1 Input Gain Use the Input Gain menu item to adjust the Bluetooth Aux input gain level. -
Page 73: Audio | Omneo Ch 2 Levels
DBP Digital Beltpack Menu Structure | en Press the SEL/MENU button. The field becomes active. Rotate either shaft encoder to adjust the level. Press the SEL/MENU button to confirm the change, or press the CLR/BACK button to abort changes. 9.11 Audio | OMNEO CH 2 Levels Use the OMNEO CH 2 Levels menu item to configure OMNEO Aux input and output gain levels for OMNEO channel 2. -
Page 74: Output Gain
en | Menu Structure DBP Digital Beltpack 9.11.2 Output Gain Use the Output Gain menu item to adjust the level of output audio gain on OMNEO channel 2. The range for this field is -10 dB to 10 dB The default is 0 dB. To adjust output gain, do the following: Navigate to the Input Gain menu item (Audio | OMNEO CH2 Levels | Output Gain). -
Page 75: Headset Left
DBP Digital Beltpack Menu Structure | en Press the SEL/MENU button. The field becomes active. Rotate the A/C shaft encoder to scroll through the selections. Rotate the B/D shaft encoder to select or deselect the item. Press the SEL/MENU button to confirm the change, or press the CLR/BACK button to abort changes. -
Page 76: Headset Right
en | Menu Structure DBP Digital Beltpack Press the SEL/MENU button to confirm the change, or press the CLR/BACK button to abort changes. 9.12.3 Headset Right Use the Headset Right menu item to select which input sources are routed to the right channel of the headset independently to those routed to the left channel By default, From Intercom is selected. -
Page 77: 3.5Mm Aux Out
DBP Digital Beltpack Menu Structure | en Rotate the A/C shaft encoder to scroll through the selections. Rotate the B/D shaft encoder to select or deselect the item. Press the SEL/MENU button to confirm the change, or press the CLR/BACK button to abort changes. -
Page 78: Bluetooth Out
en | Menu Structure DBP Digital Beltpack To select the input sources routed to OMNEO Ch2 Out, do the following: Navigate to the OMNEO Ch2 Out menu item (Audio | Mixers | OMNEO Ch2 Out). Press the SEL/MENU button. The field becomes active. Rotate the A/C shaft encoder to scroll through the selections. -
Page 79: Call Alerts
DBP Digital Beltpack Menu Structure | en Rotate the A/C shaft encoder to scroll through the selections. Rotate the B/D shaft encoder to select or deselect the item. Press the SEL/MENU button to confirm the change, or press the CLR/BACK button to abort changes. -
Page 80: Call Vibration
en | Menu Structure DBP Digital Beltpack 9.13.2 Call Vibration Use the Call Vibration menu item to set the vibration intensity when receiving a call signal. Notice! You can use call beep and call vibration at the same time, if desired. There are three settings Off, Low, and High. -
Page 81: Bluetooth
DBP Digital Beltpack Menu Structure | en To display this information, do the following: Navigate to the Information menu item. Press the SEL/MENU button. The menu opens. Rotate either shaft encoder to scroll through the selections. Cycling through the haptic settings for low and high, the DBP vibrates to give an indication of the vibration strength and frequency. - Page 82 en | Menu Structure DBP Digital Beltpack Rotate either shaft encoder to scroll available devices. Press the SEL/MENU button to select a device for pairing. A Pair… prompt appears. Press the SEL/MENU button to start pairing. A progress bar appears on the screen. A message appears on the screen when pairing is complete.
-
Page 83: Paired Headsets
DBP Digital Beltpack Menu Structure | en Notice! You may need to allow pairing to proceed on the device to which the belt pack is connecting. 9.15.2 Paired Headsets The Paired Headsets menu item contains a list of headsets previously paired to the DBP. Use this menu item to connect, disconnect, or unpair Bluetooth enabled headsets for use with the belt pack. -
Page 84: Paired Aux Devs
en | Menu Structure DBP Digital Beltpack Rotate either shaft encoder to select Connect or Disconnect. Press the SEL/MENU button to initiate the action. A Connecting progress bar appears on the screen. When it finishes the connection, a Completed message appears on the screen. The connection attempt can also fail sometimes and shows a red failed message. - Page 85 DBP Digital Beltpack Menu Structure | en To connect, disconnect, or unpair a Bluetooth device, do the following: Navigate to the Paired Aux Devs menu item (Bluetooth | Paired Aux Devs). Press the SEL/MENU button. The field is active if Bluetooth devices are available, otherwise the menu item does not activate.
-
Page 86: Display
en | Menu Structure DBP Digital Beltpack 9.16 Display Use the Display menu to configure display mode, brightness, screen saver timeout, and the orientation of the screen. 9.16.1 Display Mode Use the Display Mode menu item to select a predefined display brightness. There are three modes from which to choose. -
Page 87: Brightness
DBP Digital Beltpack Menu Structure | en Rotate either shaft encoder to scroll through the options. Notice! As you switch between the different modes, the Brightness bar graph changes to show the brightness level for that mode. You can edit the brightness of the mode by selecting the mode and then modifying the brightness of the selected mode in the Brightness menu item. -
Page 88: Screen Saver
Download screen saver images or splash screen images, page 44 . The DBP contains a default screen saver of the RTS logo. Available options: Disabled, 5 Minutes, 10 Minutes, 20 Minutes, 30 Minutes, 1 Hour, 2 Hours, 4 Hours, 6 Hours, 8 Hours, 10 Hours, and 12 Hours. - Page 89 DBP Digital Beltpack Menu Structure | en Rotate either shaft encoder to enable screen flip. The screen display flips. Press the SEL/MENU button to confirm the change, or press the CLR/BACK button to abort changes. Bosch Security Systems, LLC 2021-06 | 01 | F.01U.380.825 Technical Manual...
-
Page 90: Icons
en | Icons DBP Digital Beltpack Icons The Digital Belt Pack has a graphical icon menu system to navigate easily to menu items. Setup Menu Enter the Setup menu Network Menu Enter the Network menu Device Name Configure the Device Name DHCP Enable/Disable DHCP IP Address... - Page 91 DBP Digital Beltpack Icons | en Audio Enter the Audio menu Headset Enter the Headset menu Sidetone Adjust the Sidetone. The type of sidetone adjustment (XLR, Bluetooth, or 3.5mm) is dependent upon the active mic selection made in the Mic Select menu Echo Canceller Enable/Disable the Echo Canceller Microphone...
- Page 92 en | Icons DBP Digital Beltpack Headset L+R Configure the mixes to Headset Left and Right Headset Left Configure the mixes to Headset Left only Headset Right Configure the mixes to Headset Right only To Intercom Configure the mixes to To Intercom 3.5mm Aux Out Configure the mixes to 3.5mm Aux Out OMNEO Ch2 Out...
-
Page 93: Technical Data
DBP Digital Beltpack Technical data | en Technical data Power Supply DC PoE: 802.3af / 802.3at Maximum Power Consumption: 4.0 W (PoE DC Input) Environmental Operating Temperature: -4° F to 113° F (-20° C to 45° C) 5% to 90% relative humidity Storage Temperature: -4°... - Page 94 en | Technical data DBP Digital Beltpack Frequency Response (600 Ohm load) 25 Hz to 20 kHz OMNEO Ports (PoE In and PoE Out) Maximum Capacity: 2 Full-duplex ports Copper Connector Type: RJ-45 Format: IEEE 802.3 compliant Copper Ethernet Speed: 100/1000 Mbps Bluetooth Bluetooth Version: 4.0 Supported dongles: IO Gear GBU522...
- Page 95 DBP Digital Beltpack Technical data | en Headset Connector 5-Pin Dynamic 5-Pin Electret 4-Pin Dynamic 4-Pin Electret Pin 1 Mic - Ground Mic - Ground Pin 2 Mic + Mic + Pin 3 Speaker - Speaker - Speaker - Speaker - Pin 4 Left Speaker + Left Speaker +...
- Page 96 | Technical data DBP Digital Beltpack 2021-06 | 01 | F.01U.380.825 Bosch Security Systems, LLC Technical Manual...
- Page 98 12000 Portland Avenue South Burnsville MN 55337 www.rtsintercoms.com © Bosch Security Systems, LLC, 2021 202106141758...
Need help?
Do you have a question about the DBP 4M and is the answer not in the manual?
Questions and answers