Table of Contents
Advertisement
Quick Links
Advertisement
Table of Contents

Related Manuals for Escort Passport GT2


Summary of Contents for Escort Passport GT2
- Page 1 V E H I C L E P E R F O R M A N C E C O M P U T E R...
-
Page 2: Table Of Contents
WARNING Index The manufacturer is not responsible for any accidents, property damage, or injuries that occur while using One-button Operation the Performance Computer. Quick Start Guide Like your car’s speedometer, this device is no more than a measuring instrument, a tool that can be used to Remote Control Cord measure vehicle performance. -
Page 3: Quick Start Guide
Quick Start Guide Please read the entire manual to learn details of the many capabilities of your new Performance Computer. This page provides only a basic overview of the instal- lation, features, and capabilities. INSTALLATION 1) Plug into lighter socket Plug the cord into the Performance Computer, and into your car’s lighter socket. -
Page 4: Remote Control Cord
Installation Mounting Location Unit must be mounted squarely in car Mount the unit on the windshield, centered between Mount the unit on the windshield, centered between driver and passenger. The unit must be straight across driver and passenger. The unit must be straight across the car. -
Page 5: How It Works
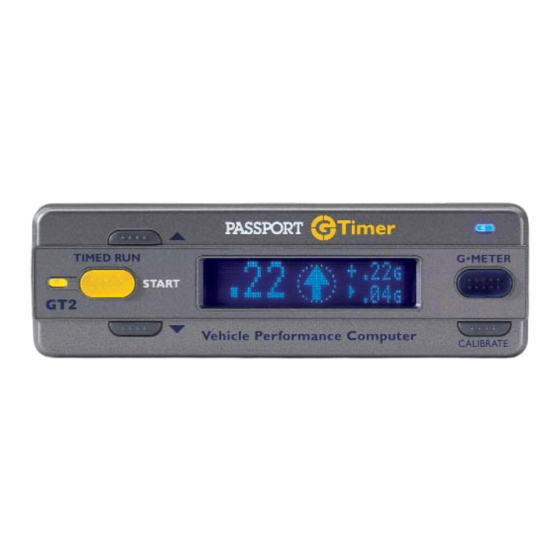
How it works Specifications The Performance Computer measures Accelerometer 2-axis, +2G range, high-resolution digital outputs. the performance of your car by sensing acceleration forces. Processor An internal precise digital 2-axis accelerometer tracks Advanced RISC-based 8-bit microcontroller with 128KB your car’s acceleration, braking, and cornering forces Flash Program Memory, 4KB SRAM, 4KB EEPROM, approximately 200 times each second. - Page 6 G-METER OPTION 1: BAR GRAPHS Press and release the G-METER button as necessary to select “G-METER OPTION 1.” This display shows straightforward bar graphs of G-Forces. The top line shows acceleration and braking forces; the bottom line shows cornering forces. The default scale for the Bar Graphs is .80 G full scale.
- Page 7 G-METER OPTION 3: PEAK HOLD Press and release the G-METER button as necessary to Showing a recent acceleration peak of .38G. select “G-METER OPTION 3.” This display shows the peaks in acceleration, braking, left cornering, and right cornering G-Forces, and “holds”...
- Page 8 G-METER OPTION 7: RACEMONITOR .10 Press and release the G-METER button as necessary to The car is accelerating and turning left with a select “G-METER OPTION 7.” This display shows only the combined vector forces (see the explanation in G-METER option 2: Friction Circle). In addition to a large numerical readout of the com- bined G-Force and an arrow showing the approximate Since the default Meter Maximum is .80G,...
- Page 9 Timed Runs Your Performance Computer’s intuitive “one-button” 1: HOW TO START A TIMED RUN operation makes timing your car’s performance easy. Car must be stopped. You start the process by pressing the TIMED RUN but- ton. The unit performs an internal calibration, then the Press and release the timer starts automatically when you accelerate, and TIMED RUN button.
- Page 10 4: REVIEWING DETAILED RUN RESULTS The Performance Computer automatically records all Here is an example of the data you can run data during a timed run. To review the data after view after each timed run. the run, press the UP and DOWN buttons. Each time you press the DOWN button, The data for your 10 most recent runs is automatically you will see another screen of data.
-
Page 11: Measuring Horsepower
Measuring Horsepower For the performance computer to accurately measure To accurately measure engine your car’s horsepower, you must enter information horsepower, the following six about your vehicle’s weight, drivetrain loss, and aero- setup items must be correct: dynamic qualities. Vehicle Weight • HP Min Speed • HP Max Speed Note: This setup is optional, and is NOT necessary for HP Drivetrain Loss •... - Page 12 Estimate your vehicle’s CDA How to determine the CDA of your car: There are three possible ways to determine the CDA Use the following examples to estimate the CDA for of your car: your vehicle. • Find specifications for your car’s CDA •...
- Page 13 Setup Mode The Setup mode lets you enter your car’s weight and HOW TO ENTER THE SETUP MODE make other selections to optimize horsepower mea- surement, and also customize the operation of other Hold the G-METER button. features. After 5 seconds, you will see G-Meter and Timed Run accuracy these two alternating instructions: For most cars, it is not necessary to...
- Page 14 pensions can change this setting for more accurate cor- DETAILS ON SETUP MODE ITEMS nering G-Force measurements. To enter the Setup Mode, hold the G-METER button. For cars with very soft suspension, change to 6.0. Then follow the on-screen instructions, which are: For cars with soft suspension, change to 4.5.
- Page 15 DETAILS ON SETUP MODE ITEMS (cont’d) 16 BRAKE TEST You must change this setting if you want your Performance Computer to perform brake tests. 15 END TIMED RUN Most users won’t need to adjust this setting. You can choose to include “60mph to zero” brake test- You can choose to end timed runs automatically, or time ing in timed runs.
-
Page 16: Optional Accessories
DETAILS ON SETUP MODE ITEMS (cont’d) 21 DATALOGGER Most users won’t need to adjust this setting. You can enable a special mode that allows saving a 19 TRIGGER Most users won’t need to adjust this setting. single 5 minute log of acceleration in memory, for This sets the G-Force criteria to start timed runs. -
Page 17: Troubleshooting
Troubleshooting run at the drag strip, since changes in your position of See additional troubleshooting tips, FAQ’s, and other only a few inches will significantly affect the drag strip information on our website, or email us at: times due to rollout. support@escortinc.com •... -
Page 18: Warranty
Payment can be made by check, money support@escortinc.com order, or credit card. Mail the unit and Power Cord To: To arrange service, call us toll-free at: ESCORT 1-800-543-1608 Customer Service Department We may be able to solve your problem over the phone. - Page 19 Escort Incorporated 5440 West Chester Road West Chester, Ohio 45069 Sales 800-433-3487 Service 800-543-1608 www.gtimer.com ©2003 Escort Inc. Escort ® , Passport ® and G-Timer ™ are trademarks of Escort Inc. Features, specifications and prices subject to change without notice.
Need help?
Do you have a question about the Passport GT2 and is the answer not in the manual?
Questions and answers