
Related Manuals for AEG 61370MF-AN


Summary of Contents for AEG 61370MF-AN
- Page 1 All manuals and user guides at all-guides.com 61370MF-an Glass Ceramic Cooking Surface Operating Instructions Installations Instructions...
- Page 2 All manuals and user guides at all-guides.com Dear customer, Please read these operating instructions through carefully. Above all, please take note of the «Safety» section on the first few pages. Please keep these operating instructions for later reference. Pass them on to any subsequent owner of the appliance.
-
Page 3: Table Of Contents
All manuals and user guides at all-guides.com Content CONTENT OPERATING INSTRUCTIONS ......Safety ..........Disposal . -
Page 4: Operating Instructions
Repairs to the appliance should only be carried out by approved service engineers. Improper repairs can cause injury or significant malfunction. If your appliance needs repairing, please contact your local AEG Service Force Centre. If your appliance malfunctions, or fractures, cracks or splits appear: - switch off all cooking zones, - Disconnect the hob from the electricity supply. - Page 5 All manuals and user guides at all-guides.com Operating Instructions (GB) Safety When Cleaning For safety reasons do not clean the appliance with a steam jet or high pres sure cleaner. Clean the hob in accordance with the maintenance and cleaning instruc tions in this manual.
-
Page 6: Disposal
All manuals and user guides at all-guides.com Operating Instructions (GB) Disposal Disposing of the packaging material All packaging can be recycled, sheet and hard foam parts are appropriately marked. Please dispose of packaging material and any old appliance with due regard to safety and the environment. Information on disposal The appliance must not be disposed of in the household rubbish. -
Page 7: Appliance Description
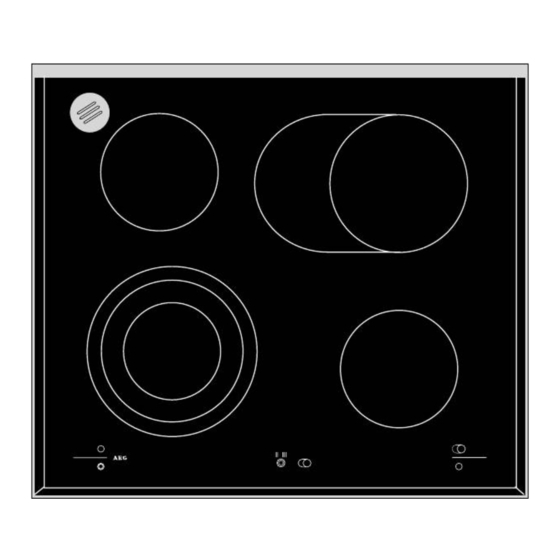
All manuals and user guides at all-guides.com Operating Instructions (GB) Appliance Description Features of the hob Single Ring Cooking Zone Casserole Zone Outlet for Steam from the oven Dicital Digital displays displays Triple Ring Cooking zone Single Ring Cooking Zone Touch Switch for Switching On Triple Ring/ Casserole Zone... -
Page 8: Prior To Using For The First Time
All manuals and user guides at all-guides.com Operating Instructions (GB) Prior to Using for the first Time Initial Cleaning 1. Remove the film from the digital display panel. 2. Wipe the ceramic glass cooking surface with a damp cloth to remove any traces left from manufacturing. -
Page 9: Operation Of The Cooking Surface
All manuals and user guides at all-guides.com Operating Instructions (GB) Operation of the cooking surface When the cooking zones are switched on, they may hum briefly. This is a characteristic of all ceramic glass cooking zones and does not impair either the function or the life of the appliance. -
Page 10: Switching On The Casserole Zone
All manuals and user guides at all-guides.com Operating Instructions (GB) Switching on the Casserole Zone Depending on the size of the pan, on the casserole zone the larger ring can be switched on, in addition to the smaller cooking zone, using the touch switch on the glass ceramic cooking surface. -
Page 11: Usage, Tips
All manuals and user guides at all-guides.com Operating Instructions (GB) Usage, Tips Pans The better the pan, the better the results. You can recognise good pans by their bases. The base should be thick and as flat as possible. Pans with aluminium or copper bases can leave metal discoloration on the glass ceramic surface that is very difficult or impossible to remove. -
Page 12: Cleaning And Care
All manuals and user guides at all-guides.com Operating Instructions (GB) Cleaning and care Ceramic Glass Important: Cleaners must not come into contact with the ceramic glass when hot! All cleaners must be removed with plenty of clean water after cleaning as they may have a caustic effect when the rings are next heated! Do not use any aggressive cleaners, such as e.g. -
Page 13: The Hob Frame
All manuals and user guides at all-guides.com Operating Instructions (GB) Burnt on Soilage 1. Remove burnt on sugar, melted plastic, aluminium foil or other melted ma terials immediately, while the hob is still hot, using a glass scraper. Important: When using the glass scraper on the hot cooking zone, there is a risk of burns! 2. -
Page 14: What To Do If
- the cooking zone was only used for a short period and is therefore not hot enough - there has been a power cut. If the cooking zone is still hot, please call AEG Customer Service. If this information does not provide you with the necessary assistance, please seek specialist advice. -
Page 15: Installation Instructions
Casserole zone rear right 1500/2400 W Single ring cooking zone front right 1200 W Heater Element Voltage 230 V ~ 50 Hz Total load 7.1 kW 941 054 481 Prod-nr: Serie 7.10 kW 230 V ~ 50 Hz 61370MF-an Typ 218.1ZCWBNAPNNA... -
Page 16: Legal Stipulations, Standards, Directives
All manuals and user guides at all-guides.com Installation Instructions (GB) Legal stipulations, standards, directives This appliance meets the following standards: EN 60 335-1 and EN 60 335-2-6 in respect of the safety of electrical appliances for household use and similar purposes and DIN 44546 / 44547 / 44548 in respect of properties of electrical cookers for the household. -
Page 17: Safety Instructions For The Installer
All manuals and user guides at all-guides.com Installation Instructions Safety Instructions for the Installer A device must be included in the electrical installation that makes it possi ble to isolate the appliance from the mains supply with a minimum contact separation of 3 mm. -
Page 18: Installing Into A Kitchen Worksurface
All manuals and user guides at all-guides.com Installation Instructions (GB) Installing into a kitchen worksurface Make a note of the serial number on the appliance rating plate prior to installation. This number will be required in the case of requests for service and is no longer accessible after installation, as it is on the original rating plate on the underside of the appliance. - Page 19 All manuals and user guides at all-guides.com Installation Instructions Variant 1; with spring clips Catch spring Screws Worktop Frame Glass ceramic plate...
- Page 20 All manuals and user guides at all-guides.com Installation Instructions (GB) Variant 2; with spring clamps Wokrktop Frame Glass ceramic plate Screws Catch spring Fitting the steam outlet...
-
Page 21: Electrical Connection
Combination The cooking surface can be combined with the following appliances: Built-in oven: AEG type 53 . . . AEG type 80 . . . Low level built-in oven: AEG type 53 . . . The cooking surface is not permitted to be combined with: Built-in switch box: AEG type 57 . - Page 22 All manuals and user guides at all-guides.com...
-
Page 23: Service
All manuals and user guides at all-guides.com Service SERVICE In the «What to do, if ...» section a number of malfunctions are listed that you can rectify yourself. In the event of a malfunction, look there first. Is it a technical malfunction? Then please contact your customer service centre. - Page 24 All manuals and user guides at all-guides.com AEG Hausgeräte GmbH Postfach 1036 D-90327 Nürnberg http://www.aeg.hausgeraete.de ECopyright by AEG 374 3556 01 / 02.00 mh...
Need help?
Do you have a question about the 61370MF-AN and is the answer not in the manual?
Questions and answers