
Subscribe to Our Youtube Channel
Related Manuals for Regal Century VLink

Summary of Contents for Regal Century VLink
- Page 1 VLink A wireless adapter for use with Century VGreen Variable Speed Motors Installation and User Manual Stock Number: VL100 E Century VLink Installation Manual -- MCIM16001E 9975E Century VLin...
-
Page 2: Table Of Contents
4.3.2 Add 2nd VLink....................28 4.3.3 Setup ......................... 28 4.3.4 Motor Info ......................37 4.3.5 Reminders ......................39 4.3.6 Alerts & Emails ....................39 4.3.7 About ......................... 39 4.3.8 Software Update ....................40 E Century VLink Installation Manual -- MCIM16001E 9975E Century VLin... -
Page 3: Safety
CAUTION indicates a hazardous situation, which, if not avoided, could result in minor or moderate injury. NOTICE NOTICE NOTICE identifies potential equipment damage or failure conditions. Also, alerts personnel to potential dangerous situations. E Century VLink Installation Manual -- MCIM16001E 9975E Century VLin... -
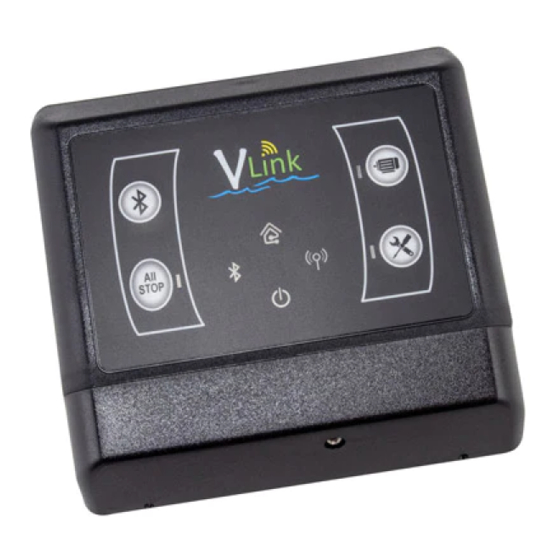
Page 4: Introduction
All Stop Bluetooth Connection Connection Bluetooth Motor Smart Grid Power Pairing ON/OFF Service Mode Connection RS485 and Power Connection WPS (Wi-Fi Protected Setup) DIP Switches System Reset Figure 2: VLink Overview E Century VLink Installation Manual -- MCIM16001E 9975E Century VLin... -
Page 5: Bluetooth Pairing Button And Connection Led
(ON one second, then OFF one second). When the WPS button is pressed, the LED will blink once per every second (ON a 1/2 second, then OFF a 1/2 second). E Century VLink Installation Manual -- MCIM16001E 9975E Century VLin... -
Page 6: Wps Button
NOTE: It is recommended to wait until the installation is complete to snap the VLink to the mounting bracket. E Century VLink Installation Manual -- MCIM16001E 9975E Century VLin... -
Page 7: Connecting To A Vgreen 270 Motor
2. Remove the terminal box cover from the controller (two screws). Figure 2: Terminal Box Cover Removed 3. Remove the plastic wiring cover inside the terminal box (one screw). Figure 3: Internal Plastic Cover Removed E Century VLink Installation Manual -- MCIM16001E 9975E Century VLin... - Page 8 6. Once the existing User Interface has been removed, you are now ready to start the installation 7 . Start by assembling the RS-485 connector to the communication cable as follows: Pin # Wire Color Description +10V White RS485-A Green RS485-B Black Common E Century VLink Installation Manual -- MCIM16001E 9975E Century VLin...
- Page 9 Plug the four User Interface mounting holes with the plastic plugs (PN: 2514059-001) included. Plastic Plugs (4x) FIGURE 7 Figure 8: Terminal Box Cover and Plugs Installed E Century VLink Installation Manual -- MCIM16001E 9975E Century VLin...
-
Page 10: Connecting To A Vgreen 165 Motor
Assemble the RS-485 connector to the communication cable as follows: Pin # Wire Color Description +10V White RS485-A Green RS485-B Black Common 4. Plug in the RS-485 cable into the RS-485 socket. E Century VLink Installation Manual -- MCIM16001E 9975E Century VLin... -
Page 11: Connecting To The Internet
App. The Internet connection is enabled via the home wireless network. Once connected, the VLink can be controlled by logging in with the User’s VLink Account from the Mobile App or from the Web App at www.centuryvlink.com. E Century VLink Installation Manual -- MCIM16001E 9975E Century VLin... -
Page 12: Create User Account
Enter a valid Email Address and your desired Password and agree to the Terms of Service shown in Figure 12 below. Figure 12: Create Account and Terms of Service Screens E Century VLink Installation Manual -- MCIM16001E 9975E Century VLin... - Page 13 E-mail address provided in Step 2. You will need to verify your account by clicking “this link” in the contents of the Email shown below in Figure 15. E Century VLink Installation Manual -- MCIM16001E 9975E Century VLin...
- Page 14 Verification Email instructions, specified in section 3.5.1.5 Step 5, do so now. Without first verifying your account, clicking Sign in to new account, will not allow proceeding Step 7 . Figure 17: Account Created 14 14 E Century VLink Installation Manual -- MCIM16001E 9975E Century VLin...
-
Page 15: Connecting To A Home Wireless Network
After the Tutorial or if Skip is selected, Connection Setup is provided for connecting the VLink to the home wireless network with either the Wi-Fi or WPS methods as shown in Figure 20. E Century VLink Installation Manual -- MCIM16001E 9975E Century VLin... - Page 16 QR code icon as shown in Figure 22 below. After entering the Access ID, select Continue allowing the Mobile App to associate the Access ID and connect to the VLink as shown in Figure 23. Figure 22: Mobile QR Code Access ID Screens E Century VLink Installation Manual -- MCIM16001E 9975E Century VLin...
- Page 17 Mobile via the QR code icon as shown in Figure 25 below. After entering the Access ID, select Continue allowing the App to associate the Access ID as shown in Figure 26 Figure 25: Mobile QR Code and Access ID Screens E Century VLink Installation Manual -- MCIM16001E 9975E Century VLin...
- Page 18 OFF ½ second, ON ½ second, and OFF ½ second if connected to your Home Wireless Network, but not connected to the Internet. If this LED blink pattern occurs, verify your Home Router connection to the Internet and refer to section 5, TROUBLESHOOTING GUIDE. E Century VLink Installation Manual -- MCIM16001E 9975E Century VLin...
-
Page 19: Vlink Initial Setup
After connecting the VLink to the internet and logging in with your VLink account, the VLink Mobile App offers Status, Override, Schedule, and Energy tabs shown in Figure 31 below: Figure 31: Mobile App Status Screen E Century VLink Installation Manual -- MCIM16001E 9975E Century VLin... -
Page 20: Vlink Web App Operation
Figure 33: Web App Status Screen 3.6 VLink Final Mounting 1. Once you are done installing VLink, route the RS-485 cable through the notch 2. Attach the VLink terminal box cover. (1 Screw) E Century VLink Installation Manual -- MCIM16001E 9975E Century VLin... -
Page 21: User Guide
3100 RPM Cycle 2 12:00 PM 4:00 PM 2600 RPM Cycle 3 4:00 PM 12:00 AM 1600 RPM Cycle 4 12:00 AM 8:00 AM 0 RPM Table 2: VLink Default Schedule E Century VLink Installation Manual -- MCIM16001E 9975E Century VLin... -
Page 22: Service Mode
The motor speed and time remaining are also numerically displayed inside of the rings along with the name of the actively running Cycle or feature such as Priming, Override, Learn Mode, and Freeze Protection as shown in Figure 35 below: E Century VLink Installation Manual -- MCIM16001E 9975E Century VLin... -
Page 23: Override Tab
• Custom overrides via the “+” button Figure 37: Override Screen The override buttons for invoking the Schedule and All Off are permanently dedicated and cannot be modified or deleted. E Century VLink Installation Manual -- MCIM16001E 9975E Century VLin... -
Page 24: Schedule Tab
The Schedule Tab provides the main functionality for controlling the VGreen Motor. The Schedule is specified with defined cycles over a 24-hour period and provides the estimated monthly energy cost shown in Figure 39 below: E Century VLink Installation Manual -- MCIM16001E 9975E Century VLin... - Page 25 Figure 40: Cycle Speed and Length Schedule Screen The Schedule Edit function shown in Figure 41 below provides the capability to add/ delete cycles and schedule Aux Load per cycle. E Century VLink Installation Manual -- MCIM16001E 9975E Century VLin...
-
Page 26: Energy Tab
Rate cost is provided. The kilowatt-hour usage and monthly energy cost are based on the set schedule, and are used to calculate total estimated monthly and yearly energy cost and Kilowatt-hour consumption. E Century VLink Installation Manual -- MCIM16001E 9975E Century VLin... -
Page 27: Vlink Features
Configuration of the Aux Load, Priming, Freeze Protection, and Service Mode features Motor Info Motor health, motor faults, and general motor information Reminders and Custom user notifications Alerts & Emails E Century VLink Installation Manual -- MCIM16001E 9975E Century VLin... -
Page 28: Add 2Nd Vlink
Setup provides access to Aux Load (VGreen 270 Only), Priming, Freeze Protection, Service Mode, and Learn Mode as shown in Figure 45 below. If necessary, scroll down to see all items of the Setup Menu. Figure 45: Setup Menu Items E Century VLink Installation Manual -- MCIM16001E 9975E Century VLin... - Page 29 Independent of the Menu or Schedule, Aux Load can also be specified to operate per Override, as described in section 4.2.2 “Override Tab” . Edit of the Override is shown in Figure 48 below: E Century VLink Installation Manual -- MCIM16001E 9975E Century VLin...
- Page 30 V-Green 165 with both a VLink wireless adapter and digital inputs it is important to understand the communication priority scheme. Communication priority scheme determines what communication will have priority over another (I.E. Digital input vs. VLink). E Century VLink Installation Manual -- MCIM16001E 9975E Century VLin...
- Page 31 Priming is invoked whenever motor transitions from zero RPM to a non-zero RPM Cycle per the Schedule, an Override, or Learn Mode. Priming is not invoked prior to running Freeze Protection or Service Mode. E Century VLink Installation Manual -- MCIM16001E 9975E Century VLin...
- Page 32 Table 10: Priming Capabilities The Priming defaults are summarized in Table 11: Priming Default Values. Priming Defaults Setting Enabled/ON Speed 2600 RPM Duration 3 Minutes Table 11: Priming Default Values E Century VLink Installation Manual -- MCIM16001E 9975E Century VLin...
- Page 33 Speed Min 600 RPM Speed Max 3450 RPM Min Duration 1 Hours Max Duration 12 Hours Min Turn On Temp 33ºF Max Turn On Temp 50ºF Table 12: Freeze Protection Capabilites E Century VLink Installation Manual -- MCIM16001E 9975E Century VLin...
- Page 34 Service Mode is configured from the App Menu by selecting Setup Service Mode where Duration and Speed can be modified, as shown in Figure 55 below: Figure 55: Service Mode Edit Screen E Century VLink Installation Manual -- MCIM16001E 9975E Century VLin...
- Page 35 The estimated monthly energy consumption is displayed inside the Schedule Ring of the Schedule Tab shown in Figure 57 below. This value will be accurate after Learn Mode is executed. E Century VLink Installation Manual -- MCIM16001E 9975E Century VLin...
- Page 36 Figure 58: Learn Mode Reinitialize Screen Learn Mode is summarized in Table 16 below: Learn Mode Summary Speed 3450 RPM Duration 5 Minutes Uninitialized ault (Out-of-Box) Table 16: Learn Mode Summary E Century VLink Installation Manual -- MCIM16001E 9975E Century VLin...
-
Page 37: Motor Info
Figure 60: Motor Health Test Screen Health Reports are obtained by clicking the View Health Reports button, as shown in Figure 61 below: Figure 61: Motor Health Test and Report Screens E Century VLink Installation Manual -- MCIM16001E 9975E Century VLin... - Page 38 Figure 62: Motor Fault displayed by the Status Screen Figure 63: Motor Faults Screen About Motor provides Motor and Control Details shown in Figure 64: Figure 64: Motor and Control Details E Century VLink Installation Manual -- MCIM16001E 9975E Century VLin...
-
Page 39: Reminders
Figure 66: Alerts & Emails 4.3.7 About The About feature provides Model Number, Serial Number, VLink Software Version, and the Mobile’s Web and App versions shown in Figure 67 below: E Century VLink Installation Manual -- MCIM16001E 9975E Century VLin... -
Page 40: Software Update
When the OTA is 100% complete, Software Update Complete is provided along with a Push Notification indicating the OTA download succeeded at the VLink, as shown in Figure 69 below: Figure 69: Software Update Complete Screens 40 40 E Century VLink Installation Manual -- MCIM16001E 9975E Century VLin... -
Page 41: Account
Adapter from Account are shown in Figure 72 below: Figure 72: VLink Specific Information and Capabilities Screen The Time Zone and Enable Daylight Savings Time are set in this screen. E Century VLink Installation Manual -- MCIM16001E 9975E Century VLin... -
Page 42: Network
VLink, as shown in Figure 75 below. Press and hold the WPS button on the WA for greater than 8 seconds if the Wireless Connection LED is not blinking once per second. E Century VLink Installation Manual -- MCIM16001E 9975E Century VLin... -
Page 43: Help
Help from the App Menu, the user is provided the Email options available and the Email as shown in Figure 77 below: Figure 77: Send Help Email Screens The user can now enter the desired text to obtain Help from VLink@centuryelectricmotor.com. E Century VLink Installation Manual -- MCIM16001E 9975E Century VLin... -
Page 44: Troubleshooting Guide
WPS button for greater than 8 the “Failed to connect pressed and held for seconds. Re-attempt the Mobile to VLink” screen is greater than 8 seconds. App Connection Setup. displayed. E Century VLink Installation Manual -- MCIM16001E 9975E Century VLin... - Page 45 WPS methods. attempting to connect OFF for 3 seconds, the VLink to the Home Re-enter correct wireless then repeats this Wireless Network. password in network window. pattern. E Century VLink Installation Manual -- MCIM16001E 9975E Century VLin...
-
Page 46: Software Licencing
This product includes Regal Software, Commercial Third Party Software, and Publically Available Software. The Regal Software included in this Regal Product, is Copyright (c) by Regal, Inc., and its use is subject to the licenses, terms and conditions of the agreement in force between the purchaser of the Regal Product and Regal, Inc. - Page 47 For the purposes of this definition, “control” means (i) the power, direct or indirect, to cause the direction or management of such entity, whether by contract or otherwise, or (ii) ownership of fifty E Century VLink Installation Manual -- MCIM16001E 9975E Century VLin...
- Page 48 3 . You must retain, in the Source form of any Derivative Works that You distribute, all copyright, patent, trad emark, and attribution notices from the Source form of the E Century VLink Installation Manual -- MCIM16001E 9975E Century VLin...
- Page 49 You agree to indemnify, defend, and hold each Contributor harmless for any liability incurred by, or claims asserted against, such Contributor by reason of your accepting any such warranty or additional liability. END OF TERMS AND CONDITIONS E Century VLink Installation Manual -- MCIM16001E 9975E Century VLin...
-
Page 50: Vlink Specifications
8. DISCLAIMER The information in this document incorporates proprietary rights and is not to be duplicated wholly or in part without the express written permission of Regal Beloit America, Inc. ©Copyright 2016. The text and images in this document are not to be modified without express written permission of Regal Beloit Corporation and / or Regal Beloit America, Inc.
Need help?
Do you have a question about the Century VLink and is the answer not in the manual?
Questions and answers