
Related Manuals for Toshiba SD-38VEKE


Summary of Contents for Toshiba SD-38VEKE
- Page 1 DIGITAL VIDEO DVD VIDEO PLAYER & VIDEO CASSETTE RECORDER SD-38VEKE OWNER’S MANUAL ©2007 Toshiba Corporation 2K20301A [EN] cov 2/3/07, 2:20 PM...
-
Page 2: Safety Precautions
SAFETY PRECAUTIONS WARNING: TO REDUCE THE RISK OF FIRE OR ELECTRIC SHOCK, DO NOT EXPOSE THIS APPLIANCE TO RAIN OR MOISTURE. DANGEROUS HIGH VOLTAGES ARE PRESENT INSIDE THE ENCLOSURE. DO NOT OPEN THE CABINET. REFER SERVICING TO QUALIFIED PERSONNEL ONLY. CAUTION: This Digital Video Disc Player employs a Laser System. - Page 3 —NEVER guess or take chances with electrical equipment of any kind —it is better to be safe than sorry! ************* EXCLUSION CLAUSE Toshiba shall under no circumstances be liable for loss and/or damage to the product caused by: fire; earthquake; iii) accidental damage;...
-
Page 4: Precautions
Precautions Notes on handling Notes on moisture condensation When shipping the DVD/VCR, the original shipping Moisture condensation damages the DVD/VCR. carton and packing materials come in handy. For fully Please read the following carefully. protection, repack the unit as it was originally packed Moisture condensation occurs, for example, when you at the factory. -
Page 5: Notes On Discs
Notes on discs On handling discs Structure of disc contents Do not touch the playback side of the disc. Normally, DVD video discs are divided into titles, and the titles are sub-divided into chapters. Video CDs and Audio CDs are divided into tracks. DVD video disc DVD video disc Title 1... - Page 6 Because of problems and errors that can occur during the creation of DVD and CD Software and/or the manufacture of DVD and CD discs, Toshiba cannot assure that the DVD player will successfully play every disc bearing DVD and CD logos. If you happen to...
-
Page 7: Table Of Contents
Contents Before using your unit Disc playback operation Playing a disc ..........38 SAFETY PRECAUTIONS ........ 2 Zooming/Locating desired scene ....41 Precautions ............4 Marking desired scenes ......... 42 Notes on discs ..........5 Repeat playback/A-B Repeat playback ..43 Contents ............ -
Page 8: Parts And Functions
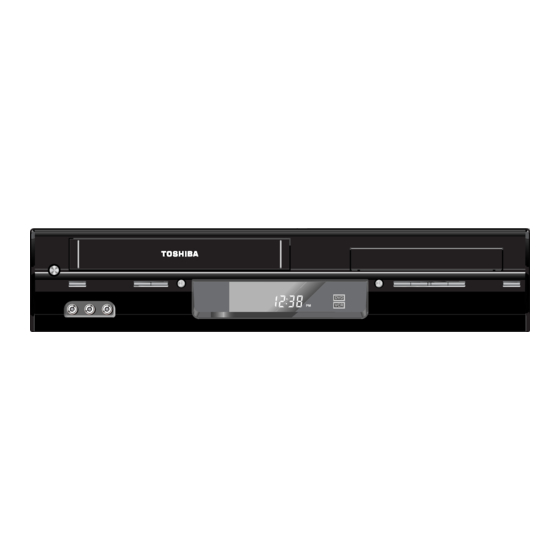
Parts and functions Front VCR/DVD mode selector button OPEN/CLOSE button REC button DVD mode indicator FWD button ON/STANDBY button Disc tray Cassette loading slot Remote sensor VCR mode indicator EJECT button PLAY button REV button CHANNEL buttons Display window STOP button AUDIO (L/R)/VIDEO IN (LINE IN 3) jacks Rear... -
Page 9: Display
Display Display window Display Description VCR mode of TV/VCR switch Playback (lights) / Auto resume (flashes) Still picture DVD disc is inserted. VCD/CD is inserted. Clock display (colon[ : ] flashes) 10 : 00 01 : 00 Counter display by hour/minute at VCR/DVD / by minute/second at CD Track number display for CD TV channel position display CH 2... -
Page 10: Remote Control
Remote control Page OPEN/CLOSE Open or Close the disc tray POWER Power on/off TV/VCR Switch to TV only at Scart connection Select to operate VCR Select to operate DVD CLOCK/COUNTER Change the front Display mode PROGRAM Confirmation of Timer-Recording ONE TOUCH REPEAT Skip back about 10 seconds of DVD/VCD/CD playback 40 INSTANT SKIP Skip the unwanted short material of a tape VCR MENU/SETUP Display menu of setup... - Page 11 Remote control How to install the batteries Use micro batteries type R03 (AAA/UM-4 Size). These batteries are offered as carbon / zinc-type or as alkaline-type. You may use both, but do not mix types. The alkaline type lasts longer compared to the carbon / zinc type but is more expensive. Note: Flat, weak batteries will leak.
-
Page 12: Basic Connection
Basic connection Connect your DVD/VCR to your home's aerial and to your TV-set as shown in the illustration. When you have finished these connections, connect your DVD/VCR to the 230 V / 50 Hz outlet. Antenna Antenna-Input RF-Input (from To Scart socket house antenna) VCR/DECODER Scart Socket (L2) DVD/VCR... -
Page 13: Playback Connection
Playback connection The exact arrangement you use to interconnect various video and audio components to the DVD/VCR is dependent on the model and features of each component. Check the Owner's Manual provided with each component for the location of SCART socket. Connection to a Satellite Receiver If a Satellite Receiver is used, we recommend the following configuration: Satellite... - Page 14 Playback connection Component video outputs/inputs PROGRESSIVE outputs/inputs Some TVs or monitors are equipped with component video inputs that are capable of reproducing a progressively scanned video signal. Connecting to these inputs allows you to view the highest quality pictures with less flicker. INTERLACED outputs/inputs Some TVs or monitors are equipped with component video inputs.
-
Page 15: Setting The On-Screen Language
Setting the on-screen language Turn on your TV and select the AV Preparation: input mode. So you can follow the • Press POWER button to turn on the DVD/VCR. setting on TV screen. • Press VCR to select the VCR mode. (The VCR indicator will light.) You can choose from five different languages for the on-screen displays. -
Page 16: Setting The Clock
Setting the clock You must set the date and time Preparation: manually for timer recordings. • Turn ON the TV and set to the AV input mode. • Press VCR to select the VCR mode. (The VCR indicator will light.) Example: Setting the clock to "11:30"... -
Page 17: Automatic Tv Station Presetting
Automatic TV station presetting Your DVD/VCR has one built-in tuner Automatic station presetting to receive the broadcast. Before you All stations will preset in sequence available in your area. record one TV-Broadcast, you must set and preset the whole of the broad- Preparation: casts. -
Page 18: Mapping Tv Stations
Mapping TV stations Changing TV station names Preparation: For a number of TV stations (such as • Turn ON the TV and set to the video input mode. MTV) no name code will be displayed • Press VCR to select the VCR mode. (The VCR indicator will because these TV stations do not light.) provide the necessary information. - Page 19 Mapping TV stations Reassigning TV station positions Preparation: • Turn ON the TV and set to the video input mode. • Press VCR to select the VCR mode. (The VCR indicator will light.) Example: Reassign the TV station under No. 6 to position No. 2. Select the “CHANNEL MAPPING”...
- Page 20 Mapping TV stations Skipping unwanted TV stations Preparation: (Skip those TV stations that are not • Turn ON the TV and set to the video input mode. wanted to be selected by pressing the • Press VCR to select the VCR mode. (The VCR indicator will light.) CH +/–.) Press VCR MENU.
-
Page 21: Manual Tv Station Presetting
Manual TV station presetting Manual station presetting The Auto CH Memory function (See You can activate the auto search function until your preferred station page 17) memorizes all broadcasts to is tuned in. Then you memorize this station into the chosen channel the suitable CH positions. - Page 22 Manual TV station presetting The Fine Tuning adjustment Please wait until OK :ENTER Under a normal receiving condition, the CH 1 appears. It may take a few sec- station-search will stop automatically at onds. the best receiving position. That picture Then press ENTER.
-
Page 23: Loading And Unloading A Cassette Tape
Loading and unloading a cassette tape Use only video cassette tapes marked Loading Push the centre of the tape until it is automatically Insert the cassette tape with its labeled side facing up and inserted. the erase prevention tab positioned at your left. An in- verted cassette tape cannot be inserted. -
Page 24: Cassette Tape Playback
Cassette tape playback Preparation: • Turn ON the TV and set to the AV input mode. • Press VCR to select the VCR mode. (The VCR indicator will light.) Load a pre-recorded tape (When loading a cassette tape without the erase prevention tab, playback will start auto- matically). -
Page 25: Special Playback
Special playback Picture Search Reverse picture search function Press REV once or twice during the playback. To resume normal playback: Press PLAY. Forward picture search function Press FWD once or twice during the playback. To resume normal playback: Press PLAY. Still Picture Press PAUSE/STEP during playback. -
Page 26: Repeat Playback
Repeat playback Normal repeat playback The entire video tape will be played until its end. The tape will then automatically rewind to the beginning and the playback will be re- peated. Press VCR MENU. Press TIMER REC SET to select AUTO REPEAT. AUTO REPEAT [OFF] NICAM... -
Page 27: Counter Display
Counter display ZERO RETURN function Preparation This function makes tape-rewinding • Turn ON the TV and set to the video input mode. stop at the counter 00:00:00 position • Press VCR to select the VCR mode. (The VCR indicator will light.) automatically. -
Page 28: Video Index Search System
Video Index Search System Whenever a recording is begun, an Example: Indexing of TV commercials. invisible index mark is recorded on the tape. These index marks are all Start playback and wait until the identical, and each mark means: "Here end of the TV commercial is starts a new recording". -
Page 29: Recording A Tv Program
Recording a TV program Preparation • Turn ON the TV and set to the AV input mode. • Press VCR to select the VCR mode. (The VCR indicator will light.) Load a blank cassette tape with the erase prevention tab intact. (The DVD/VCR will auto- matically turn on.) Select the program(e.g.29) you want to record with CH +/–... - Page 30 Recording a TV Program You can record a program using the Press TV/VCR until “VCR” appears on the display. Select the TV receiver of the DVD/VCR and at the program on the DVD/VCR you want to record. This program can same time watch another program on be watched on the screen and recorded by the DVD/VCR.
-
Page 31: One-Touch Timer Recording (Otr)
One-touch Timer Recording (OTR) The one-touch timer recording feature Preparation provides a simple and convenient way • Turn ON the TV and set to the AV input mode. to make a timed recording. • Press VCR to select the VCR mode. (The VCR indicator will light.) Load a blank cassette tape with the erase prevention tab intact. -
Page 32: Timer Recording
Timer recording Timer recording can be programmed Preparation on the TV-screen with the remote con- • Turn ON the TV and set to the AV input mode. trol. The built-in timer allows automatic • Press VCR to select the VCR mode. (The VCR indicator will light.) unattended recording of up to 8 pro- •... - Page 33 Timer recording In case of Timer programs-overlapping Press ENTER to accept them. Do not overlap timer programs as portions of the To enter other pro- conflicting programs will be lost. The first recording 23 MON 13:00 14:30 grams, repeat steps ------ --:-- --:-- -- time has priority over the next recording time as ------ --:-- --:-- --...
-
Page 34: Detailed Description Of The Vps/Pdc Function
Detailed Description of the VPS/PDC Function VPS is a service provided by the public TV station. When you select a VPS-compatible TV station and activate the VPS function, the beginning and the end of the timer recording will be controlled by the TV station. -
Page 35: Nicam/German A2 Stereo Recording And Playback
NICAM/German A2 Stereo Recording and Playback This DVD/VCR is capable of recording Preparation: sound in Hi-Fi system. The recording • Turn ON the TV and set to the video input mode. will be performed automatically. • Press VCR to select the VCR mode. (The VCR indicator will light.) NICAM STEREO broadcasts are recorded in its original sound system NICAM stereo sound reception:... - Page 36 NICAM/German A2 Stereo Recording and Playback German A2 stereo sound reception: Stereo program indication It will be displayed for approx. 4 seconds when stereo programs STEREO are being received. Bilingual program indica- tion It will be displayed for approx. BILINGUAL 4 seconds when bilingual pro- grams are being received.
-
Page 37: Duplicating A Video Tape
Duplicating a video tape When you try to connect video recorder or Video camera to the recording DVD/VCR with audio/video cables, make sure the power of both units have been turned off. Connect the recording DVD/VCR with the TV. Therefore, you can watch what the recording DVD/VCR is recording. -
Page 38: Playing A Disc
Playing a disc This section shows you the basics on how to play a CAUTION disc. Keep your fingers well clear of the disc tray as it is closing. Neglecting to do so may cause serious personal injury. Basic playback (DVD/VCD/CD) Preparations: •... - Page 39 Playing a disc To pause playback (still mode) Playing a Disc while the VCR section is Press PAUSE/STEP during playback. recording or standing by for timer recording 1) Start to record. To resume normal playback, press Follow steps 1~4 on page 29. PLAY.
- Page 40 Playing a disc You can play discs at various speeds. Playing in fast reverse or fast forward directions (DVD/VCD/CD) To resume normal playback Press REV or FWD during playback. Press PLAY. REV: Fast reverse playback FWD: Fast forward playback Notes: •...
-
Page 41: Zooming/Locating Desired Scene
Zooming/Locating desired scene Locating desired scene Zooming (DVD/VCD) (DVD/VCD/CD) This unit will allow you to zoom in on the frame image. You can then make selections by switching the position Use the title, chapter and time recorded on the DVD of the frame. -
Page 42: Marking Desired Scenes
Marking desired scenes The unit stores the points that you want to watch again up to 3 points. You can resume playback from each scene. Marking the scenes (DVD/VCD) Returning to the scenes (DVD/VCD) Press MARKER during playback. Press MARKER during playback or stop mode. Marker 1 Marker 1 Marker 2... -
Page 43: Repeat Playback/A-B Repeat Playback
Repeat playback/A-B Repeat playback Repeat playback (DVD/VCD) A-B Repeat playback (DVD/VCD/CD) A-B repeat playback allows you to repeat selection Press PLAY MODE during playback or stop between two selected points. mode. Press A-B RPT during playback. The start point is selected. [DVD] Press ENTER repeatedly to select “Chapter”... -
Page 44: Program Playback/Random Playback
Program playback/Random playback You can arrange the playback order of tracks on the disc and the unit can also select tracks at random and play them back. These features work for Video CD. For Audio CD and MP3/JPEG/DivX ® CD, please see “Random playback (CD)” on page 52 and “Program playback (CD)”... -
Page 45: Changing Angles/Title Selection/Dvd Menu
Changing angles/Title selection/DVD menu Changing angles (DVD) When playing back a disc recorded with multi-angle facility, you can change the angle that you are viewing the scene from. Press ANGLE during playback. Press ANGLE repeatedly until the desired angle is selected. The current angle will appear. -
Page 46: Changing Soundtrack Language/Setting Surround Sound
Changing soundtrack language/Setting surround sound Changing soundtrack language (DVD/VCD) You can select the language when you play a multilingual disc. In case of Video CD playback Press AUDIO during playback. Audio type changes as follows each time you press The current soundtrack language AUDIO. -
Page 47: Subtitles/To Turn Off The Pbc/Disc Status
Subtitles/To turn off the PBC/Disc status Subtitles (DVD) Disc status (DVD/VCD) When playing back a disc recorded with subtitles, you With press of DISPLAY, the status of the disc will can select the subtitle language or turn the subtitle off. appear on the screen. -
Page 48: Mp3/Jpeg/Divx And Audio Cd Operation
(including CD-R containing MP3 files). Given the fact that technology in this area is still maturing, Toshiba cannot guarantee that all genre of recordable discs will produce optimal playback quality. The technical criteria set out in this owner’s manual are meant as a guide only. - Page 49 ® MP3/JPEG/DivX and Audio CD operation MP3 CD and Audio CD playback About file browser Place an Audio CD or a disc on which MP3 files have been recorded onto the disc tray. A file browser screen will appear on the 3/15 00:00:00 /Folder-1/MP3-7.MP3 screen.
- Page 50 ® MP3/JPEG/DivX and Audio CD operation JPEG CD playback Slide show playback The slide show enables you to view pictures (files) one Place a disc on which JPEG files have been after another automatically. recorded onto the disc tray. Preparation: Set “JPEG Interval”...
- Page 51 ® MP3/JPEG/DivX and Audio CD operation ® ® DivX CD playback Playing DivX VOD content ® DivX VOD content is protected by DRM (Digital Rights ® Place a disc on which DivX files have been Management) system. This restricts playback of recorded onto the disc tray.
-
Page 52: Repeat And Program Playback Using File Browser
Repeat and program playback using file browser Repeat playback (CD) Random playback (CD) In the file browser, press B/A/C/D to select In the file browser, press B/A/C/D to select “Repeat” in stop mode. “Mode” in stop mode. Folder-1 Select Files Folder-1 Select Files Folder-2... - Page 53 Repeat and program playback using file browser Program playback (CD) In the file browser, press B/A/C/D to select Press C/D to select “Program View”, then “Edit Mode”, then press ENTER. press ENTER. Program View shows only the programed files that you have added at step Folder-1 MP3-1 Repeat...
-
Page 54: Customizing The Function Settings
Customizing the function settings You can change the default settings to customize performance to your preference. Setting procedure Press SETUP in stop mode. Then press A or ENTER. The selectable settings will appear. The following on-screen display Parental Menu E.B.L. : Off : Off : English... - Page 55 Customizing the function settings Setting details Parental E.B.L. Menu : Off : Off : Off : Deutsch Parental Menu E.B.L. : Off : Off : English : On QSound TV Screen Subtitle Set Password : On : 4:3 : Deutsch QSound Subtitle TV Screen...
- Page 56 Customizing the function settings Setting details Display JPEG Interval On screen display can be switched on or off when you You can continuously playback all JPEG files automatically. press any buttons. After the selection below, the disc will start playback on JPEG files which have been recorded.
- Page 57 Customizing the function settings Setting details Menu E.B.L. Parental : Off : English : Off : Off Parental Menu E.B.L. Night Mode : Off : English : Off : Off QSound Subtitle TV Screen Password : On : English : 4:3 : Change Subtitle TV Screen...
- Page 58 Customizing the function settings Setting details If you forget the password. DivX(R) VOD 1) Press OPEN/CLOSE to open the disc tray. ® In order to play DivX VOD (Video On Demand) 2) Remove the disc. content on this unit, you first need to register the unit 3) Press OPEN/CLOSE again to close the disc tray.
-
Page 59: Temporary Cancel The Rating Level By Dvd Disc
Temporary cancel the rating level by DVD disc Depending on the DVD disc, the disc may try to temporarily cancel the rating level that you have set. It is up to you to decide whether to cancel the rating level or not. Note: Load a DVD disc and press PLAY or OPEN/ This temporary cancellation of rating level will be kept... -
Page 60: Language Code List
Language code list Enter the appropriate code number for the initial settings “Menu”, “Subtitle” and/or “Audio” (see page 55). Language Name Code Language Name Code Language Name Code Language Name Code Abkhazian 1112 Fiji 1620 Lingala 2224 Singhalese 2919 Afar 1111 Finnish 1619... -
Page 61: Problems And Troubleshooting
Problems and troubleshooting Use the following check list for troubleshooting when you have problems with your unit. Be sure all connections are properly made when using with other units. SYMPTOMS POSSIBLE SOLUTIONS PAGE DVD/VCR • Make sure the AC mains lead is plugged in. –... -
Page 62: Video Head Cleaning
Problems and troubleshooting/Video head cleaning SYMPTOMS POSSIBLE SOLUTIONS PAGE No 4:3 (16:9) picture. • The setup does not match your TV. No on-screen display. • Set Display to On. No surround sound. • The setup does not match your stereo system. The unit or remote operation key •... -
Page 63: Specifications
Specifications GENERAL Power supply: AC 230V 50Hz Power consumption: Operation: 21W Stand by: 5W Weight: 3.6 kg Dimensions: Width : 430.6 mm Height : 89.7 mm Depth : 254.7 mm Input Level: SCART-socket: VIDEO: 1 Vp-p, 75 Ω AUDIO: –3.8 dBm, 50 k Ω Audio IN jack: –3.8 dBm, 50 k Ω... - Page 64 Following information is only for EU-member states: The use of the symbol indicates that this product may not be treated as household waste. By ensuring this product is disposed of correctly, you will help prevent potential negative consequences for the environment and human health, which could otherwise be caused by inappropriate waste handling of this product.
Need help?
Do you have a question about the SD-38VEKE and is the answer not in the manual?
Questions and answers