
Related Manuals for A-Neuvideo ANI-AD100

Summary of Contents for A-Neuvideo ANI-AD100
- Page 1 ANI-AD100 Amplifier with LR/Optical/CATx Input Mixer w/ MIC AUDIO / VIDEO MANUFACTURER A-NeuVideo.com Frisco, Texas 75036...
- Page 2 SAFETY INFORMATION 1. To ensure the best results from this product, please read this manual and all other documentation before operating your equipment. Retain all documentation for future reference. 2. Follow all instructions printed on unit chassis for proper operation. 3.
- Page 3 NEUVIDEO SAFETY PRECAUTIONS Please read all instructions before attempting to unpack, install or operate this equipment and before connecting the power supply. Please keep the following in mind as you unpack and install this equipment: • Always follow basic safety precautions to reduce the risk of fire, electrical shock and injury to persons. •...
-
Page 4: Table Of Contents
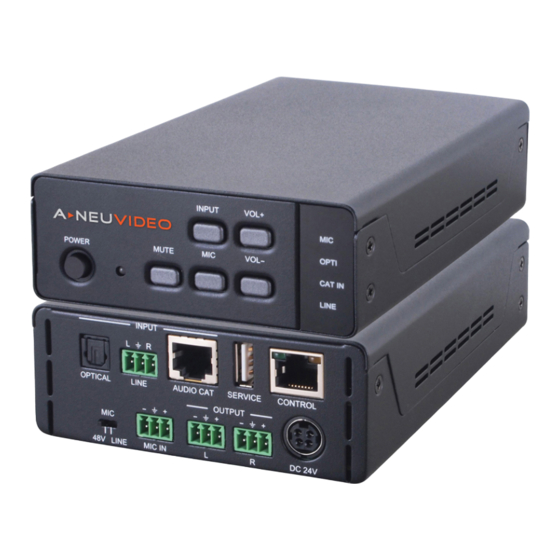
CONNECTION DIAGRAM.......................12 INTRODUCTION The ANI-AD100 Amplifier with Optical/LR/Microphone/CAT6 has a built-in Mixer combining MIC input to be mixed with other input sources. Output to speakers in either mono or stereo mode. The addition of on optional CAT6 transmitter supports both digital and analog audio source selections at a input distance up to ~985ft/300M away. -
Page 5: Features
FEATURES / Amplifier Specifications FEATURES • Digital to Analog audio Conversion (DAC) • Optical input sampling rate up to 192kHz • Optical, L/R, CAT inputs and 48V/Line Microphone • Audio CAT input up to ~985ft/300M • Speaker Output up to 50W •... -
Page 6: Specifications
SPECIFICATIONS • Input Ports: • Optical • L/R (Terminal Block) • CAT5e/6/7 • Mic (Terminal Block) • IP Control (RJ-45) • USB (Service only) • Output Ports: L/R (Terminal Block) • Power Supply: 24V/2.7A DC (US/EU standards, CE/FCC/ UL certified) •... -
Page 7: Optional Transmitters
• LPCM 2CH, Dolby Digital 2~5.1CH, DTS 2~5.1CH (Pass through) • Powered via the ANI-AD100 NOTE: Some features become disabled when connected to the ANI-AD100 ANI-23TCDTX • Supports Analog stereo audio and RS-232 extension over a signal CAT5e/6/7 cable up to ~985ft/300M •... -
Page 8: Operation Controls & Functions
Operation controls & Functions Front Panel q POWER BUTTON & LED: Press this button to turn ON the device and the LED will turn off or to set it to standby mode and the LED will illuminate in Red. When muting is enabled, Power LED will illuminate in Green: Press for 4 seconds, the LED will flash and unit will revert back to Factory Default. - Page 9 Operation controls & Functions BACK Panel q OPTICAL INPUT: This slot is to connect with input source’s optical output port with optical cable. w L/R INPUT: These slots are to connect with input source’s L/R output port with terminal block jacks.
-
Page 10: Rs-232 & Telnet Commands
RS-232 & Telnet Commands COMMAND DESCRIPTION PARAMETER Power off (standby) None Power on None SOURCE N Source selection N = 0~3 or ? (0=Optical, 1=Audio CAT, 2=Line In, 3=Mic In) VOL N Output volume setting N = -50~20dB or ? MUTE N N = 0~1 or ? (0=Unmute, 1=Mute) Output volume mute control... -
Page 11: Software Application & Telnet
CONTROL Softw are Application & TELNET Softw are Application Please download the software from our website and save it in a directory where you may use it later. Connect amplifier with MULTI-CONTROL with active network system open software application from the directory on a PC/Laptop. Click on “Find Devices” on the network and a list of the devices connected to the Control System will show up. - Page 12 CONTROL Softw are Application & TELNET Once in the CLI (Command Line Interface) type Telnet” followed by the IP address of the unit and “23”, then hit “Enter”. The IP address can be found in the OSD within the “Ethernet” menu item. This will connect us to the unit we wish to control.
-
Page 13: Webgui Control
WebGUI Control On a PC/Laptop that is connected to an active network system, open a web browser and type device’s IP address on the web address entry bar. The browser will display the device’s Audio and System Settings for users to control. Click on Audio Settings to control the device’s power status, rename sources, select the audio system, microphone format, volume and audio mute. -
Page 14: Connection Diagram
CONNECTION DIAGRAM... - Page 15 THIS PAGE IS INTENTIONALLY LEFT BLANK.
- Page 16 THROUGH OR UNDER A-NeuVideo, INC (COLLECTIVELY, THE “PRODUCT”). By using installing or using the Product, you unconditionally signify your agreement to these Terms and Conditions. If you do not agree to these Terms and Conditions, do not use the Product and return the Product to A-NeuVideo, Inc. at the return address set forth on the Product’s packing label at your expense.
Need help?
Do you have a question about the ANI-AD100 and is the answer not in the manual?
Questions and answers