Table of Contents
Advertisement
Quick Links
Advertisement
Table of Contents

Related Manuals for RHINO NG2005


Summary of Contents for RHINO NG2005
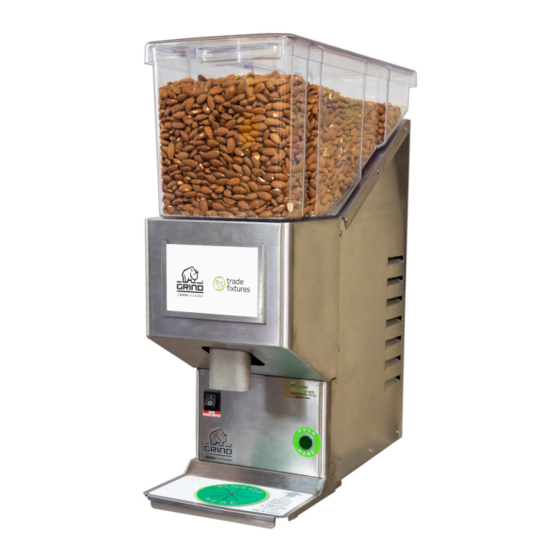
- Page 1 Installation & Operating Manual Revision Date: 20200819:0426 Revision: H RHINO® Grind Nut Butter Grinder Model No. NG2000, NG2004 & NG2005 THIS DOCUMENT CONTAINS IMPORTANT INFORMATION AND MUST BE READ AND UNDERSTOOD PRIOR TO INSTALLATION AND OPERATION OF NUT GRINDER EQUIPMENT.
- Page 2 Access to Help VIDEOS AND THIS MANUAL ARE ONLINE We recommend reading every page of this paper RHINO® Grind manual, but us- ing a QR code scanner on your smartphone will take you to an electronic webpage with videos, and electronic manual. Where you see this logo in this paper manual, you can scan to go to a video on the topic being discussed.
- Page 3 The products, technical information, and instructions contained in this manual are subject to change without notice. These instructions are not intended to cover all details or variations of the equipment, nor to provide for every possible contingency in the installation, operation or maintenance of this equipment. This manual assumes that the person(s) working on the equipment have been trained and are skilled in working with electrical, plumbing, pneumatic, and mechanical equipment.
-
Page 4: Table Of Contents
INFORMATION PERTAINING TO QUESTIONS THAT ARISE DURING INSTALLATION, OPERATION, SERVICE AND MAINTENANCE, OR TROUBLESHOOTING THIS EQUIPMENT. SHOULD YOUR RHINO® Grind NUT BUTTER GRINDER EVER LOSE POWER, WE SUGGEST LOOKING AT BOTH THE POWER ON/OFF SWITCH AND FAQ’S IN THIS MANUAL... - Page 5 Our RHINO® Grind nut butter grinder will dispense nut butter paste at a flow rate of 2.5Lbs/min. of peanuts. Different nut meat flow rates, and how to adjust settings can be found in this manual.
- Page 6 Read and Follow All Instructions Read and follow all safety instructions, best practices, and precautions in this manual and on the RHINO® Grind nut butter grinder (decals and labels). Retain this manual for future reference. Read and follow all applicable safety regulations before operating the RHINO®...
- Page 7 Do not grind anything other than specified nut meat through this unit. See a list of approved nut meats found on pages 8-9 of this manual. Do not plug the RHINO® Grind in a power socket and/or circuit breaker with Ground Fault Circuit Interrupt (GFCI).
-
Page 8: Safety Precautions
Proper Lifting Procedures When placing the RHINO® Grind for the first time, you will be required to lift and set approximately 70+ lbs at the location of your choosing. The initial fill, and subsequent refills of the nut hopper will weigh 20lbs. - Page 9 ANTI TIP SAFETY BRACKET The RHINO® Grind should be operated on a sturdy level countertop, table or sur- face capable of supporting 100lbs per completely full unit. If the RHINO® Grind is installed on a short pull out drawer that does not fully support to the front of the cup rest, we highly recommend using an anti-tip bracket.
-
Page 10: Specifications / Features
RHINO® Grind machine. Typical current draw is 7A. DIMENSIONS OF RHINO® Grind The minimum counter depth is 15 1/2” to support the RHINO® front and rear feet. If the counter depth is less than 22” we highly recommend using the anti-tip bracket with the unit. - Page 11 WITH CAUTION! A. Align the 4 tabs in the back of the hopper with the rear of the RHINO® Grind. B. Tabs should rest in the slots on the grinder body. C. Align front merchandiser ensuring the tabs align with no gap. Assure front merchandiser fully seats to chassis.
- Page 12 PRODUCT LABEL There is a product label holder on the front of the RHINO® Grind which measures 6” wide by 4” tall. The visible area measures 5.5” by 3.75” tall. Slide LABEL GOES HERE. the product label behind the clear sheet and into the channel.
-
Page 13: Getting Started/Quick Start
Dry roasted nuts work best for producing a spreadable butter. Raw, unroasted nuts or those with low oil content are not recommended to grind in the RHINO® Grind, as they may produce a thick, coarse nut butter meal paste or not produce nut butter at all. - Page 14 Dry roasted nuts work best for producing a spreadable butter. Raw, unroasted nuts or those with low oil content are not recommended to grind in the Rhino Grind unit, as they may product a thick coarse nut butter meal paste or not produce nut butter at all.
-
Page 15: Cleaning And Sanitizing
Running the RHINO® Grind on Fine texture minimizes the nut powder/dust dispense you may see, or particles until the paste forms. Discard this cup, and you are now... -
Page 16: Recommended Cleaning Schedule
RECOMMENDED CLEANING SCHEDULE DAILY CLEANING • To assure the RHINO® Grind maximizes sales and attracts customers, it is important to maintain a clean area. • On a daily basis, the exterior of the cabinet should be wiped down to remove any food trace, clean any spillage which may have accumulated, and remove any trash. -
Page 17: Disassembly/Reassembly Procedure
3. Remove, or dispose of the nut hopper contents depending on their age. 4. Disassemble as per instructions given below. For any issues you may encounter with the RHINO® Grind nut butter grinder, we recommend you take the following course of action:... - Page 18 Disassembly / Reassembly Remove housing from Press/Hold Auger lock pin. Rotate Remove thumbscrews from the auger assembly Grinding Wheel counterclockwise. housing. Place on catch tray brkt. Wipe thoroughly internal and external surfaces of the hopper, shutter and pins using a dry cloth Wipe the auger, rotary seal Empty the hopper bin &...
-
Page 19: Cleaning Of Product Delivery Parts
1. Reassemble by reversing the instructions. 2. Ensure the nut hopper is properly installed. 3. Fill the nut hopper with nut meat. 4. Connect cord to power source. 5. Switch on the RHINO® Grind. 6. If activation button does not activate, please refer to page 18 Troubleshooting. -
Page 20: Wiring Schematic
Wiring Schematic / U.S. Model 100-120V 50-60Hz... - Page 21 Wiring / U.S. & ROTW Model 200-240V 50-60Hz...
-
Page 22: Illustrated Parts List
RHINO® Grind ILLUSTRATED PARTS LIST: GRINDING ASSY. -
Page 23: Troubleshooting
RESUMING NORMAL OPERATION Once you have removed and corrected the issue which caused you to interrupt/ shutoff the power to the RHINO® Grind, and power is ready to be restored: 1) Plug power cord into the main socket. 2) Switch the Main On/Off power switch to the ON position. - Page 24 Troubleshooting Tips START UP DRY PRODUCT / NOZZLE CLOGGING At startup, some products produce a dry residual that clogs the duckbill valve. The result is that product does not flow. Potential solutions: (Each step is progressive. Check for product flow after each step) 1.
- Page 25 Troubleshooting Tips 3. Use the cut Duckbill Valve (short) supplied along with the unit. • Special Duckbill valve (see photo below) 4. If the siphoning still exists, order the special grinding plate from Trade Fixtures. (Part #NG2521) DUCKBILL VALVE PRODUCT BRIDGING, OR NOT ENTERING THE GRINDER Certain products have size and exterior surface features that allow the product to “bridge”...
- Page 26 7. Hand tighten the anti rotation screw. 8.Store the tool/wrench on the rear of the RHINO Grind. The provided wrench features a screw driver on one end AND wrench for removing or breaking loose the outer grinding plate.
- Page 27 Troubleshooting Tips...
- Page 28 Troubleshooting Tips...
- Page 29 Troubleshooting Tips PLEASE NOTE: Trade Fixtures is open for business Monday through Friday from 8 a.m. to 5 p.m. (CST) and closed on the weekends. During these normal working hours we can be reached via phone, or email. If you are calling, or emailing outside of normal work days/hours, please leave us a message of who you are, the name and location of your store, and what issue...
-
Page 30: Setting The Timer Switch
Start/Stop push button to run the unit. If you prefer this operation mode, there is nothing further to do. Simply plug in the RHINO® Grind and begin using it. However, if you desire to configure your Start/Stop push button for a predetermined amount of time, you need to access the toggle switch bank and set the black toggle switches according to the table below. -
Page 31: Setting The Grind Texture (Smooth Or Coarse)
Setting the Grind Texture By default, the RHINO® Grind ships with the nut butter texture set to Fine. If you want to change the dispense from Fine (Smooth), to Coarse product, simply unscrew the adjustment thumbscrews (x2), rotate the grinding plate, and screw the adjustment thumbscrews back down manually. - Page 32 Setting the Grind Texture STEPS TO ADJUST FROM FINE TO COARSE 1. Remove the Front Merchandiser. 2. Loosen anti rotation screw on the grinding cover. 3. Loosen the texture adjustment screw. Do this (x2). 4. Rotate the cover and grinding plate clockwise. 5.
-
Page 33: Warranty Information
Warranty Information Trade Fixtures / New Leaf Designs LLC (Trade Fixtures) warrants this equipment manufactured by it as follows: One (1) year parts These warranty periods run from the date of installation. Trade Fixtures warrants that the equip- ment manufactured by it will be commercially free of defects in material and workmanship existing at the time of manufacture and appearing within the applicable warranty period. - Page 34 1501 Westpark Drive, Suite 5 Little Rock, Arkansas 72204 1.800.872.3490 www.tradefixtures.com service@tradefixtures.com Trade Fixtures / New Leaf Designs, LLC. Products illustrated or described within this printed brochure are subject to design, patent, trademark and copyright protection. Photography was taken in, or simulates a retail environment and is not meant to imply endorsement by any brand,...
Need help?
Do you have a question about the NG2005 and is the answer not in the manual?
Questions and answers