Table of Contents
Advertisement
Quick Links
Advertisement
Table of Contents

Related Manuals for Ryobi ONE+ R18SEC


Summary of Contents for Ryobi ONE+ R18SEC
- Page 1 FRONT PAGE R18SEC...
-
Page 2: Intended Use
PERSONAL SAFETY IMPORTANT! ■ Stay alert, watch what you are doing and use It is essential that you read the instructions in this manual common sense when operating a power tool. Do not before assembling, operating, and maintaining the use a power tool while you are tired or under the product. - Page 3 ■ Use the power tool, accessories and tool bits etc. and knowledge, or people who are unfamiliar with these in accordance with these instructions, taking into instructions to use the product. Local restrictions may account the working conditions and the work to limit the age of operator.
-
Page 4: Maintenance
bleach-containing products, etc., can cause a short use. Use clean cloths to remove dirt, dust, oil, or grease. circuit. Do not at any time let brake fluids, gasoline, petroleum- based products, or penetrating oils come in contact ■ Charge the battery pack in a location where the ambient with plastic parts. -
Page 5: Symbols In This Manual
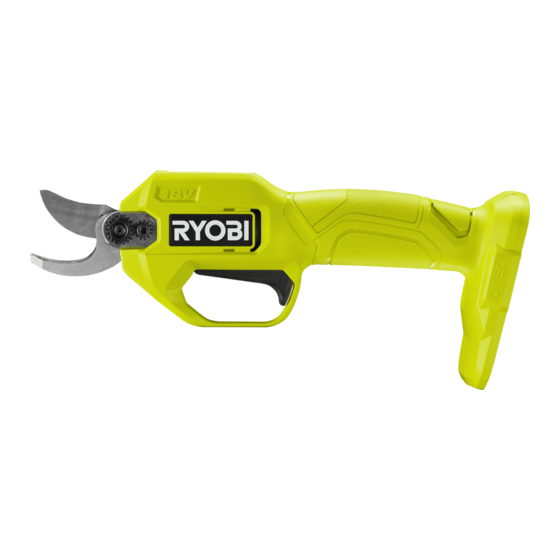
Visible radiation, instructional safeguard To prevent serious injury, do not touch cutting blades. Regulatory Compliance Mark (RCM). Product meets applicable regulatory requirements. Beware of thrown or flying objects. Keep all bystanders, especially children and pets, at least 15 m away from the operating area. - Page 6 R18SEC Cutting blade LED indicator Handle Trigger Locking screw and washer Locking nut Fixed blade Blade cover Operator’s manual Battery pack Charger Replacement cutting blade Light lubricant oil Sharpening stone Screw driver Socket wrench Wrench Know your product...
- Page 7 Always wear head and eye protection. Remove the blade cover. Install the battery pack. Make sure that Wear non-slip, heavy-duty protective the latches on the battery pack snap in gloves. place. Press and hold the trigger for 3 seconds Keep hands away from the blade. to turn on the product and open the Contact with the blade will result in cutting blade.
- Page 8 Operating the Cleaning the p.14 product product Replacing or Storing the p.11 p.15 sharpening the blades product...
-
Page 9: Operating The Product
OPERATING THE PRODUCT 1. Remove the blade cover. 2. Install the battery pack. Make sure that the latches on the battery pack snap in place. 3. Press and hold the trigger for 3 seconds to turn on the product and open the cutting blade. The LED indicator turns on. - Page 10 operation. NOTE: The product goes into sleep mode if the trigger is not pressed for more than 30 seconds. The LED indicator turns off. Press and hold the trigger for 3 seconds to wake the product. 5. Press and hold the trigger for 3 seconds to turn off the product and close the cutting blade.
- Page 11 REPLACING OR SHARPENING THE CUTTING BLADE NOTE: Before removing the blade for sharpening or replacement, ensure that you have a T10 screwdriver, a #4 wrench, and an #13 socket wrench. Refer to the replacement parts list in this manual for the correct replacement parts.
- Page 12 5. Flip the product over onto its other side. 6. Remove swing gear assembly, bolt, cutting blade. 7. Remove the cutting blade, and dispose of it properly. NOTE: Use a 300 - 400 grit sharpening stone to sharpen the cutting edge of the cutting blade and to remove burrs on the edge of the fixed blade if there are any.
- Page 13 9. Reinstall swing gear assembly, bolt, and cutting blade. 10. Reinstall the locking nut, washer, and screw on the other side. 11. Reinstall the housing and the screws. Rotate the screws clockwise secure housing. 0.2Nm Maintenance...
-
Page 14: Cleaning The Product
CLEANING THE PRODUCT 1. Press the latches on the battery pack to remove it from the product. 2. Clean the body and handles of the product with a soft, dry cloth after each use. Do not use water and soap to clean the product. 3. -
Page 15: Storing The Product
STORING THE PRODUCT 1. Press the latches on the battery pack to remove it from the product. NOTE: Make sure that all parts are clean and dry before storing the product. 2. Install the blade cover. Always install the blade cover when storing transporting product. -
Page 16: Product Specifications
RB18L40, RB18L40A, RB1840C, RB1840X, RB18L50, RB18L50A, RB18L60A, RB18L90A BCL18141H, BCL18143H, BCS618, RC18627U, Compatible RC18150, RC18150U, RC18120, RC18115, chargers BCL1814IV REPLACEMENT PARTS Replacement blade set RSE1 (099981362) NOTE: Visit your local Bunnings special orders desk or contact RYOBI Customer Service for replacement parts. - Page 20 31 Gilby Road, Mount Waverley, VIC 3149 Melbourne, Australia Techtronic Industries N.Z. Limited Unit C, 70 Business Parade South, Highbrook, Auckland 2013, New Zealand RYOBI is a trade mark of Ryobi Limited, and is used under license. © 2021 Techtronic Cordless GP 099241001001-01...
Need help?
Do you have a question about the ONE+ R18SEC and is the answer not in the manual?
Questions and answers