Table of Contents
Advertisement
Quick Links
1 Manual purpose........................................................................................................................5
1.2 To operator.................................................................................................................... 5
1.2.1 Primary contents................................................................................................ 5
1.2.2 Supplements and other information................................................................... 6
1.3 Agreement..................................................................................................................... 6
1.3.1 Warning.............................................................................................................. 6
1.3.2 Printing and creation agreement........................................................................ 7
1.4 Environmental protection..............................................................................................7
1.5 Machine label................................................................................................................ 7
1.6Additional help and information.................................................................................... 8
2 Safety instructions....................................................................................................................9
2.1 Standards and instructions............................................................................................ 9
2.2Safety regulations...........................................................................................................9
2.2.1 General safety instructions.................................................................................9
2.2.2 Manual guidance.............................................................................................. 10
2.2.3 Marks and instructions on the machine............................................................10
2.2.4Alteration.......................................................................................................... 11
2.2.5 Guarantee......................................................................................................... 12
2.2.6 Safety-transport................................................................................................12
2.2.7 Safety - installation.......................................................................................... 12
2.2.8 Safety-operation............................................................................................... 12
2.2.9 Safety-maintenance..........................................................................................13
2.2.10 Safety - repair.................................................................................................13
2.3 Operating skill.............................................................................................................14
2.3.1 Operator........................................................................................................... 14
2.3.2 Operator Skills................................................................................................. 14
2.4 Safety features.............................................................................................................14
2.4.1 Security function overview.............................................................................. 15
2.4.2 Emergency stop button.....................................................................................15
2.4.3 Film carriage bottom safety device..................................................................16
2.4.4 Ground lead......................................................................................................16
Content
1
Advertisement
Table of Contents

Related Manuals for Smart wasp X300

Summary of Contents for Smart wasp X300
-
Page 1: Table Of Contents
Content 1 Manual purpose........................5 1.2 To operator........................5 1.2.1 Primary contents....................5 1.2.2 Supplements and other information..............6 1.3 Agreement........................6 1.3.1 Warning......................6 1.3.2 Printing and creation agreement................ 7 1.4 Environmental protection....................7 1.5 Machine label........................ 7 1.6Additional help and information..................8 2 Safety instructions........................9 2.1 Standards and instructions.................... - Page 2 2.5 Main operational risk safety warning................16 3 Technical parameter description.................... 18 3.1 Main component composition..................18 3.2 Control panel.......................19 3.3 Working principle......................21 3.4 Pit configuration......................22 3.5 Technical parameters and main configuration............23 3.4.1 Ramp configuration..................22 3.5.1 Mechanism parameters..................23 3.5.2Electrical parameters..................25 4 Transportation and installation instructions................
- Page 3 5.5 Place pallet instructions....................44 5.6 First put film operation....................45 5.7 Turn on the equipment....................46 5.8 Turn off the equipment....................47 5.9 Touch screen homepage....................47 5.10 Pause packaging (normal stop)................. 49 5.11 Stop in automatic mode (emergency stop)..............50 5.12 Reset to the origin position..................51 5.13 Select packaging mode....................51 5.14 Manual operation.....................
- Page 4 8.2 Component breakdown diagram and detailed list............78 8.2.1Turntable decomposition diagram and schedule..........78 8.2.2 Column exploded view and detail list..............80 8.2.3 Film carriage exploded view and detail list............. 83 8.2.4 Pressure decomposition diagram and schedule..........90 8.2.5 Clamping and cutting film exploded view and schedule......... 94 8.3 Spare and wearing parts....................
-
Page 5: Manual Purpose
1 Manual purpose This manual is intended for training professional users and operators. With the help of this manual, you will be familiar with the pallet wrapping machine and its optional functions, enabling you to use, operate, manage and maintain the machine in a safe and effective manner. -
Page 6: Supplements And Other Information
1.2.2 Supplements and other information This manual has been carefully written based on our experience and the latest knowledge. Therefore, the information in this manual is valid and correct at the time of publication (see cover). As we continue to improve and develop our products, modifications to the machine are part of the internal process. -
Page 7: Printing And Creation Agreement
Notice Used to highlight some information. 1.3.2 Printing and creation agreement · There is always a bullet between lists and enumerations that do not have a specified order. · It must be performed in the order specified by the number in the process. ·... -
Page 8: Additional Help And Information
1.6Additional help and information Smart Wasp is committed to providing the highest level of support to its users and operators. Depending on the product, the support provided mainly includes: · Training · Service management system · 24-hour global support ·... -
Page 9: Safety Instructions
2 Safety instructions 2.1 Standards and instructions The machine is designed and manufactured in accordance with the requirements of the Machinery Directive 2006/42 / EC and meets the legal requirements applicable on the date of construction: · Mechanical instruction: 2006/42/EC ·... -
Page 10: Manual Guidance
· Dressed correctly. Do not wear loose clothing. Remove jewelry, watches, etc. to prevent them from getting stuck in moving parts. · Please wear protective equipment (e.g. protective clothing, protective shoes, gloves, helmet, goggles, earmuffs) according to the user's operating environment. ·... -
Page 11: 4Alteration
Smart Wasp. Unauthorized modifications or alterations to the machine may result in serious personal injury or death. Smart Wasp is always willing to discuss improving the value of the machine by modifying it for the user. See section 1.6... -
Page 12: Guarantee
2.2.5 Guarantee · The machine is warranted for 12 months after installation. To exclude components and electrical components that may wear out during normal use, the customer must notify the dealer of the defect and the machine serial number. The customer must be able to hand over the defective component to the dealer. -
Page 13: Safety-Maintenance
crush) When the machine is running: - Please do not touch the turntable. - Keep away from the area between the pallet. - Do not try to manually stop or drag the tray, please use the emergency stop button ·Please wear personal protective equipment as specified or recommended by the user. ·The film carriage moves up and down during operation. -
Page 14: Operating Skill
· If the security feature is temporarily disabled, the security feature is reactivated or enabled as soon as the maintenance work is completed. After cleaning the machine, please make sure to check the normal function of the safety function before production. ·... -
Page 15: Security Function Overview
2.4.1 Security function overview This pallet wrapping machine has the following safety features: ·Emergency stop button (Please see section 2.4.2) ·Safety marks and instructions (Please see section 2.2.3) ·Film carriage bottom safety device (Please see section 2.4.3) ·Ground lead (Please see section 2.4.4) A Emergency stop button B Ground lead C and D Film carriage bottom safety device... -
Page 16: Film Carriage Bottom Safety Device
2.4.3 Film carriage bottom safety device The film carriage bottom anti-drop protection switch is located under the film carriage. The machine will stop once the lower plate touches the protection switch. 2.4.4 Ground lead The electrical system is grounded. A continuity test has been performed on the ground wire. The electrical system was tested for insulation and dielectric strength at the factory. - Page 17 · Risk of collision: do not stand under the film carriage · Other dangerous situations at startup: When moving goods, the forklift is far away from the machine cargo...
-
Page 18: Technical Parameter Description
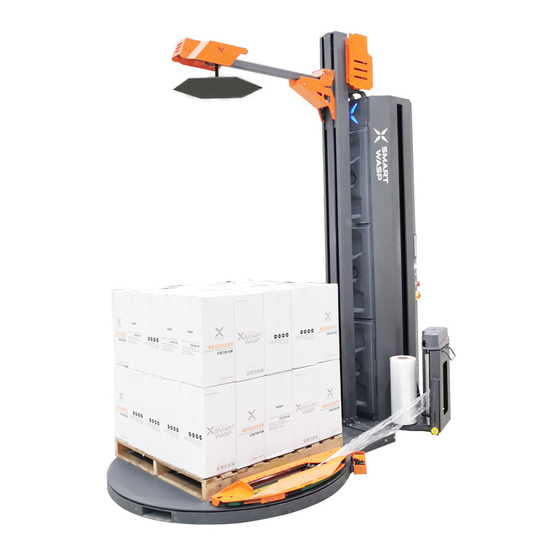
3 Technical parameter description 3.1 Main component composition X300 pallet wrapping machine adopts special film to package the pallet goods. The film can be uniformly attached to the pallet goods in the pre-pull mode, and its main components are shown in the following figure. -
Page 19: Control Panel
E Turntable 3.2 Control panel 3.2.1Main control panel... - Page 20 3.2.2 Sensor position The picture below shows the sensor location and access system information for easy Serial Name Function number It is used to operate the operation of the device and set TOUCH Touch Screen the operating parameters. Refer to section 5.7 Turn the main switch clockwise to energize the power Main power...
-
Page 21: Working Principle
3.3 Working principle The operation of X300 standard winding machine can be completed by one operator. Its basic working principle is as follows: 1. The goods are transported by forklift to the standard wrapping machine, put on the film roller and the film is manually affixed to the first surface of the goods (See 5 operating instructions for details). -
Page 22: Pit Configuration
turntable. 3. According to the packaging requirements of different goods, the film begins to rise after winding a certain number of turns at the bottom of the cargo. The rise of the film carriage, the rotation of the turntable and the film release together to achieve the overall packaging of the goods. -
Page 23: Technical Parameters And Main Configuration
3.5 Technical parameters and main configuration 3.5.1 Mechanism parameters... - Page 24 Model Machine size See the figure above X300 Film thickness 14mic Smart Wasp Brand Film width 500mm Film paper core 250mm Release film Standard Dynamic pre-stretch 250% mode pre-stretch rate Max packing 30~40 pallets/hour Intelligent sensor standard speed Max wrapping...
-
Page 25: 2Electrical Parameters
Film thickness 14mic Smart Wasp Brand X300 pallet wrapping machine turntable with existing (Φ) diameter is 1650 mm, 1800 mm and 2000 mm, the form shown in column and package of the existing high configuration: Column Total height Wrapping height(mm)... -
Page 26: Transportation And Installation Instructions
4 Transportation and installation instructions 4.1 Security transport Notice 1. Please note that for the transport of machines must follow general safety practices and the safety instructions given in this section. 2. The packaging material is composed of plastic film, three-ply, etc. (please follow the local advice or regulations on disposal and recycling of packaging materials) 3. -
Page 27: Temporary Storage
3. Remove the power plug 4. Insert the forklift into the bottom of the machine to raise the machine by about 50mm ove to a new place. Notice During transportation, pay attention to obstacles on the top of the machine and obstacles on the floor, such as sinks. -
Page 28: Preparation Before Installation
4.4 Preparation before installation Please read the entire installation section before you start, then follow the instructions to install it step by step. Notice (1) Finish each step before moving on to the next! (2) The device has multiple security measures. Operating in the right way will ensure safe operation. -
Page 29: Ground Confirmation
· Leave some space around the machine for daily operation, maintenance and repair. · To get the machine running at its best, place the machine on a flat surface. If necessary, level the machine with a gasket. 4.4.2 Ground confirmation The ground must be able to withstand the weight of the equipment, the maximum load of the equipment and its impact, so it is required: Ground bearing capacity ≥... -
Page 30: Loading And Unloading
· One set of tools (in the toolbox), one forklift · 1-2 mechanical/electrical technicians and 1 user 4.4.5 Loading and unloading ⑴ Main body(the turntable and it’s column)Part loading, unloading and handling Equipment used: forklift. Method of operation: Use a forklift to remove the equipment and transport it to the installation site. -
Page 31: Equipment Installation
4.5 Equipment installation 4.5.1 Equipment installation preparation (1) Move the equipment to the installation area with a forklift, and remove the items used for outer packing, tying materials and fixing equipment. (2) Take out the attached tools, check whether the equipment is complete and put in order. (3) Make sure the trolley is locked on the stiffener plate of the support frame, to prevent the lifting body from colliding with the base and damaging the parts during the erection process. - Page 32 packaged separately. (2)Use the attached tools to mount the column to the turntable(see Figure 4.5.2.1 for the installation of the column) Figure4.5.2.1 (3)Connection between quick plug of power cord of chassis motor and reserved quick plug of column is shown in figure 4.5.2.2.
-
Page 33: Film Carriage Installation
Figure4.5.2.2 4.5.3 Film Carriage installation (1)Unlock the trolley from the stiffener plate, and check that the cloth belt anti-loosening switch is properly pressed by the cloth belt. As shown in the figure 4.5.3.1 below. Figure4.5.3.1... - Page 34 (2) Turn on the power and manually reset the cart to the lower limit. Rotate the main power switch to turn off the machine as shown below. Figure4.5.3.2 Manually hang the film carriage from the outside of the column on the trolley, and pay attention to lead the connecting wire to the lifting body through the threading hole below the hanger plate.
- Page 35 Figure4. 5.3.3 (4)Rotate the main power switch clockwise, raise the film holder to a suitable height with manual mode, rotate the main power switch counterclockwise, and turn off the machine. Install the film tensioning sprocket and connect the film seat film tensioning drive chain, (5)...
-
Page 36: Column Door Installation
Figure4.5.3.4 (6)Close the membrane seat safety plate and rotate the membrane seat safety plate screw into the elongated hole. (7)Turn the power on, manually reset the film carriage to the lower limit, then turn off the equipment and disconnect the power. 4.5.4 Column door installation... -
Page 37: Pressurized Installation
Schematic diagram of the column door installation process. Note the installation sequence of the door as shown in figure 4.5.4.1 Figure4.5.4.1 4.5.5 Pressurized installation (1)Install the pressure bottom, fix the pressure bottom on the B surface with four bolts A and tie the bolts without completely locking, as shown in the figure below. - Page 38 Figure4.5.5.1 (3) Install the top of the pressure, remove the motor housing A, and fix the pressure column on Plate C with four bolts B. After the bottom fixing bolts of the pressure are threaded, lock and install the housing A uniformly, as shown in the figure below. Figure4.5.5.2 (1) Connect the aviation plug at the top of the column, as shown below.
- Page 39 Figure4.5.5.3 (2) Install the jacking device. Fix the jacking device on the surface of the pressure column B with bolt A and lock the bolt, as shown in the figure below. Figure4.5.5.4...
- Page 40 (3) Connect the aviation plug at the connection between the top pressing and the column, as shown in the figure below. Figure4.5.5.5 (4) Install the left and right side panels cover and fix the left and right side panels cover on the pressurized column with bolt A, as shown in the figure below.
-
Page 41: Broken Film And Blocking Installation
Figure4.5.5.6 4.5.6 Broken film and blocking installation ⑴ Place the film cutting system vertically on the turntable (be careful to handle it carefully to avoid scratching or damaging parts), align the holes of the film cutting system mounting block with the threaded holes on the turntable, and use M8*25 hexagon socket head screws to break The membrane device is installed and locked on the turntable as shown in Figure 4.5.6.1. -
Page 42: Operating Instructions
4.5.6.3. Figure 4.5.6.3 Blocker 5 Operating instructions 5.1 Safety instructions Notice Strictly follow the operating safety procedures (see section 2) and the instructions given in this chapter. 5.2 The task of the operator 1. Turn on the machine. See section 5.3. 2. -
Page 43: Start The Machine
Note: the above tasks of the operator are performed in accordance with the standard working process. 5.3 Start the machine Turn the main switch clockwise(A) At this point, the power indicator (C) will be on. 2. In case of emergency, press the emergency stop button(B). 5.4 Install and replace wrapping film Notice Please use the same type of film roll as given in section 3.5.1. -
Page 44: Place Pallet Instructions
indicated on the diagram at the top of the film roll. Notice Most types of stretch film have an adhesive surface (A), so called adhesion side. Since the inner side of the pallet must be covered with sticky material, make sure that this side is glued to the surface. -
Page 45: First Put Film Operation
1.Please first make sure there are no people or obstacles within 1 meter of the machine. 2.The pallets are transported by forklift to machine and placed it as far as possible in the center of the turntable. Note X100 has a printed film-breaking area. After loading, ensure that one corner of the goods is in the film-breaking area, as shown in the figure below. -
Page 46: Turn On The Equipment
After the pallet is placed, the wrapping film needs to be manually placed on the machine film roll holder. The operation flow is shown in the figure below. 1.After the film roll is placed, manually stretch the film to a sufficient length. 2.Make the film unfold. -
Page 47: Turn Off The Equipment
5.8 Turn off the equipment If you don't use the machine for a long time, please shut down the machine. Turn the right switch counterclockwise. 5.9 Touch screen homepage 1.Click to enter the system to enter the touch screen operation 2.Touch screen password:... - Page 48 Name Icon Descriptions in single layer Wrap ping The wrapping number of stretch film required at the top mode (reference value is 2) settin The wrapping number of stretch film required at the bottom (reference value is 2) The number of times the pallets are wrapped up and down (reference value is 1) This value indicates the time to continue rising after detecting the height of the cargo (reference value of 2.5).
-
Page 49: Pause Packaging (Normal Stop)
Down speed: the descending speed of film carriage Basic operat Start: Control machine runs automatically button Pause: pause the current action of the machine. Press any button to end the pause state Reset: 1. Move the device to the origin position, and the device can be started only at the origin position 2. -
Page 50: Stop In Automatic Mode (Emergency Stop)
stop. 2. Restore the package state by pressing any one of the start buttons. Notice After pressing the Pause button and starting again,the machine will continue to run from where it left off until the packaging process is completed. 5.11 Stop in automatic mode (emergency stop) In emergency circumstances: Press the emergency stop button (B). -
Page 51: Reset To The Origin Position
5.12 Reset to the origin position When the turntable is not at the origin position: Press the reset button the machine will automatically reset to the home position. 5.13 Select packaging mode... - Page 52 1. Press can switch between modes 2.After switching to the selected mode, press the home page to select the...
-
Page 53: Manual Operation
corresponding mode and write the corresponding parameters into the automatic screen and return to the home page. 3.Press will appear the single and multi-layer mode settings screen 4.Press can shield the top of the film 5.Press shielded pressurization 6.Press can select photoelectric induction height measurement and multi-layer height setting height measurement 5.14 Manual operation select manual operation mode from the screen:... -
Page 54: Setting Overview
5.15 Setting overview... - Page 55 Name Icon Description Wrapping number statistics Count statistics System parameter setting, System password is required to enter, parameter operator setting is prohibited Device Language switching, alarm information, Information IO monitoring, version information Login Display current user login status status Homepage Return to the automatic page...
-
Page 56: Maintenance And Repair Instructions
6 Maintenance and repair instructions 6.1 Safety instructions Notice Strictly follow the applicable safety instructions during maintenance (see section 2.2.10) and the instructions given in this chapter. 6.2 Maintenance preparation ·Please follow the general safety instructions. Before starting any maintenance work (or cleaning): -Turn off the machine - Remove the power plug - Wait at least two minutes... -
Page 57: Check The Function Of Safety Facilities
Cleaning the drum on the membrane seat √ Lubricate the film carriage drive chain √ Check whether the cloth belt on the upright post is worn √ Lubricate the belt bearing seat 6.10 √ Lubricate the turntable drive chain 6.11 √... -
Page 58: Lubricate Film Carriage Bottom Drive Chain
6.7 Clean the roller on the film carriage Notice Some types of film leave a layer of adhesive on the surface of the drum, which causes the film to slide on the drum. 1. To check that the device is safe, see section 6.2. 2. -
Page 59: Lubricate Film Carriage Bottom Drive Chain
6.9 Lubricate film carriage bottom drive chain Notice If the belt on the column is severely worn or cracked, please replace it immediately. 1. Check that the system is safe and correct, please refer to Section 6.2. 2. Open the top coaming and open the door plate. -
Page 60: Lubricate The Belt Bearing Seat
6.10 Lubricate the belt bearing seat Notice If the belt on the column is severely worn or cracked, please replace it immediately. Before leaving the factory, lubricating oil has been added to the bearing block of the column. Lubricating oil is still needed for long-term use. -
Page 61: Check The Chain Tension Of The Turntable Drive Chain
1. Check that the system is safe and correct, please refer to Section 6.2. 2. Loosen the fastener (A). 3. Remove the chain cover (B). 4. Remove the chain cover (B). 5. Install the chain cover. 6.12 Check the chain tension of the turntable drive chain 1. -
Page 62: Lubricated Platen Rotating Belt Seat Bearing
1. Check that the system is safe and correct, please refer to Section 6.2. 2. Loosen the six fasteners of the motor mounting plate weldment (A). 3. Remove the turntable(B). 5. Replace wheel assembly. 4. Check the condition of the lower wheel (A). 6. -
Page 63: Troubleshooting Instructions
7 Troubleshooting instructions 7.1 Safety precautions Notice Strictly observe safety regulations Please refer to section 2.2.11 for repair and troubleshooting. 7.2 Troubleshoot 7.2.1 Touch screen (HMI) alarm condition description The possible causes of the alarm information prompted by the touch screen and the solutions to be taken are as follows. - Page 64 Press the anti-pressure switch at the same time to observe whether the PLCI1. O is on or not, and if not, replace the anti-pressure switch. 1) The travel switch is not in the center of the belt. 1) Adjust the center of the 2) The mounting between belt and travel switch Belt anti-loose switch...
-
Page 65: Description Of Inverter Alarm
Prohibit click start Automatic state start cannot button in touch screen Reset first, and then start. be activated in manual state in manual action. Manual mode Manual mode is prohibited Wait until the automatic run prohibited when the when machine complete then machine is running in... - Page 66 • Cable length limits must not be • Earth faults exceeded. r0949 = 0: Hardware reported • Motor cable and motor must r0949 = 1: Software reported have no short-circuits or earth r0949 = 22: Hardware reported faults. • Motor parameters must match the motor in use.
- Page 67 • Inverter overloaded Check the following: • Ventilation inadequate • Load or load cycle too high? Inverter • Pulse frequency too high • Motor power (P0307) must overtemper • Surrounding temperature too high match inverter power (r0206) ature • Fan inoperative •...
- Page 68 back films during operation 2. Tighten the film to prevent film roll 1. The power is not plugged in 1. Plug in the power plug No action 2. The emergency stop button is 2. Rotate the emergency stop when the pressed button to eliminate emergency machine...
-
Page 69: Mechanical Common Faults And Elimination
running in P0290). A506 Overload warning. Difference between heat Check that load steps and shock IGBT sink and loads lie within specified limits. junction IGBT junction temperature exceeds warning temperatur limits. rise warning Motor overload. • A511 Independently of the kind of Load cycles or load steps too high. - Page 70 Problem Possible reasons Solution description 1. Rotate the “Emergency Stop Button” on the operation panel to eliminate the The turntable does 1. Emergency stop button has “Emergency Stop Alarm” and the red not rotate after been pressed. light at the top will be eliminated. starting.
- Page 71 abnormality deviation or position 2. The sensor is damaged. 2.Change sensor 3. Chains fall off, break, or have 3.Clean up the things or reinstall the something in the chain chain 1.The film roll is bonded with 1. Clean the surface of the film roller Film winding too debris with alcohol (do not use sharp tools such...
-
Page 72: Appendix
8 Appendix 8.1Electrical principle drawing... -
Page 78: Component Breakdown Diagram And Detailed List
8.2 Component breakdown diagram and detailed list 8.2.1Turntable decomposition diagram and schedule Workpiece number Workpiece name Quantity 9XXDA000003 Turntable JJGLD000168 Hexagon socket countersunk head screws M10X25 9XXDA000005 Chain cover JDJJL000001 CV vertical aluminum shell geared motor 9XXDA000018 Motor mounting plate welding parts JJGLD000233 Hexagon socket plain end set screw M6×12... - Page 79 9XXDA000009 Turntable drive sprocket 9XXDA000007 Sleeve 9XXDA000008 Gland Hexagon socket countersunk flat cap head screw JJGLD000152 M8X16 9XXDA000021 Turntable base weldment JJGLS000090 Outer hexagon head bolt M12X50 JJGLM000008 Hexagon nut M12 9XXDA000073 Chassis roller assembly 9XXDA000275 Guide sprocket assembly JDQZY000002 Shaft ringΦ20×1 9XXDA000006 Bottom induction block...
-
Page 80: Column Exploded View And Detail List
8.2.2 Column exploded view and detail list Column installation exploded view... - Page 81 Workpiece number Workpiece name Quantity 9XXLG000273 Side door (new) 9XXLG000106 Rear door panel 9XXLG000193 Lifting power unit (lifting motor) 9XXLG000100 Light guide plate 9XXLG000101 Light box 9XXLG000145 Wheel mechanism 9XXLG000168 Top coaming welding piece 9XXLG000273 Side door panel (new) 9XXD0000042 Power Indicator 9XXD0000041 Start up buttonXB2-BA31C...
- Page 82 2)Breakdown diagram of lifting car Workpiece number Workpiece name Quantity 9XXLG000141 Guide wheel assembly JDJJL000004 Lift car motor 9XXLG000200 Film carriage main power sprocket (18 teeth) DKGJJ000001 Proximity switch (normally open) 9XXLG000214 Counting switch mounting bracket 9XXLG000135 Take-up wheel assembly...
-
Page 83: Film Carriage Exploded View And Detail List
8.2.3 Film carriage exploded view and detail list 1 ) Exploded view of the assembly of the micro-movement film seat (with electromagnetic cutting) Workpiece number Workpiece name Quantity 9XXSD000100 Micro-movement film carriage door body 9XXSE00010 Film seat cutting module... - Page 84 9XXSE000111 Main frame of membrane Exploded view of the door body of the micro-movement membrane seat Workpiece number Workpiece name Quantity 9XXSE000106 Film carriage door 9XXSE000104 Micro-motion induction roller mounting frame 9XXSA000068 Film carriage door handle 9XXSA000071 Film seat guide film roller(L523) 9XXSE000102 Film seat guide film roll up fixing piece 9XXSE000103...
- Page 85 JJGLD000225 Contour screw Φ8-L35-M6 9XXSA000063 Door handle reset torsion spring 9XXSA000014 Handle shaft copper sleeve JJGLD000224 Contour screw Φ8-L20-M6 9XXSA000006 Door shaft copper sleeve 9XXSB000006 Proximity switch holder 9XXSA000062 Observation board JJGLD000226 Contour screw Φ12-L20-M10 DKGJJ000001 Proximity switch (normally open) JJGLM000018 Lock nut M6 JJGLD000080...
- Page 86 Workpiece number Workpiece name Quantity 9XXSD000012 Film carriage cutting bracket welding 9XXSD000003 Broken film cover 9XXSD000006 Broken film blade 9XXSD000002 Broken film connecting rod JQTDC000001 Broken film electromagnet JJGLD000062 Hexagon socket flat head screw M3X8 JJGPD000006 Flat washer M3X0.5 JJGPD000001 Flat washer M5X1 JJGLM000004 Hex nut M5...
- Page 87 Partially exploded view of film carriage main frame Workpiece number Workpiece name Quantity 9XXSE000112 Main frame and top plate welding 9XXSE000121 Safety board 9XXSA000138 Film seat film guide roller (L607) 9XXSA000058 Transmission from sprocket 1 (35 teeth) 9XXSA000127 Transmission from sprocket 2 (12 teeth) 9XXSA000041 Tension sprocket...
- Page 88 9XXSA000061 Straight push mechanism roller 9XXSA000055 Film roll bottom gasket 9XXSA000056 Fixed sleeve under film roll 9XXSA000057 Film roll column top fixing piece 9XXSA000003 Door opening limit bushing 9XXSA000002 Door opening limit plate 9XXSA000134 Photoelectric switch bracket 9XXSC000003 Heightening membrane seat cover fixing column 9XXSC000009 New model membrane seat top cover JJGLD000224...
- Page 89 JJGLD000043 Hexagon socket head screw M8X16 JJGTD000004 Elastic washer M6X1.6 JJGLD000032 Hexagon socket head screw M4X3000 JJGTD000002 Elastic washer M4X1.1 JJGTD000001 Elastic washer M3X0.8 JJGPD000002 Flat washer M6X1.6 JJGLD000244 Hexagon socket flat head screw M6×20 9XXSE000089 Little Hornet Film Roll JZCDZ000048 Bearing with seat JJGLD000236...
-
Page 90: Pressure Decomposition Diagram And Schedule
8.2.4 Pressure decomposition diagram and schedule (1) Decomposition diagram of pressurized assembly Workpiece number Workpiece name Quantity... - Page 91 9XXPE000042 General assembly of top pressing device 9XXPE000097 Side panel 1 9XXPE000098 Side panel 2 9XXPE000076 Proximity switch induction plate 9XXPE000099 mask JZCDZ000019 Zinc alloyUFL204 9XXPE000063 The top cover plate 9XXPE000130 The slider 9XXPE000113 Drive sprocket JCDLC000010 Pressure drive chain 9XXPE000091 The drive shaft 9XXPE000026...
- Page 92 (2)Decomposition diagram of top pressing device Workpiece number Workpiece name Quantity...
- Page 93 9XXPE000117 The trim A 9XXPE000119 Connection piece JJGLM000012 Hexagonal nut M20 9XXPE000036 Induction coil JJGPD000024 M20 Flat mat 9XXPE000044 Compression spring 2 9XXPE000077 Access switch mounting plate DKGJJ000008 Cylindrical proximity switch 9XXPE000120 u-bolt 9XXPE000052 Compressive bar welding 9XXPE000128 Big gasket JDQKY000013 Holes with retaining ring D32 9XXPE000011...
-
Page 94: Clamping And Cutting Film Exploded View And Schedule
(5) Decomposition diagram of pressurized trolley Workpiece number Workpiece name Quantity JDQZY000003 Shaft with retaining ringΦ15×1 JZCSG000003 Deep groove ball bearings6002 9XXPE000037 Adjusting wheel mounting seat 9XXPE000013 The car body 9XXPE000062 Tie rod JJGLM000006 Hexagonal nutM8 9XXPE000039 Plate 1 9XXPE000018 Axis B JJGLS000068 External hexagon head boltsM8X65... - Page 95 9XXAA000055 1650 broken film frame welding parts Hexagon socket countersunk head screw JJGLD000248 M8×16 Hexagon socket countersunk head screw JJGLD000253 M6×12 9XXAA000068 Belt tensioner fixed shaft 9XXAA000069 Tension torsion spring 9XXAA000070 Belt tensioning fixed sleeve JJGLD000251 Hexagon socket head screw M6×16 9XXAA000071 Transition mounting plate 9XXAA000072...
- Page 96 3) Broken film assembly Workpiece number Workpiece name Quantity 9XXAA000053 1650 broken film frame assembly JJGLD000264 Hexagon socket head screw M8×30 JJGPD000003 Flat washer M8X1.6 JJGTD000005 Elastic washer M8X2.1 9XXAA000141 Device right fixed foot JJGLD000268 Hexagon socket head screw M5×16 9XXAA000004 Break film movement components 9XXAA000099...
- Page 97 JJGLM000005 Hex nut M6 9XXAA000112 Device left fixed foot JJGTD000003 Elastic washer M5X1.3 9XXAA000080 Conversion belt JJGLD000266 Hexagon socket head screw M5×12 9XXAA000114 Belt pressure pad 9XXAA000154 Belt press JJGLD000256 Hexagon socket head screw M3×16 JJGTD000001 Elastic washer M3X0.8 JJGPD000006 Flat washer M3X0.5...
-
Page 98: Spare And Wearing Parts
8.3 Spare and wearing parts Workpiece number Workpiece name Quantity DKGJJ000008 Cylindrical proximity switch DKGJJ000001 Proximity switch (normally open) DKGWD000001 Microswitch 9XXDI000073 Bearing package nylon 19 sets 9XXSA000055 Film roll gasket 9XXSA000056 Film roll sleeve 9XXPE000043 Compression spring 1 9XXPE000044 Compression spring 2...
Need help?
Do you have a question about the X300 and is the answer not in the manual?
Questions and answers