Table of Contents
Advertisement
Advertisement
Table of Contents

Subscribe to Our Youtube Channel
Related Manuals for JTECH Medical COMMANDER ECHO

Summary of Contents for JTECH Medical COMMANDER ECHO
- Page 2 This Page Intentionally Left Blank...
-
Page 3: Table Of Contents
Preventative Inspection . . . . . . . . . . . . . . . . . . . . . . . . . . . 44 Commander Echo Console (9RF316) . . . . . . . . . . . . . . . . . 11 Maintenance . -
Page 4: Publication Information
Fax (385) 695-5001 www.jtechmedical.com © 2017 JTECH Medical All rights reserved. This manual is provided as a service to our customers, any other use is strictly prohibited. This manual may not be reproduced by any means, physically or electronically, without the express written consent of JTECH Medical. -
Page 5: Graphic Symbol Definitions
An IEC 60417-5140 symbol Non-Ionizing Radiation An ISO 15223 symbol Warning: devices are non sterile Commander Echo Console and Echo devices comply with Part 15 of FCC Logo the FCC Rules Indicating Degree of protection against electric shock: An IEC 60878 symbol... -
Page 6: Conventions Used Throughout This Manual
• Calibration - The process of using a known force or angle to adjust the instrument parameters so that any arbitrary force or angle input can be accurately determined. • Control Stick - The singular multi-axis button on the Commander Echo Console, which can be moved up, down, left, right, and pressed, in order to operate the Console. -
Page 7: Console Led/Lcd States
The instrument is plugged in, receiving power from an external source, per second, and the battery is actively charging. Solid Green, blinking BLUE 5 The battery is overheated (thermal fault) warning. times per second Orange Unknown battery charging status. © 2017 JTECH Medical MN022_M... -
Page 8: Messages
Message 10: Bad Time-Stamp, Primary This message is displayed during testing mode if the Console Device receives an out-of-order RF packet from the primary instrument. This ensures data integrity is maintained. © 2017 JTECH Medical MN022_M... - Page 9 +/- 10% of the factory calibration information. This does not prohibit the user from testing. Message 21: No Free Instrument Slots This message appears if trying to register a new instrument when 20 instruments have already been registered. © 2017 JTECH Medical MN022_M...
-
Page 10: Warnings And Notifications
Warnings and Notifications Protection against ingress of liquids: Not protected against ingress of liquids. Keep Dry, do not immerse in water or autoclave any portion of Commander Echo Console, instruments, or accessories. Type of protection against electric shock: Type B applied part. -
Page 11: Waste Disposal
ISO 13485:2003 with Canadian Medical Devices Conformity Assessment System (CMDCAS) Intended Use and Intentions for Use The intended use of the Commander Echo Console and Echo devices is to assist the clinician with establishing objective assessment of a person’s physical strength, flexibility, and (with the Algometer) establishing pain tolerance levels. -
Page 12: System Setup
System Setup The JTECH Medical Commander Echo Console is able to interface with up to seven (7) different instrument types. The devices and accessories will vary depending on which instruments you have chosen to purchase for use with your Console. Refer to each instrument’s section within this manual to ensure you received the proper items and accessories. -
Page 13: Commander Echo Console (9Rf316)
To turn the Console off, hold the Control Stick down for 2 seconds. (Note: in some menus you have to exit the menu before you can turn off the Console) For detailed instructions on operating the Commander Echo Console, please refer to pages 12-19 in the manual. -
Page 14: Using The Commander Echo Console
Operating the Console Control Stick The Commander Echo Console is fitted with a Control Stick, which allows you to turn the Console on and off, navigate through the menus, and make your selections. Refer to the following list in order to operate the Control Stick: •... -
Page 15: Console Menu Tree
Order – LLRR, RRLL, LRLR, RLRL System – Info, Calibrate, Restore Exit Instrument Name Reps – 1-4 Threshold – Varies by Unit of Measurement Order – LLRR, RRLL, LRLR, RLRL System – Info, Calibrate, Restore Exit © 2017 JTECH Medical MN022_M... -
Page 16: Instrument Specific Settings
Reps - Select from 1-8 repetitions (Note: This instrument does not differentiate between sides). Info. - Displays instrument information (SN, REV, Battery, Zero CT, WT CT, Angle) Calibrate - Perform a full calibration of the selected instrument. Restore - This will restore the instrument’s calibration to factory settings. © 2017 JTECH Medical MN022_M... - Page 17 Ready Time - Select a Ready Time, in seconds, which will run prior to the start of each repetition (0, 1, 2, 3s). Info. - Displays instrument information (SN, REV, Battery, Zero CT, WT CT, Weight) Calibrate - Perform a full calibration of the selected instrument. Restore - This will restore the instrument’s calibration to factory settings. © 2017 JTECH Medical MN022_M...
-
Page 18: Reviewing And Deleting A Test
“Wireless Static Force Gauge (9RF310)” on page 34. Reviewing and Deleting a Test Once a test has been completed, it will be stored on the Commander Echo Console until it is deleted. To view the completed test data, follow these steps: 1 . -
Page 19: Performing A Full Calibration On The Inclinometers
6 . Press the Control Stick to begin calibration. 7 . The Commander Echo Console will now attempt to connect to the selected instrument. Press the “On” button for the corresponding instrument followed by pressing the Control Stick on the Console to establish connection. -
Page 20: Commander Echo Console
Registering a New Instrument For Use With Your Commander Echo Console The Commander Echo Console comes with all instruments pre-registered for use; however, should you purchase a new instrument at a later time, the following instructions can be used to add or remove a instrument. -
Page 21: Displaying Console Battery Voltage
4 . The Console LCD will show the Console’s serial number, firmware revision, battery voltage, and RF channel. Features and Benefits • The Commander Echo system is a battery powered portable wireless testing system, which allows for unprecedented mobility. • Connect up to seven (7) different instrument types with one Commander Echo Console. -
Page 22: Wireless Dual Inclinometers (9Rf303, 9Rf304)
3 . Push the “On” button on the inclinometer to enable communication Incorrect motion with the Commander Echo Console. If necessary, repeat this procedure for the other inclinometer. For instructions on operating the Commander Echo Console, please refer to the Console Section of the manual. - Page 23 Commander Echo Console. 5 . The Commander Echo will automatically advance to the next available test in the series. If no test data is currently being stored for the instrument, it will begin with Test 1. If all of the selected tests already have data stored, then the Commander Echo Console will display Message 2 on the LCD and not allow further testing until the data has been erased, or the test settings have been altered to allow for more tests.
- Page 24 Each TEST is zeroed on the first repetition. After being zeroed on the first rep, the inclinometer moves to some max angle (greater than 10 degrees from zero), and then returns to within 10 degrees of the zero position. The maximum angle will automatically be stored and the next rep will start. © 2017 JTECH Medical MN022_M...
- Page 25 The Dual Inclinometers are very accurate for measuring extremity ranges of motion because it effectively eliminates goniometer alignment errors and substantially increases inter- and intra-rater repeatability. For instructions on performing specific tests, please refer to the optional Multimedia Help System © 2017 JTECH Medical MN022_M...
-
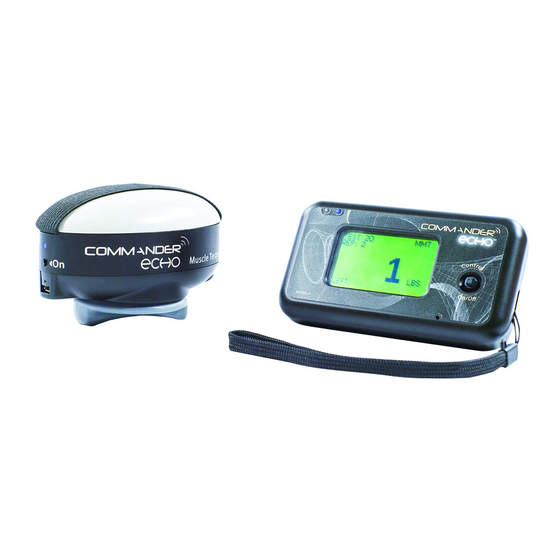
Page 26: Wireless Muscle Tester (9Rf305)
2 . Push the “On” button to enable communication with the Commander Echo Console. For instructions on operating the Commander Echo Console, please refer to the Console Section of the manual. For instructions on performing specific tests, please refer to the optional Multimedia Help System CD. - Page 27 (no pressure applied), press the Control Stick to set the instrument zero. 5 . The Commander Echo will automatically advance to the next available test in the series. If no test data is currently being stored for the instrument, it will begin with Test 1. If all of the selected tests already have data stored, then the Commander Echo Console will display Message 2 on the LCD and not allow further testing until the data has been erased, or the test settings have been altered to allow for more tests.
-
Page 28: Wireless Grip (9Rf306)
2 . Push the “On” button to enable communication with the Commander Echo Console. For instructions on operating the Commander Echo Console, please refer to the Console Section of the manual. For instructions on performing specific tests, please refer to the optional Multimedia Help System CD. - Page 29 (no pressure applied), press the Control Stick to set the instrument zero. 5 . The Commander Echo will automatically advance to the next available test in the series. If no test data is currently being stored for the instrument, it will begin with Test 1. If all of the selected tests already have data stored, then the Commander Echo Console will display Message 2 on the LCD and not allow further testing until the data has been erased, or the test settings have been altered to allow for more tests.
-
Page 30: Wireless Algometer (9Rf307)
2 . Push the “On” button to enable communication with the Commander Echo Console. For instructions on operating the Commander Echo Console, please refer to the Console Section of the manual. For instructions on performing specific tests, please refer to the optional Multimedia Help System CD. - Page 31 (no pressure applied), press the Control Stick to set the instrument zero. 5 . The Commander Echo will automatically advance to the next available test in the series. If no test data is currently being stored for the instrument, it will begin with Test 1. If all of the selected tests already have data stored, then the Commander Echo Console will display Message 2 on the LCD and not allow further testing until the data has been erased, or the test settings have been altered to allow for more tests.
-
Page 32: Wireless Goniometer (9Rf308)
Do not bend, or twist the extension to disengage as the extension may break. 3 . Push the “On” button to enable communication with the Commander Echo Console. For instructions on operating the Commander Echo Console, please refer to the Console Section of the manual. - Page 33 5 . The Commander Echo Console will automatically advance to the next available test in the series. If no test data is currently being stored for the instrument, it will begin with Test 1. If all of the selected tests already have data stored, then the Commander Echo Console will display Message 2 on the LCD and not allow further testing until the data has been erased, or the test settings have been altered to allow for more tests.
-
Page 34: Wireless Pinch Gauge (9Rf309)
Wireless Pinch Gauge (9RF309) Used to convey functional abilities concerning pinch strength. 1 . Push the “On” button to enable communication with the Commander Echo Console. For instructions on operating the Commander Echo Console, please refer to the Console Section of the manual. - Page 35 (no pressure applied), press the Control Stick to set the instrument zero. 5 . The Commander Echo will automatically advance to the next available test in the series. If no test data is currently being stored for the instrument, it will begin with Test 1. If all of the selected tests already have data stored, then the Commander Echo Console will display Message 2 on the LCD and not allow further testing until the data has been erased, or the test settings have been altered to allow for more tests.
-
Page 36: Wireless Static Force Gauge (9Rf310)
Static Force Gauge. 2 . Push the “On” button to enable communication with the Commander Echo Console. For instructions on operating the Commander Echo Console, please refer to the Console Section of the manual. - Page 37 (no pressure applied), press the Control Stick to set the instrument zero. 5 . The Commander Echo will automatically advance to the next available test in the series. If no test data is currently being stored for the instrument, it will begin with Test 1. If all of the selected tests already have data stored, then the Commander Echo Console will display Message 2 on the LCD and not allow further testing until the data has been erased, or the test settings have been altered to allow for more tests.
-
Page 38: User Manual For Commander Echo Downloader
The Optional Commander Echo Downloader software provides an easy-to-use interface for creating reports which can be printed, or saved, from data on your Commander Echo Console. The reports are stored in .rtf format, which allows the user to open the reports using Microsoft Word 2007, or newer. -
Page 39: Installing From A Flash Drive
1 . Insert the JTECH Medical Commander Echo Downloader Flash Drive into one of your computer’s available USB ports. The “AutoPlay” menu should show up; click the Commander Echo option. i . If the Commander Echo option isn’t available, click the Open folder to view files option. Start autorun. exe . -
Page 40: First Time Using Commander Echo Downloader
Commander Echo Downloader Software. The software should show that the Console’s status is Connected, and the firmware box should be populated. Click on the “Load Tests” button to import the test data you have collected on your Commander Echo Console. © 2017 JTECH Medical MN022_M... -
Page 41: Notes About The Software
.rtf files, at which point you can review and print your reports. Notes about the Software Click the “Manual” button to open the Commander Echo manual through the software. It will automatically attempt to open the manual with the program you have chosen as the default for opening .pdf files. -
Page 42: General Information
Echo System. As a precaution, we recommend that you minimize their usage within the transmission range of your Commander Echo System. We have taken every precaution and tested to the highest standards to ensure accurate data transmission with your System. The main reason for linking your Commander Echo instruments with your Console is to reduce the potential for unintentional data transfer from other devices, including other Commander Echo systems operating in the area. - Page 43 Because of the sensitive electronics inside, Commander Echo instruments are not designed for battery replacement in the field. If an instrument fails to hold a charge, contact JTECH Medical Customer Service. What are the current travel restrictions for Echo Devices? Current regulations do not prohibit carrying on Echo Devices or checking them in baggage.
- Page 44 RF interference. using the same radio This can resolve most problems with RF spectrum,. Can also be interference and multiple Commander Echo caused by additional systems being in use. Commander Echo systems in operation Additional Console troubleshooting information can be found by visiting our customer portal at http://portals.jtechmedical.com...
-
Page 45: Troubleshooting Your Instruments
RED and then stops after a (up to 6 hours) and attempt to use it again. few seconds on any attempt to turn the instrument on. Additional instrument troubleshooting information can be found by visiting our customer portal at http://help.jtechmedical.com © 2017 JTECH Medical MN022_M... -
Page 46: Storage And Cleaning Of Instruments
® Storage and Cleaning of Instruments Notice: The Commander Echo Console and its instruments are sensitive electronic devices, and should be handled with care. If handled and cared for properly, the devices have all been designed and manufactured to provide years of accurate and reliable use. -
Page 47: Calibration Of Instrument
17 for further information on this process. In order to continue testing with a high level of accuracy, the Commander Echo unit requires a zero calibration of the instrument being used prior to the start of each exam. For more detailed explanation of this process, refer to the “Performing an Exam”... -
Page 48: Customer Support
(repair, replacement, shipping, etc.), after the initial warranty time period. You can buy extended warranties for your Commander Echo hardware. Please contact JTECH Medical Customer Service for more information on JTECH Guardian Hardware Maintenance plans. - Page 49 3 . Date of purchase 4 . Product name or type and Product serial number(s) 5 . Description of the problem If you are calling in regards to the Optional Commander Echo Downloader Software please also have the following: 6 . Computer specifications Product Return Policy •...
-
Page 50: Agreement And Limited Warranty
Commander Echo Downloader Software its documentation are Copyrighted © 2013 by JTECH Medical. License: JTECH Medical grants the customer rights to use this software on a single computer at a single location as long as the customer complies with the terms of this license. JTECH reserves the right to terminate this license if the customer violates any provisions thereof. - Page 51 This warranty gives you specific legal rights, and you may also have other rights that vary from state to state. The customer and JTECH acknowledge that the software is not intended as a consumer good under state and federal warranty laws. © 2017 JTECH Medical MN022_M...
-
Page 52: Technical Specifications
Technical Specifications This page intentionally left blank © 2017 JTECH Medical MN022_M... - Page 53 Four(4) - six(6) continuous hours of charging following initial charge Battery conservation Instruments transition to “off power” state when not in use Specified Power Supply, JTECH Medical PN: PW006 [Protek Power PMP15M-10-B6] or (Battery Charger) JTECH Medical PN: PW008 [Globtek, Inc. WR9QA3000CCP-N-MED] Type of Operation...
- Page 54 Four(4) - six(6) continuous hours of charging following initial charge Battery conservation Instruments transition to “off power” state when not in use Specified Power Supply, JTECH Medical PN: PW006 [Protek Power PMP15M-10-B6] or (Battery Charger) JTECH Medical PN: PW008 [Globtek, Inc. WR9QA3000CCP-N-MED] Type of Operation...
- Page 55 Four(4) - six(6) continuous hours of charging following initial charge Battery conservation Instruments transition to “off power” state when not in use Specified Power Supply, JTECH Medical PN: PW006 [Protek Power PMP15M-10-B6] or (Battery Charger) JTECH Medical PN: PW008 [Globtek, Inc. WR9QA3000CCP-N-MED] Type of Operation...
- Page 56 Four(4) - six(6) continuous hours of charging following initial charge Battery conservation Instruments transition to “off power” state when not in use Specified Power Supply, JTECH Medical PN: PW006 [Protek Power PMP15M-10-B6] or (Battery Charger) JTECH Medical PN: PW008 [Globtek, Inc. WR9QA3000CCP-N-MED] Type of Operation...
- Page 57 Four(4) - six(6) continuous hours of charging following initial charge Battery conservation Instruments transition to “off power” state when not in use Specified Power Supply, JTECH Medical PN: PW006 [Protek Power PMP15M-10-B6] or (Battery Charger) JTECH Medical PN: PW008 [Globtek, Inc. WR9QA3000CCP-N-MED] Type of Operation...
- Page 58 Four(4) - six(6) continuous hours of charging following initial charge Battery conservation Instruments transition to “off power” state when not in use Specified Power Supply, JTECH Medical PN: PW006 [Protek Power PMP15M-10-B6] or (Battery Charger) JTECH Medical PN: PW008 [Globtek, Inc. WR9QA3000CCP-N-MED] Type of Operation...
- Page 59 Four(4) - six(6) continuous hours of charging following initial charge Battery conservation Instruments transition to “off power” state when not in use Specified Power Supply, JTECH Medical PN: PW006 [Protek Power PMP15M-10-B6] or (Battery Charger) JTECH Medical PN: PW008 [Globtek, Inc. WR9QA3000CCP-N-MED] Type of Operation...
- Page 60 Four(4) - six(6) continuous hours of charging following initial charge Battery conservation Instruments transition to “off power” state when not in use Specified Power Supply, JTECH Medical PN: PW006 [Protek Power PMP15M-10-B6] or (Battery Charger) JTECH Medical PN: PW008 [Globtek, Inc. WR9QA3000CCP-N-MED] Type of Operation...
- Page 61 Nickel Plated Steel Notice: Accessory Maximum Force Input applies to the accessory only, and does not apply to the accessory when attached to any device. Warning: Discontinue use of any product if skin irritation develops. © 2017 JTECH Medical MN022_M...
- Page 62 0.3 A (rms) for 240 VAC Instruments transition to “off power” state when not in use Specified Power Supply, JTECH Medical PN: PW006 [Protek Power PMP15M-10-B6] or Enclosure Leakage Current 100 uA max. @ 264 VAC, 63 Hz (Battery Charger) JTECH Medical PN: PW008 [Globtek, Inc.
- Page 63 Maximum Output Power 15 W Type of Protection against electric shock Class II Manufacturer, Model JTECH Medical PN: PW008 [Globtek, Inc. WR9QA3000CCP-N-MED] Protection against harmful ingress of IPX0 - ordinary equipment water Degree of Safety of Application in the This device is not suitable for use in the presence of flammable anesthetic...
-
Page 64: Emc Guidance
Guidance and Manufacturer’s Declaration - Electromagnetic Emissions The Commander Echo System is intended for use in the electromagnetic environment specified below. The customer or user of the Commander Echo System should assure that it is used in such an environment. - Page 65 Guidance and Manufacturer’s Declaration - Electromagnetic Immunity The Commander Echo System is intended for use in the electromagnetic environment specified below. The customer or user of the Commander Echo System should assure that it is used in such an environment.
- Page 66 Guidance and Manufacturer’s Declaration – Electromagnetic Immunity The Commander Echo System is intended for use in the electromagnetic environment specified below. The customer or the user of the Commander Echo System should assure that it is used in such an environment.
- Page 67 Recommended separation distances between portable and mobile RF communications equipment and the Commander Echo System The Commander Echo System is intended for use in an electromagnetic environment in which radiated RF disturbances are controlled. The customer or the user of the...
-
Page 68: Index
Notes about the Software . . . . . . . . . . . . . . . . . . . . . . . . . 39 Commander Echo Console (9RF316) . . . . . . . . . . . . . . . . . 11 Operating the Console Control Stick .
Need help?
Do you have a question about the COMMANDER ECHO and is the answer not in the manual?
Questions and answers