Epson Stylus Photo R1900 Series Manual
Epson stylus photo r1900: quick start
Hide thumbs
Also See for Stylus Photo R1900 Series:
- Service manual (230 pages) ,
- Getting started manual (64 pages) ,
- User manual (52 pages)
Table of Contents
Advertisement
Quick Links
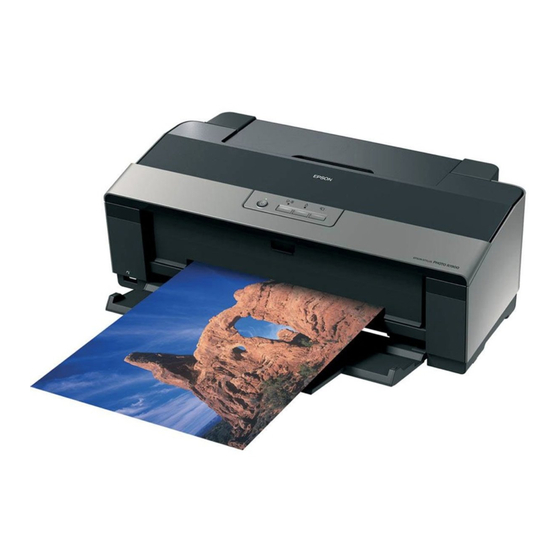
Printer Parts
Edge guide
USB port
(for camera cable)
Power button
Paper button
and light
and light
Roll paper
feeder
Paper support
and extensions
Control panel
buttons
CD/DVD tray
guide
Output tray and
extensions
Printer cover
(open)
Ink cartridge
holder (in
home position)
Ink button
Roll paper
and light
button
Roll paper
edge guide
USB ports
(for computer
cables)
Epson Stylus Photo R1900 Series
CD/DVD tray
Accessories
Ink Cartridges
Ink color
Photo Black
Matte Black
Cyan
Magenta
Yellow
Red
Orange
Gloss Optimizer
11/07
Roll paper holders
8-cm CD/DVD adapter
Single sheet guide
Part number
Part number on
software screens
87
T0871
87
T0878
87
T0872
87
T0873
87
T0874
87
T0877
87
T0879
87
T0870
Epson Stylus Photo R1900 Series
- 1
Advertisement
Table of Contents

Related Manuals for Epson Stylus Photo R1900 Series


Summary of Contents for Epson Stylus Photo R1900 Series
-
Page 1: Printer Parts
Yellow button Orange Gloss Optimizer Roll paper edge guide USB ports (for computer cables) 11/07 Epson Stylus Photo R1900 Series Roll paper holders 8-cm CD/DVD adapter CD/DVD tray Single sheet guide Part number Part number on software screens T0871 T0878... -
Page 2: Epson Papers
Epson Stylus Photo R1900 Series Epson Papers Paper type ® Epson Premium Photo Paper Glossy Epson Ultra Premium Photo Paper Glossy Epson Photo Paper Glossy Epson Premium Photo Paper Semi-gloss Epson Ultra Premium Photo Paper Luster Epson Ultra Premium Presentation Paper Matte... -
Page 3: Printer Specifications
Since the quality of any particular brand or type of paper may be Note: changed by the manufacturer at any time, Epson cannot guarantee the quality of any non-Epson brand or type of paper. Always test a sample of paper stock before purchasing large quantities or printing large jobs. - Page 4 Epson Stylus Photo R1900 Series Printable Area When printing borderless, quality may decline in the expanded Note: printable area. Sheets Left Bottom Sheets with borders Top: 0.12 inch (3 mm) minimum Left: 0.12 inch (3 mm) minimum Right: 0.12 inch (3 mm) minimum Bottom: 0.12 inch (3 mm) minimum...
- Page 5 Ink Cartridges We recommend that you use genuine Epson cartridges and do Note: not refill them. The use of other products may affect your print quality and could result in printer damage. Yields vary considerably based on images printed, print settings, paper type, frequency of use, and temperature.
-
Page 6: Running A Printer Check
If the error persists, contact Epson. Epson Stylus Photo R1900 Series Running a Printer Check A printer check will help you determine if the R1900 Series is operating properly. 1. Turn off the printer and your computer, if connected. 2. Disconnect any connected USB cables. -
Page 7: Loading Paper In The Sheet Feeder
Do not load paper above the arrow on the edge guide. Check the paper package for any additional loading instructions. The left edge guide may move slightly during paper feeding and printing. Do not adjust the edge guide or open the printer cover during printing. 11/07... -
Page 8: Loading Special Paper In The Single Sheet Guide
2. Open the output tray and pull out the extensions. 3. Slide the roll paper edge guide on the back of the printer all the way to the right. 4. Attach the single sheet guide by aligning the notches on its base with the slots on the back of the printer. -
Page 9: Loading Roll Paper
6. Insert the left roll paper holder (marked with a down orange triangle) into the far left slot on the back of the printer (marked with a right orange triangle). Then insert the other roll paper holder in the corresponding slot on the right. -
Page 10: Loading A Cd Or Dvd
Note: 0.16 inch (4 mm) of the edge of the center hole, you may need to adjust the Inner Diameter setting in the File menu of the Epson Print CD software. See the on-screen Reference Guide for instructions. Cleaning the Roller Before you print on a CD or DVD, it’s a good idea to clean... -
Page 11: Selecting The Media Type Setting
Make sure the tray is beneath the guide rails. 7. Now you can print on the CD/DVD using the Epson Print CD software; see the on-screen Reference Guide. 8. After printing, the tray ejects partially from the printer. Pull out the tray and remove the disc. -
Page 12: Replacing An Ink Cartridge
Epson Stylus Photo R1900 Series Replacing an Ink Cartridge Your Epson Stylus Photo R1900 Series and its software will let you know when an ink cartridge is low or expended. If an ink cartridge is low, the ink light flashes. -
Page 13: Purchasing Ink Cartridges
Leave your old cartridges in the printer until you are ready to replace them to prevent the print head nozzles from drying out. We recommend that you use genuine Epson cartridges and do Note: not refill them. The use of other products may affect your print quality and could result in printer damage. -
Page 14: Cleaning The Print Head
It’s best to run the automatic nozzle check and cleaning utility first to let the printer check and clean the nozzles, if necessary. If you still notice quality problems, you can check and clean the nozzles manually. -
Page 15: Automatically Checking And Cleaning The Print Head
3. Now you can manually run a nozzle check and confirm that the print head is clean. You may need to clean the print head up to 4 times. You can also turn the printer off and wait at least 6 hours. Then try printing again. From the Computer 1. -
Page 16: Aligning The Print Head
Banding may also occur if your print head nozzles need Note: cleaning. 1. Load a few sheets of Epson Presentation Paper Matte (or the photo paper you have on hand) in the sheet feeder. It’s best to use matte or photo paper for the most accurate alignment. -
Page 17: Transporting The Printer
Do not use a hard brush, benzine, alcohol, or paint thinner Caution: to clean the printer or you may damage it. Do not use oil or other lubricants inside the printer or let water get inside it. 1. Turn off the printer. -
Page 18: Related Documentation
Epson Stylus Photo R1900 Series Related Documentation Epson Stylus Photo R1900 Series Start Here sheet Epson Stylus Photo R1900 Series User’s Guide Epson Stylus Photo R1900 Series CD-ROM with on-screen Reference Guide Epson Stylus Photo R1900 Series 18 - CPD-24044...
Need help?
Do you have a question about the Stylus Photo R1900 Series and is the answer not in the manual?
Questions and answers