Table of Contents
Advertisement
2.4 IN. LCD
INSPECTION CAMERA
Item Number W50045
OWNER'S MANUAL
WARNING
It is the owner and/or operators' responsibility to study all WARNINGS, operating, and
maintenance instructions contained on the product label and instruction manual prior to
operation of this product. The owner/operator shall retain product instructions for future
reference.
The owner and/or operator are responsible for maintenance, maintaining all decals or
warning labels and while in use, maintaining the unit in good working order. Safety
information shall be emphasized and understood prior to usage. The product shall be
inspected per the operating instructions.
Protect yourself and others by observing all safety information.
Failure to comply with instructions could result in personal injury and/or property damage!
Advertisement
Table of Contents

Related Manuals for Performance Tool W50045

Summary of Contents for Performance Tool W50045
- Page 1 2.4 IN. LCD INSPECTION CAMERA Item Number W50045 OWNER’S MANUAL WARNING It is the owner and/or operators’ responsibility to study all WARNINGS, operating, and maintenance instructions contained on the product label and instruction manual prior to operation of this product. The owner/operator shall retain product instructions for future reference.
- Page 2 90 days from the date of purchase, provided that product is returned to place of purchase immediately after discovery of defect. After 90 days and up to one year from date of purchase, PERFORMANCE TOOL®...
-
Page 3: Safety Guidelines - Definitions
SAFETY GUIDELINES / DEFINITIONS This instruction manual is intended for your benefit. Please read and follow the safety, installation, maintenance and troubleshooting steps described within to ensure your safety and satisfaction. The contents of this instruction manual are based upon the latest product information available at the time of publication. -
Page 4: Electrical Safety
IMPORTANT SAFETY INFORMATION • Work Safe. Operate tool a safe distance from yourself and others in the work area. Keep proper footing and balance at all times. Do not overreach, especially on ladders. Be certain ladders being used are sturdy, stable, on a firm surface and erected as safe working angles. -
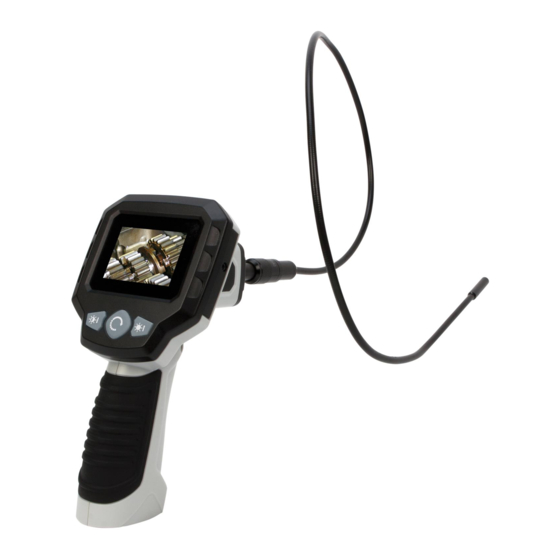
Page 5: Parts Listing
PARTS LISTING Power indicator LED Display Cable Unit Camera Battery compartment Magnet Accessory Hook Accessory RCA Video Cable Collar Accessory Mirror Accessory... -
Page 6: Lcd Screen
CONTROLS, COMPONENTS & ACCESSORIES 1. LCD screen 5. Rotate image button 2. Power button 6. Battery meter (hold for 3 seconds to turn on) 3. Increase light output button 7. Light output level 4. Decrease light output button 8. Cable Connector SPECIFICATIONS Specifications are subject to change without notice. -
Page 7: Troubleshooting
ASSEMBLY The LCD monitor in this camera unit is fixed to the body. To assemble unit: 1. Pull back the locking collar on the receiving end of the display unit. 2. Align metal tab on threaded end of camera cable with the slot in the collar. 3. -
Page 8: Battery Installation/Replacement
Battery installation/replacement 1. Slide cover off bottom of unit and remove battery carrier. 2. Remove batteries from battery carrier (if installed). 3. Install new batteries, negative side of each battery to the spring in each slot. 4. Reinsert battery carrier and replace slide cover. NOTE: carrier must be inserted properly to operate.
Need help?
Do you have a question about the W50045 and is the answer not in the manual?
Questions and answers
Battery what type use PT W50045
The Performance Tool W50045 requires 4 AA batteries, which are included.
This answer is automatically generated