Table of Contents
Advertisement
Quick Links
Advertisement
Table of Contents

Subscribe to Our Youtube Channel
Related Manuals for HXM HD-005


Summary of Contents for HXM HD-005
- Page 1 HD-005 DIGITAL DRUM USER’S MANUAL...
- Page 2 CAUTION CAUTION Any changes or modifications in construction of this device which are not expressly approved by the party responsible for compliance could void the user’s authority to operate the equipment. WARNING When using electrical products, basic safety precautions should always be followed, including the following: NOTE: This equipment has been tested and found to comply with the limits for a Class B digital device, pursuant to Part 15 of the FCC Rules.
- Page 3 TAKING CARE OF YOUR DRUM DO NOT ATTEMPT TO OPEN THE UNIT OR MAKE ANY CHANGE IN THE CIRCUITS OR PARTS OF THE UNIT. - direct sunlight (near a window), SERVICE AND MODIFICATION - high temperatures (near a heat source, outside, or This product should be serviced by qualified service in a car during the daytime), personnel when,...
-
Page 4: Table Of Contents
CONTENTS TABLE INSTALLATION ..........................5 SOUND MODULE .......................... 9 CONTROL PANEL ........................9 BOTTOM PANEL ........................10 PLAY PAD ............................ 11 TURN ON THE POWER ....................... 11 PLAYING PADS ........................11 MASTER VOLUME ........................ 11 DRUM KIT ........................... 12 KIT SELECT .......................... 12 KIT EDIT .......................... -
Page 5: Installation
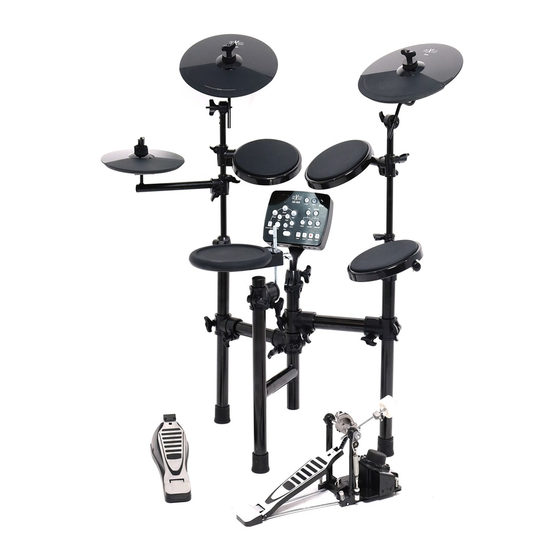
INSTALLATION CRASH RIDE TOM1 HI-HAT TOM2 TOM3 SOUND MODULE SNARE RACK HI-HAT PEDAL KICK KICK PEDAL The drawing shows a complete drum kit after installation. Each drum pad, cymbal pad and Hi-Hat control pedal has its part number underneath the component name for your reference in installation. - Page 6 INSTALLATION RACK SYSTEM Folded rack in package Cymbal Holders are contained separately in the package.
- Page 7 INSTALLATION RACK INSTALLATION 3. Insert cymbal holders and adjust their position 2. Move and rotate support arms to this position. 4. Move and rotate s n a r e h o l d e r t o proper position. 1.Open and stretch support legs as the picture shows.
- Page 8 INSTALLATION COMPONENTS INSTALLATION Hi-Hat Installation 1. Remove the wing nut,washer and felt pad 2. Put the Hi-Hat into the rod along with parts removed in step 1. Fasten the wing nut. Crash and Ride Installation 1. Remove the wing nut, washer and felt pad 2.
-
Page 9: Sound Module
SOUND MODULE CONTROL PANEL CLICK TEMPO MASTER VOLUME PATTERN CRASH RIDE HIHAT TOM 2 TOM 1 VOICE VOLUME DRUM OFF TOM 3 HI-HAT PEDAL SNARE KICK STOP PLAY RECORD SAVE (1) Display: The display is a 3-digital 7-Segment LED type showing Information such as Kit number, Voice number etc. -
Page 10: Bottom Panel
SOUND MODULE BOTTOM PANEL D C 9 V LINE OUT L I N E I N T R I G G E R HEADPHONE U S B P O W E R O F F (1) Power Switch: Turn On/Off the sound module Note: After you turn the power off, do not turn it on immediately. -
Page 11: Play Pad
PLAY PAD TURN ON THE POWER Playing Snare Drum Strike the central position (head) of the pad to make head sound, strike the rim of the pad to make a rim (1) Turn down the external audio device connected sound. with the drum. -
Page 12: Drum Kit
DRUM KIT This drum has 20 preset drum kits for your choice. The kit is a combination of different instrument voices assigned to each pad which has unitary style for performance. Any kit could be edited and saved. After the power is turned on, the kit mode is engaged automatically the KIT button is lit and the kit number is shown on the display. -
Page 13: Exit From The Edit Mode
DRUM KIT The following procedure is for voice assignment. The way of changing its volume is the same. While the VOICE button and the selected pad button blink, its current voice number will appear on the display. Use the +, - button to change the voice number ranging 1 - 184. Press both + and - button simultaneously, its original voice will be restored. -
Page 14: Pattern
PATTERN There are 50 built-in patterns for your enjoyment and exercise. PLAY THE PATTERN Press the PATTERN button to engage the pattern mode and Enter the pattern mode its indicator will light up. The pattern number with “P” in front will appear and blink on the display. -
Page 15: Metronome
METRONOME Press the CLICK button to activate the metronome, its indi- cator will light up and flash according to current tempo. Note: During the pattern playing, the metronome cannot sound but the CLICK button will flash if the metronome is engaged. Activate the metronome Press the button again to stop it. -
Page 16: Record
RECORD This drum provides facilities to record one piece of your per- formance and save it as pattern 51. The recording could be accompanied with pattern. Before recording, you should pre- pare necessary settings including selecting drum kit, metro- nome and tempo setting, pattern selecting etc. RECORD STANDBY STOP PLAY... -
Page 17: Stop And Save
RECORD Press the RECORD button again or press the STOP button to terminate the recording. The RECORD button blinks and is ready for the next recording. The new recording over-writes the contents of the previous recording in unit of measure. In this way, you can edit your recording. -
Page 18: Usb & Midi
USB & MIDI MIDI stands for Musical Instrument Digital Interface. This is a world wide standard communication interface that enables electronic musical instruments and computers to communicate with each other so that instruc- tions and other data can pass between them. This exchange of information makes it possible to create a system of MIDI instruments and devices that offers far greater versatility and control than that is available with isolated instruments. -
Page 19: Voice List
VOICE LIST Description Description Description HighAgogo SNARE HighQ LowAgogo Snare 1 Slap Cabasa Snare 2 ScraPush Maracas Snare 3 ScraPull ShortWhist Snare 4 Stick LongWhist Snare 5 SquarClick ShortGuiro Snare 6 MetroClick LongGuiro Snare 7 MetroBell Claves Snare 8 KickDrum2 Hi W-Block Snare 9 KickDrum1... - Page 20 VOICE LIST Description Description Description Open Hi-Hat 12 Low Tom5 CLOSED HI-HAT Closed Hi-Hat 1 Open Hi-Hat 13 Low Tom6 Closed Hi-Hat 2 Low Tom7 HI TOM Closed Hi-Hat 3 Hi Tom 1 Low Tom8 Closed Hi-Hat 4 Hi Tom 2 CRASH Closed Hi-Hat 5 Hi Tom 3...
-
Page 21: Specifications
SPECIFICATIONS 3 X 8” Tom (without rim), 8” Snare (with rim feature), 12” Crash cymbal (with Configuration choke feature), 12” Ride cymbal, 8” Hi-Hat, 2” Kick pad, Hi-Hat pedal Voice Drum Kit 20 preset kits Pattern 50, Full and Mute drum mode Pad Button play drum sound with led blink Pad Edit...
Need help?
Do you have a question about the HD-005 and is the answer not in the manual?
Questions and answers