
Related Manuals for FAZLEY DDK-120


Summary of Contents for FAZLEY DDK-120
- Page 1 DDK-120 Electronic Drum Kit User Manual All information and illustrations shown in this user manual are subject to change without further notice. User manual version: 1.0 Creation date + author initials: 07-05-2020 RV Revision date + author initials:...
- Page 2 Please make sure to check that all of the components and accessories listed below are included in the box, and to contact your retailer if anything is missing. If the DDK-120 does not function as it should, or you have any problems while using it, immediately switch it off and unplug it before contacting your retailer for further help and information.
-
Page 3: Safety Instructions
Safety Instructions WARNING! Keep this device away from moisture, water and rain to avoid the chance of electric shocks. Everyone involved with the installation, operation and maintenance of this device must: - Be qualified - Be skilled - Have read the instructions in this user manual - Be sure that neither the device nor the included accessories are damaged. - Page 4 - Should the device not be used in the manner described in this user manual, damages or even injuries could occur. Fazley cannot be held responsible for any injuries or damages that occur as a result of improper use of this product.
- Page 5 Overview of the Drum Module The drum module of the Fazley DDK-120 is the brain of this electronic drum kit. As such, it contains the sound samples that are played when you strike the pads and mesh-heads, and it has various functions on board that can be adjusted to suit your needs.
- Page 6 5. Click Control The Click control is used to activate and deactivate the click track; a click-based rhythm that can assist you in determining your drumming rhythm and tempo. 6. Coach Control The Coach control is used to activate the backing track function, which can be used to practice your timing with either an audible or visual click track.
- Page 7 The Inputs and Outputs of the Drum Module 1. Phone Headphone socket with 6.35mm TRS jack. L/Mono Main Output Main output with 6.35mm TRS jack that can be connected to an active speaker, mixing desk or audio interface. R Main Output Right channel output with 6.35mm TRS jack that can be used to send a stereo signal to an active speaker system, mixing desk or audio interface.
- Page 8 9. TOM 4 Using the TOM 4 input, it’s possible to expand the DDK-120 with a fourth tom (not included). All information and illustrations shown in this user manual are subject to change without further notice. User manual version: 1.0...
- Page 9 Basic Settings of the Drum Module Powering on the drum module To turn on the drum module, first make sure that the power supply is connected to both the drum module and a mains power socket. Then, check if the volume controls are turned all the way down and only adjust these when needed. Now, you can turn on the drum module by pressing the Power button.
-
Page 10: Advanced Settings
Use F1 to rename the kit. Use F2 to export the kit to a USB stick (not included). Use F3 to import a kit from a USB stick (not included) in case you’ve used a different DDK-120 kit to create a preset. - Page 11 Each new recording will begin following a 3-second countdown. Tempo Interface (Metronome) Press the TEMPO button to open the Tempo menu. Here, you can use the navigation buttons and the +/- buttons to select and adjust various parameters. The speed, beat, rhythm, voice and volume can be individually adjusted. Parameter Value Description...
- Page 12 Scan Time 0 – 4.0 ms The Scan Time is a function that analyses the loudness at which a sample should be played back depending on the way that the trigger is struck. Since each trigger will not react in the same way, in some cases it’s necessary to adjust the Scan Time a little more so that it’s measured at a later peak-point during the strike.
- Page 13 MIDI OUT ON/OFF Switch analogue MIDI OUT on or off. MIDI IN ON/OFF Switch analogue MIDI IN on or off. USB-MIDI OUT ON/OFF Switch USB MIDI OUT on or off. USB-MIDI IN ON/OFF Switch USB MIDI IN on or off. Mix Interface Press F3 in the Interface section to open the Mix interface menu and use the navigation and +/- buttons to scroll through and adjust the options as needed.
-
Page 14: System Setting Interface
Set the contrast for the display. Hihat Pedal/Stand The DDK-120 can be optionally expanded with a mechanical hi-hat system. Via this function, you can indicate if you’re using a regular trigger pedal or a mechanical hi-hat. Please note that not setting the correct option may lead to strange results. - Page 15 simple metronome backing plus various adjustable options including metronome playback speed. In this interface, you’ll find the following adjustable parameters: Parameter Value Description Duration 1-60 Set the duration for the mode Measures 2, 4, 8, 16 Set the measure Quiet 1, 2, 4 Set the number of quiet moments.
-
Page 16: Specifications
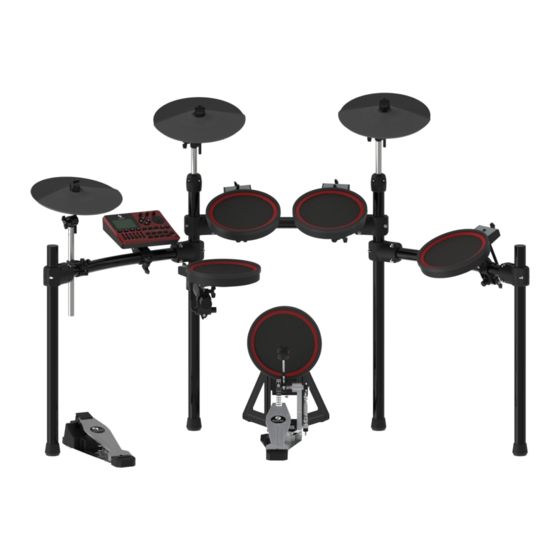
Specifications General specifications: - complete drum kit with mesh-heads - standard drum kit configuration - versatile and easy-to-use drum module - mesh-head technology for accurate response - adjustable mesh-head tension via drum key - practical, compact and easy-to-adjust drum frame - easy-to-adjust hardware for optimal playing comfort Components: - drum frame... - Page 17 Technical specifications: - 25 preset kits - 25 user kits - 423 built-in sounds - 25 built-in songs - standard trigger input:s kick, snare, tom1, tom2, tom3, hi-hat, crash, ride, hi-hat controller - extra trigger inputs: crash2 - LCD-display: 128 x 64-dot graphic display (backlit LCD) - power supply: 100-240V AC, 50/60 Hz - operating voltage:: 12V DC, 2A via included power supply - net weight: +/- 23.5 kg...
- Page 18 All information and illustrations shown in this user manual are subject to change without further notice. User manual version: 1.0 Creation date + author initials: 07-05-2020 RV Revision date + author initials:...
- Page 19 All information and illustrations shown in this user manual are subject to change without further notice. User manual version: 1.0 Creation date + author initials: 07-05-2020 RV Revision date + author initials:...
- Page 20 All information and illustrations shown in this user manual are subject to change without further notice. User manual version: 1.0 Creation date + author initials: 07-05-2020 RV Revision date + author initials:...
- Page 21 All information and illustrations shown in this user manual are subject to change without further notice. User manual version: 1.0 Creation date + author initials: 07-05-2020 RV Revision date + author initials:...
- Page 22 All information and illustrations shown in this user manual are subject to change without further notice. User manual version: 1.0 Creation date + author initials: 07-05-2020 RV Revision date + author initials:...
- Page 23 All information and illustrations shown in this user manual are subject to change without further notice. User manual version: 1.0 Creation date + author initials: 07-05-2020 RV Revision date + author initials:...
Need help?
Do you have a question about the DDK-120 and is the answer not in the manual?
Questions and answers