Advertisement
Quick Links
Advertisement

Related Manuals for Dr.Prepare DPWS-OUT004

Summary of Contents for Dr.Prepare DPWS-OUT004
- Page 1 PROJECTION ALARM CLOCK D P W S - O U T 0 0 4 Manual...
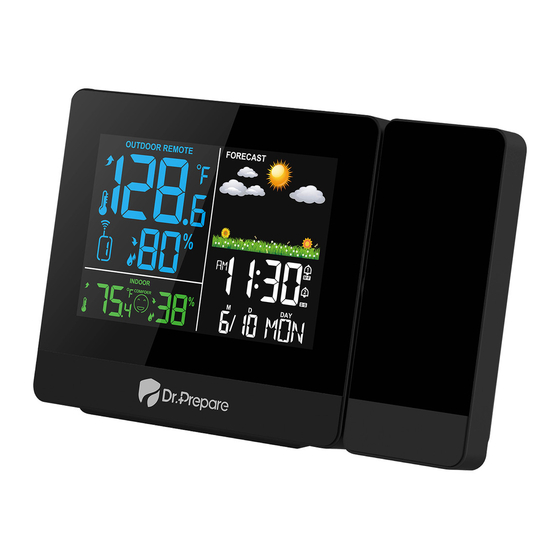
- Page 2 Identifying Parts 1. Weather Forecast 2. WWVB Signal Icon (Time Calibration) 3. Alarm 1 and Alarm 2 4. Time 5. Weekday 6. Month and Date 7. Heat Index 8. Dew Point Temperature 9. Tendency Arrow (Outdoor Temperature) 10. Outdoor Temperature 11.
- Page 3 20. SNZ / LIGHT button 21. SET Button 22. ALARM Button 23. UP Button 24. DOWN Button 25. MEM Button 26. On / Off Switch of Alarm 1 27. Rotate / Projection Button 28. On / Off Switch of Alarm 2 29.
- Page 4 Function of Buttons: Button Mode (After you switch Display Max. long-term (when plugged & Min. Switch Flip the projection into in) Adjust Switch Readings, Tempera- Enter the projection short-term backlight: channel Dew Point Press ture Units Alarm Mode for 180 projection) High- numbers...
- Page 5 Features: The LCD display lights up with all the icons for 2 seconds and 3 beeps when plugged in. Then the clock begins to search for RF signals (3 minutes, for temperature readings) and WWVB signals (3 minutes, for time calibration). Default Time: 12:00, 12-hour time format.
- Page 6 Receiving RF The weather station automatically receives RF signals for 3 minutes after the weather station is plugged in. Long press the “▲” button for two seconds to re-register data for the current channel. Reception of RF signals RF reception lasts for up to 3 minutes. During RF registration, the antenna icon starts to flash.
- Page 7 Press button to confirm your setting and the Time Zone icon starts to flash. Use "▲" and "▼" buttons to set the correct time zone. The setting order is as follow: EST: Eastern Standard Time AST: Atlantic Standard Time HAT: Hawaii-Aleutian Standard Time AKT: Alaska Standard Time PST: Pacific Standard Time MST: Mountain Standard Time...
- Page 8 Alarm Setting Mode In standard mode, press “ ” to enter alarm mode. The “AL1” icon will appear on the screen. In alarm mode, press and hold button for 2s until the Hour icon of the Alarm 1 starts to flash. Use the “▲” and “▼” buttons to set the desired hour. Press “...
- Page 9 You can press any button other than the button to turn off the alarm. Or you can press and hold the button for 3s to shut off the alarm with a beep, which means the alarm has been turned off successfully. Alarm will ring in the way as bellowed.
- Page 10 If the current humidity exceeds the maximum measurement range of the weather station, it will display 96% on the screen. Likewise, if the current humidity is lower than the minimum measurement range, the weather station will display 20% on its screen. The frequency of data updates for each channel are as followed: every 68s for channel 1, 72s for channel 2, and 76s for channel 3.
- Page 11 When the humidity is over 85%, the weather station will display the rainy icon. When the humidity is below 35%, the weather station will display the sunny or partly sunny icon. When humidity rises more than 5% in an hour, the weather forecast icon will change to partly sunny (from sunny), cloudy (from partly sunny) or rainy (from cloudy).
Need help?
Do you have a question about the DPWS-OUT004 and is the answer not in the manual?
Questions and answers