Table of Contents
Advertisement
Available languages
Available languages
Quick Links
TM
SML363BK / SML363P
INSTRUCTION MANUAL/ MANUAL DE INSTRUCCIONES/
MODE D'EMPLOI/BEDIENUNGSANLEITUNG /MANUALE DI ISTRUZIONI
www.singingmachine.com
The Singing Machine® is a registered trademark of The Singing Machine Co., Inc.
The Singing Machine® es marca registrada de The Singing Machine Co., Inc.
The Singing Machine® est une marque déposée par The Singing Machine Co., Inc.
The Singing Machine® ist eine eingetragene Handelsmarke von The Singing Machine Co., Inc.
The Singing Machine® è un marchio registrato di The Singing Machine Co., Inc.
Advertisement
Table of Contents

Related Manuals for The Singing Machine SML363BK


Summary of Contents for The Singing Machine SML363BK
- Page 1 MODE D’EMPLOI/BEDIENUNGSANLEITUNG /MANUALE DI ISTRUZIONI www.singingmachine.com The Singing Machine® is a registered trademark of The Singing Machine Co., Inc. The Singing Machine® es marca registrada de The Singing Machine Co., Inc. The Singing Machine® est une marque déposée par The Singing Machine Co., Inc.
-
Page 2: Important Safety Information
Warnings WARNING: TO PREVENT FIRE OR SHOCK HAZARD, DO NOT EXPOSE CAUTION THIS UNIT TO RAIN OR MOISTURE. RISK OF ELECTRIC SHOCK Warnings: DO NOT OPEN • This CD player employs a laser light beam. Only a qualified service person should remove the cover or attempt to service this device, due CAUTION: TO REDUCE THE RISK OF ELECTRIC SHOCK, DO NOT to possible eye injury. - Page 3 COMPLIANCE WITH FCC REGULATIONS FCC ID: This device complies with Part 15 of the FCC Rules. Operation is subject to the following two conditions: (1) this device may not cause harmful interference, and (2) this device must accept any interference received, including interference that may cause undesired operation.
- Page 4 Included What’s in the box. Main Unit Wired Microphone AC Adapter Manual Welcome Kit Audio/Video Cables — E2 —...
-
Page 5: Location Of Controls (Front)
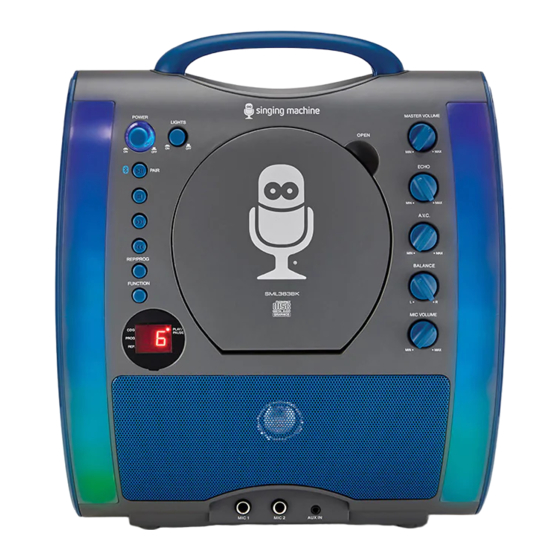
Location of Controls (Front) 1. Handle 11. FUNCTION button 22. MIC VOLUME control 2. LIGHTS button 12. Display 23. CDG indicator 3. ON/STANDBY indicator 13. Speaker 24. PLAY/PAUSE indicator 4. ON/STANDBY button 14. AUX IN jack 25. PROGRAM indicator 5. Lights 15. -
Page 6: Location Of Controls (Rear)
Location of Controls (Rear) 27. VIDEO OUT jack 28. AUDIO OUT jack (R) 29. AUDIO OUT jack (L) 30. DC IN Jack 31. Battery Door Connection Installation of Batteries DC OPERATION 1. Slide the battery door in the direction of the arrow to reveal the battery compartment. Insert eight (8) “C”... -
Page 7: Connecting The Microphone(S)
Connection Connecting the Microphone(s) Microphones: Connect a microphone into Mic jack 1 as well as Mic jack 2 (when desired). Note: Do not drop or tap the Mic as damage to the Mic or speakers may occur. Do not twirl the microphone cord as it will cause damage to the encased wiring. - Page 8 Connection Connecting to AC Power Insert the AC power cord into an AC outlet having 100-240V AC, 50- 60Hz. Note: Make all connections before connecting to AC power. Connecting to AUX In Jack Connect an external device by using an appropriate cable (3.5mm audio cable not included) as shown.
-
Page 9: Operation
Operation Playing a CDG Connect the unit as described previously; if using a CD+G, it is recommended to connect to a TV. Press the ON/STANDBY button to turn the unit on. Lift open the CD door and insert a CD or a CD+G by gently pressing it on the center spindle. - Page 10 Operation Playing a CDG (Continued) Adjust the volume to a comfortable level using the MASTER VOLUME control. Connect microphone(s) and slide the ON/OFF switch on the microphone to the ON position. Adjust the MIC VOLUME control as desired. Increasing this control will increase the volume of both microphones.
- Page 11 Operation Playing a CDG (Continued) SKIP: Advance or go back one track by pressing the Skip /Skip buttons. REPEAT: During playback, press the PROGRAM/REPEAT button once to repeatedly play the selected song; the REPEAT indicator will blink. Press the PROGRAM/ REPEAT button a second time to repeatedly play the whole CD;...
- Page 12 Operation Playing a CDG (Continued) PAUSE: During playback, if you wish to pause the disc momentarily, press the PLAY/PAUSE/PAIR button; the PLAY/PAUSE indicator will blink. Press again to resume normal playback. Press the STOP button to stop playback. Press the ON/STANDBY button to turn the unit off.
- Page 13 Operation Using a Bluetooth Device Connect the unit as described previously. Press the ON/STANDBY button to turn the unit on. Repeatedly press the FUNCTION button to select the Bluetooth mode; “bt” will blink in the display as the unit automatically searches for and pairs a previously paired Bluetooth device (if previously paired).
- Page 14 Operation Using a Bluetooth Device (Continued) To control your Bluetooth device from this unit, press the PLAY/PAUSE/ PAIR button to start playback. Press the PLAY/PAUSE/PAIR button during playback to pause the song. Adjust the volume to a comfortable level using the MASTER VOLUME control on this unit as well as the volume on your Bluetooth device.
- Page 15 Operation Using the AUX IN Jack Connect the unit as described previously. Press the ON/STANDBY button to turn the unit on. Repeatedly press the FUNCTION button to select the AUX IN mode; “AU” will appear on the display. Connect the external unit to the AUX IN Jack on the front of this unit.
- Page 16 Operation Using the AUX IN Jack (Continued) Adjust the MIC VOLUME control as desired. Increasing this control will increase the volume of both microphones. Rotate the ECHO control to add an echo effect to your voice. Rotate towards MAX to increase the echo effect.
-
Page 17: Troubleshooting Guide
• Make sure the MIC VOLUME setting is not set too low. • MASTER VOLUME is set to minimum; raise volume. • Adjust the ECHO control past the mid point on the Singing Machine. The Bluetooth device cannot be paired or connected with the unit •... -
Page 18: Specifications
The Bluetooth® word mark and logos are registered trademarks owned by Bluetooth SIG, Inc. and any use of such marks and logos by The Singing Machine Company, Inc. is under license. Other trademarks and trade names are those of their respective owners. - Page 19 Advertencias ADVERTENCIA: PARA EVITAR INCENDIOS O PELIGROS DE DESCARGA, PRECAUCIÓN NO EXPONGA ESTA UNIDAD A LA LLUVIA O HUMEDAD. RIESGO DE DESCARGA Advertencias: ELÉCTRICA. NO ABRIR • Este reproductor de CD utiliza un haz de luz láser. Solo la persona de reparaciones calificada es quien puede retirar la cubierta y reparar este PRECAUCIÓN: PARA REDUCIR EL RIESGO DE DESCARGAS ELÉCTRICAS, dispositivo debido a posibles lesiones en la vista.
- Page 20 COMPLIANCE WITH C REGULATIONS - English: This device complies with Industry Canada licence-exempt RSS standard(s). Operation is subject to the following two conditions: (1) This device may not cause interference, and (2) This device must accept any interference, including interference that may cause undesired operation of the device. - French: Le présentappareilestconforme aux CNR d'Industrie Canada applicables aux appareils radio exempts de licence.
- Page 21 Se incluyen Asegúrese de que estén incluidos los siguientes elementos. Unidad principal Micrófono con cable Adaptador de CA Manual Kit de bienvenida Cables de Audio/Video — S2 —...
- Page 22 Location of Controls (Front) Manija 10. Botón PROGRAMAR/ VOLUME) REPETIR (PROGRAM/ Botón de Luces 19. Control de ECO (ECHO) REPEAT) Indicador de 20. Control de voz 11. Botón de FUNCIÓN ENCENDIDO/ESPERA automático (Auto Voice) (FUNCTION) (ON/STANDBY) 21. Control de BALANCE 12.
- Page 23 Ubicación de los controles (reverso) 27. Conector de SALIDA DE VIDEO (VIDEO OUT) 28. SALIDA AUXILIAR (AUX OUT) derecha (R) 29. SALIDA AUXILIAR (AUX OUT) izquierda (L) 30. Conector de entrada de CC 31. Compartimiento para pilas CONEXION INSTALACIÓN DE LAS PILAS FUNCIONAMIENTO DE CC 1.
- Page 24 CONEXION Conexión de micrófono(s) Micrófonos: Inserte el enchufe de un micrófono en la entrada para micrófono 1 u y el otro enchufe de micrófono en la entrada para micrófono v (si lo desea). Nota: No arroje o dé golpecitos al micrófono, puede dañar el micrófono o los parlantes.
- Page 25 Conexió Conexión a alimentación de corriente alterna Introduzca el cable de alimentación de CA en un tomacorriente de CA con 100-240 V de CA, 50/60 Hz. Nota: Haga todas las conexiones antes de enchufar a la alimentación de CA. Conexión a entrada de Aux Conecte su dispositivo externo utilizando un cable adecuado (no se incluye el cable de audio de 3,5mm)
- Page 26 Funcionamiento Reproducción de un CDG Conecte la unidad como se describió antes; si utiliza CD+G, se recomienda que conecte un televisor. Oprima el botón de ENCENDIDO/ESPERA (ON/STANDBY) para encender la unidad. Abra el compartimiento de CD e introduzca un CD o un CD+G presionándolo cuidadosamente en el husillo central.
- Page 27 Funcionamiento Reproducción de un CDG (Continuó) Ajuste el volumen a un nivel conveniente, usando el control de VOLUMEN PRINCIPAL. Conecte el/los micrófono/s. Ubique el interruptor de ENCENDIDO/ESPERA (ON/STANDBY) del Control remoto/ Micrófono en la posición de ENCENDIDO (ON). Ajuste el control de VOLUMEN DEL MICRÓFONO (MIC VOLUME) hasta el nivel deseado.
- Page 28 Funcionamiento Reproducción de un CDG (Continuó) SALTO: Avance o retroceda una pista oprimiendo los botones de SALTO FUNCIÓN REPETIR: Durante la reproducción, presione REPETIR/ PROGRAMAR (REPEAT/PROGRAM) una vez para que se reproduzca varias veces la canción seleccionada; el indicador Repetir (Repeat) parpadeará.
- Page 29 Funcionamiento Reproducción de un CDG (Continuó) Nota: • Oprima DOS VECES DETENER para detener y eliminar el programa. PAUSAR (PAUSE): Durante la reproducción, si desea pausar momentáneamente el disco, oprima REPRODUCIR/ PAUSAR (PLAY/ PAUSE); el indicador REPRODUCIR/ PAUSAR (PLAY/PAUSE) parpadeará. Oprima nuevamente para reanudar la reproducción normal.
- Page 30 Funcionamiento Utilizar un dispositivo Bluetooth Conecte la unidad como se describió previamente. Oprima ENCENDIDO/ ESPERA (ON/STANDBY) para encender la unidad. Oprima varias veces FUNCIÓN para seleccionar Bluetooth; “bt” parpadeará en la pantalla mientras la unidad busca automáticamente y empareja un dispositivo Bluetooth previamente emparejado (si ya se realizó...
- Page 31 Funcionamiento Utilizar un dispositivo Bluetooth (Continuó) Para controlar su dispositivo Bluetooth desde esta unidad, oprima REPRODUCIR/ PAUSAR/ SINCRONIZAR (PLAY/PAUSE/ PAIR) para comenzar la reproducción. Presione REPRODUCIR/ PAUSAR/ SINCRONIZAR (PLAY/PAUSE/PAIR) durante la reproducción para pausar la canción. Ajuste el volumen a un nivel conveniente usando el control de VOLUMEN PRINCIPAL (MASTER VOLUME) de esta unidad, así...
- Page 32 Funcionamiento Uso del conector de ENTRADA AUX Conecte la unidad como se describió antes. Oprima el botón de ENCENDIDO/ESPERA (ON/STANDBY) para encender la unidad. Oprima el botón FUNCIÓN (FUNCTION) varias veces para seleccionar el modo ENTRADA AUXILIAR (AUX IN); aparecerá “AUXILIAR”...
- Page 33 Funcionamiento Uso del conector de ENTRADA AUX (Continuó) Ajuste el control de VOLUMEN DEL MICRÓFONO (MIC VOLUME) hasta el nivel deseado. Al aumentar el nivel de este control se incrementará el volumen de los dos micrófonos. Gire el control de ECO (ECHO) para darle un efecto de eco a su voz.
-
Page 34: Guía De Resolución De Problemas
Guía de Resolución de Problemas Si esta unidad presentara un problema, lea el siguiente cuadro antes de llamar al servicio técnico: No hay energía • La unidad no está encendida; oprima ENCENDIDO/ESPERA (ON/STANDBY) para encenderla. • Verifique que el adaptador de CA esté conectado de forma segura en la parte trasera de la unidad. -
Page 35: Especificaciones
El nombre de la marca Bluetooth® y los logotipos son marcas registradas propiedad de Bluetooth SIG, Inc., y todo uso que The Singing Machine Company haga de dichas marcas es en virtud de una licencia. Otras marcas registradas y comerciales pertenecen a sus respectivos titulares. - Page 36 Mises en Garde ATTENTION: POUR ÉVITER UN INCENDIE OU UN RISQUE D’ÉLECTROCUTION ATTENTION NE PAS EXPOSER CET ENSEMBLE À LA PLUIE OU À L’HUMIDITÉ. RISQUE DE CHOC ÉLECTRIQUE. Mises en garde: NE PAS OUVRIR • Ce lecteur CD utilise un rayon laser. Seul un personnel qualifié de maintenance peut ôter le couvercle ou essayer de réparer ce matériel, ATTENTION: AFIN DE RÉDUIRE LES RISQUES DE CHOCS ÉLECTRIQUES, en raison des risques encourus pour la vision.
- Page 37 Contenu Qu’y a-t-il dans la boîte. Module principal Microphone filaire Adaptateur secteur Manuel d'utilisation Ensemble de bienvenue Câbles audio/vidéo — F2 —...
- Page 38 Position des commandes (face avant) Poignée REPEAT (Programmer/ 20. Auto Voice Control répéter) (Contrôle automatique Bouton LIGHTS de la voix) (Lumières) 11. Bouton FUNCTION (Fonction) 21. Commande BALANCE Voyant ON/STANDBY (Équilibrage) (Allumé/en veille) 12. Affichage 22. Commande MIC Bouton ON/STANDBY 13.
- Page 39 Position des commandes (Arrière) 27. Jack VIDEO OUT (Sortie vidéo) 28. Jack de sortie audio droit (AUDIO OUT) (R) 29. Jack de sortie audio gauche (AUDIO OUT) (L) 30. Jack DC In 31. Couvercle du compartiment à piles Connexion Installation des piles Fonctionnement sur CC 1.
-
Page 40: Connecter Le(S) Microphone(S)
Connexion Connecter le(s) microphone(s) Microphones : Connectez un microphone au jack Mic 1 ainsi qu’au jack Mic 2 (si vous le souhaitez). Remarque: Ne faites pas tomber ou ne cognez pas le microphone car cela pourrait endommager le microphone ou les haut-parleurs. - Page 41 Connexion Connexion à l’alimentation secteur Insérez la fiche secteur dans une prise de courant CA, disposant de 100- 240 V CA, 50-60 Hz. Remarque: Connectez tous les éléments avant de raccorder l’appareil au secteur. Connexion au jack AUX In Connectez un appareil externe en utilisant un câble adapté...
- Page 42 Fonctionnement Lecture d’un CDG Connectez l’appareil tel que décrit précédemment ; si vous utilisez un CD+G, il est recommandé de connecter un téléviseur. Appuyez sur le bouton ON/STANDBY pour allumer l’appareil. Ouvrez la porte de CD et insérez un CD ou un CD+G en appuyant délicatement sur l’axe central.
- Page 43 Fonctionnement Lire un CDG (Suite) Ajustez le volume à un niveau agréable en utilisant la commande MASTER VOLUME (Volume principal). Connectez le(s) microphone(s) et faites glisser le bouton ON/OFF du microphone en position ON. Réglez la commande MIC VOLUME (Volume du microphone) comme vous le souhaitez.
- Page 44 Fonctionnement Lire un CDG (Suite) SKIP (Suivant) : Avancez ou reculez d’une piste en appuyant sur les boutons Skip /Skip REPEAT (Répéter) : Pendant la lecture, appuyez une fois sur le bouton PROGRAM/REPEAT (Programmer/répéter) pour lire plusieurs fois le titre sélectionné ; le voyant REPEAT se met à...
- Page 45 Fonctionnement Lire un CDG (Suite) Remarque: • Appuyez deux fois sur le bouton STOP pour arrêter et effacer le programme. PAUSE : Lors de la lecture, si vous souhaitez temporairement mettre le disque en pause, appuyez sur le bouton PLAY/PAUSE/PAIR (lecture/pause/couplage) ;...
- Page 46 Fonctionnement Utilisation d’un appareil Bluetooth Connectez l’appareil tel que cela a été décrit précédemment. Appuyez sur le bouton ON/STANDBY (allumer/veille) pour allumer l’appareil. Appuyez plusieurs fois sur le bouton FUNCTION (Fonction) pour sélectionner le mode Bluetooth ; « bt » se met à clignoter à...
- Page 47 Fonctionnement Utilisation d’un appareil Bluetooth (suite) Afin de contrôler votre appareil Bluetooth depuis cet appareil, appuyez sur le bouton PLAY/PAUSE/PAIR pour lancer la lecture. Appuyez sur le bouton PLAY/PAUSE/PAIR lors de la lecture pour mettre le titre en pause. Ajustez le volume à un niveau agréable en utilisant la commande MASTER VOLUME de cet appareil ainsi que la commande de volume de votre appareil...
- Page 48 Fonctionnement Utilisation du jack AUX IN Connectez l’appareil tel que cela a été décrit précédemment. Appuyez sur le bouton ON/STANDBY (Allumer/veille) pour allumer l’appareil. Appuyez plusieurs fois sur le bouton FUNCTION (Fonction) pour sélectionner le mode AUX IN ; « AU » apparait à l’écran.
- Page 49 Fonctionnement Utilisation du jack AUX IN (suite) Réglez la commande MIC VOLUME (Volume du microphone) comme vous le souhaitez. Si vous augmentez cette commande, cela augmentera le volume des deux microphones. Tournez la commande ECHO pour ajouter un effet d’écho à votre voix. Tournez-la vers MAX pour augmenter l’effet de résonance.
-
Page 50: Guide De Dépannage
Guide de dépannage Si vous rencontrez un problème avec cet appareil, vérifiez la liste suivante avant de demander de l’aide : Ne s’allume pas • L’appareil n’est pas sous tension, appuyez sur le bouton ON/STANBY (Marche/veille).pour le mettre sous tension •... -
Page 51: Spécifications
Spécifications AUDIO PUISSANCE DE SORTIE (MAXIMALE) ................2 Watts (RMS) IMPÉDANCE DE SORTIE ......................8 Ohms SECTION LECTEUR DE CD FRÉQUENCE RÉPONSE ....................100 Hz - 20 kHz RAPPORT SIGNAL-BRUIT ....................... 50 dB NOMBRE DE PROGRAMMES ..Système d’échantillonnage de programmation aléatoire 20 pistes BLUETOOTH Version Bluetooth ..........................V4.2... -
Page 52: Wichtige Sicherheitsinformationen
Warnhinweise WARNHINWEIS: ZUR VERHÜTUNG VON FEUER UND ELEKTRISCHEM ACHTUNG SCHLAG DIESES GERÄT NICHT REGEN ODER SONSTIGER FEUCHTIG- KEIT AUSSETZEN. GEFAHR EINES STROMSCHLAGES NICHT ÖFFNEN Warnhinweise: ACHTUNG: UM DIE GEFAHR EINES ELEKTROSCHOCKS ZU VERMINDERN, • Dieser CD-Player verwendet ein Laserlichtband. Nur der qualifizierte DIE ABDECKUNG (ODER RÜCKSEITE) NICHT ABNEHMEN. - Page 53 Enthalten Was gibt‘s in der Schachtel. Haupteinheit Kabelgebundenes Mikrofon AC Netzadapter Handbuch Willkommens-Set Audio-/Videokabel — G2 —...
- Page 54 Standort der Kontrollen (Vorderseite) Griff 10. PROGRAM/REPEAT 19. Echoregelung (Programm/ LICHT-Taste 20. Automatische Wiederholung) Taste Stimmregelung ON/STANDBY (An/ 11. FUNCTION (Funktion) Standby) Anzeige 21. BALANCE Control -Taste (Ausgleichsregelung) ON/STANDBY Taste 12. Anzeige 22. MIK Lautstärkenregelung Lichter 13. Lautsprecher 23. CDG-Anzeige PLAY/PAUSE/PAIR 14.
- Page 55 Position der Kontrollen (Hinterseite) 27. VIDEO-AUSGANG Jack 28. AUDIO-AUSGANG Jack (R) 29. AUDIO-AUSGANG Jack (L) 30. DC-EINGANG Jack 31. Batterie-Tür Anschluss Installation der Batterien DC-Betrieb 1. Schieben Sie die Tür in die angezeigte Richtung, um das Batteriefach zu öffnen. Setzen Sie acht (8) „C“-Größen Alkalische Batterien (nicht enthalten) ein, so wie es abgebildet ist.
-
Page 56: Mikrofon(E) Anschließen
Anschluss Mikrofon(e) anschließen Mikrofone: Stecken Sie ein Mikrofon in den Mic Jack 1 ein und auch in Mic Jack 2 (auf Wunsch). Anmerkung: Lassen Sie das Mikrofon nicht fallen, und klopfen Sie nicht mit Gewalt auf das Mikrofon, da dadurch das Mikrofon oder die Lautsprecher beschädigt werden können. - Page 57 Anschluss Anschließen des Netzstroms Verbinden Sie das AC-Netzkabel mit einer AC Standard-Steckdose mit 100-240V AC, 50-60Hz. Anmerkung: Nachdem Sie Anschlüsse vorgenommen haben, schließen Sie das AC Stromkabel an. Anschließen des AUX In Jacks Schließen Sie ein externes Gerät an, indem Sie ein passendes Kabel verwenden (3.5mm Audiokabel, nicht enthalten), wie angezeigt.
-
Page 58: Betrieb
Betrieb Eine CDG spielen Schließen Sie die Einheit wie vorher beschrieben an; falls Sie eine CD+G benutzen, ist es empfohlen, einen Fernseher anzuschließen. Drücken Sie die ON/STANDBY-Taste, um die Einheit einzuschalten. Öffnen Sie die CD-Tür und setzen Sie eine CD oder eine CD+G ein, indem Sie sanft auf die zentrale Spindel drücken. - Page 59 Betrieb Eine CD spielen (Fortsetzung) Stellen Sie die Lautstärke auf ein angenehmes Niveau anhand der MASTER VOLUME Regelung. Schließen Sie das/die Mikrofon(e) an und schalten Sie den ON/OFF Schalter des Mikrofons auf ON. Regeln Sie den MIC VOLUME wie Sie es wünschen.
- Page 60 Betrieb Eine CD spielen (Fortsetzung) SKIP (Auslassen): Gehen Sie ein Lied vorwärts oder rückwärts, indem Sie die Skip Tasten /Skip drücken. REPEAT (Wiederholen): Während die Musik spielt, drücken Sie einmal die PROGRAM/REPEAT-Taste, um das ausgewählte Lied wiederholt zu spielen; die REPEAT-Anzeige blinkt dabei auf.
- Page 61 Betrieb Eine CD spielen (Fortsetzung) Anmerkung: • Drücken Sie die STOP-Taste ZWEIMAL, um das Programm zu stoppen und zu löschen. PAUSE: Während des Spielens, falls Sie die Platte momentan auf Pause schalten möchten, drücken Sie die PLAY/PAUSE/PAIR-Taste; die PLAY/PAUSE Anzeige blinkt dabei.
- Page 62 Betrieb Verwendung eines Bluetooth-Gerätes Schließen Sie die Einheit wie vorher beschrieben an. Drücken Sie die ON/ STANDBY Taste, um die Einheit einzuschalten. Drücken Sie mehrmals die FUNCTION- Taste, um den Bluetooth-Modus auszuwählen; “bt” blinkt auf der Anzeige während die Einheit automatisch ein vorher gepaartes Gerät sucht und paart (falls dieses schon vorher gepaart wurde).
- Page 63 Betrieb Verwendung eines Bluetooth-Gerätes (Fortsetzung) Um Ihr Bluetooth-Gerät von dieser Einheit aus zu steuern, drücken Sie die PLAY/PAUSE/PAIR-Taste, damit die Musik beginnt. Drücken Sie die PLAY/ PAUSE/PAIR-Taste während des Spielens, um das Lied zu pausieren. Stellen Sie sowohl die Lautstärke auf ein angenehmes Niveau anhand des MASTER VOLUME Reglers dieser Einheit als auch die Lautstärke Ihres Bluetooth-Gerätes.
- Page 64 Betrieb Verwendung des AUX IN Jacks Schließen Sie die Einheit wie vorher beschrieben an. Drücken Sie die ON/ STANDBY-Taste, um die Einheit einzuschalten. Drücken Sie wiederholt die FUNCTION- Taste, um den AUX IN-Modus auszuwählen; “AU” erscheint dabei auf dem Display. Schließen Sie die externe Einheit an den AUX IN Jack an der Vorderseite dieser Einheit an.
- Page 65 Betrieb Verwendung des AUX IN Jacks (Fortsetzung) Regeln Sie den MIC VOLUME-Regler (Mikrofon-Lautstärke), wie Sie es wünschen. Wenn Sie diese Einstellung lauter stellen, wird die Lautstärke beider Mikrofone erhöht. Drehen Sie die ECHO-Regelung, um Ihrer Stimme einen Echo-Effekt hinzuzufügen. Drehen Sie in Richtung MAX, um den Echo-Effekt stärker zu stellen.
- Page 66 Fehlersuchanleitung Sollte diese Einheit ein Problem aufweisen, überprüfen Sie folgende Elemente, bevor Sie Dienstleistungen suchen. Schaltet nicht ein • Das Gerät ist nicht eingeschaltet; drücken Sie die Power ON/STANBY -Taste, um es einzuschalten. • Vergewissern Sie sich, dass das Stromkabel sicher an der Hinterseite der Einheit angeschlossen ist. •...
-
Page 67: Spezifikationen
Verbesserung, ohne Vorankündigung und/oder ohne Verbindlichkeit. Die Wortmarke Bluetooth® und die Logos sind eingetragene Marken und Logos von Blue- tooth SIG, Inc. und werden von The Singing Machine Company, Inc. unter Lizenz verwendet. Andere Marken und Produktnamen sind Eigentum der jeweiligen Rechteinhaber. -
Page 68: Importanti Istruzioni Di Sicurezza
Avvertenze AVVISO: PER RIDURRE IL RISCHIO DI SCOSSE ELETTRICHE, NON ATTENZIONE ESPORRE L’UNITÀ A PIOGGIA O UMIDITÀ. RISCHIO DI SCOSSE ELETTRICHE Avvertenze: NON APRIRE • Il lettore CD impiega un fascio di luce laser. Soltanto un tecnico qualificato dovrebbe rimuovere il coperchio o tentare di riparare il ATTENZIONE: PER RIDURRE IL RISCHIO DI SCOSSE ELETTRICHE, NON RIMUOVERE dispositivo, a causa di possibili lesioni agli occhi. -
Page 69: La Confezione Include
La confezione include Cosa include la confezione? Unità principale Microfono cablato Adattatore per corrente alternata (CA) Manuale Kit di benvenuto Cavi audio/video — I2 —... - Page 70 Posizione dei comandi (Anteriore) 1. Maniglia 11. Tasto FUNZIONE 21. Pulsante BILANCIAMENTO 2. Tasto LUCI 12. Display 22. Tasto VOLUME MIC 3. Led ON/STANDBY 13. Altoparlante 23. Led CDG 4. Tasto ON/STANDBY 14. Jack AUX IN 24. Led PLAY/PAUSE 5. Luci 15.
- Page 71 Posizione dei comandi (Posteriore) 27. Jack VIDEO OUT 28. Jack AUDIO OUT (D) 29. Jack AUDIO OUT (S) 30. Jack DC IN 31. Sportello batteria Collegamento Installazione delle batterie FUNZIONAMENTO CC 1. Far scorrere la porta della batteria nella direzione delle frecce per rivelare il vano batterie. Inserire otto (8) batterie "C"...
-
Page 72: Collegamento Dei Microfoni
Collegamento Collegamento dei microfoni Microfoni: Collegare un microfono nel Mic jack 1 e nel Mic jack 2 (se desiderato). Nota: Non far cadere e non toccare il microfono in quanto si potrebbero verificare danni al microfono o agli altoparlanti. Non ruotare il cavo del microfono poiché potrebbe danneggiare il cablaggio inserito. - Page 73 Collegamento Collegamento all’alimentazione CA: Inserire il cavo di alimentazione CA in una presa CA, 100-240V CA, 50- 60Hz. Nota: Effettuare tutte le connessioni prima di collegarsi all'alimentazione CA. Collegamento a AUX In Jack È possibile collegare un dispositivo esterno utilizzando un cavo adatto (cavo audio 3,5 mm non incluso) come indicato.
-
Page 74: Funzionamento
Funzionamento Riproduzione di un CDG Collegare l’unità come descritto in precedenza; se si utilizza un CD+G, si consiglia di collegarla ad una TV. Premere il tasto ON/STANDBY per accendere l’unità. Sollevare lo sportello del CD e inserire un CD o un CD+G premendo delicatamente sul perno centrale. - Page 75 Funzionamento Riproduzione di un CDG (Continua) Regolare il volume ad un livello confortevole utilizzando il pulsante VOLUME MASTER. Collegare i microfoni e far scorrere l’interruttore ON/OFF sul microfono in posizione ON. Regolare il tasto VOLUME MIC a piacimento. Verrà cosi aumentato il volume di entrambi i microfoni.
- Page 76 Funzionamento Riproduzione di un CDG (Continua) SKIP: Andare avanti o indietro di un brano premendo il tasto Skip Skip RIPETI: Durante la riproduzione, premere il tasto PROGRAMMA/ RIPETI una volta per riprodurre ripetutamente il brano selezionato; il led REPEAT lampeggerà. Premere il tasto PROGRAMMA/RIPETI una seconda volta per riprodurre ripetutamente l’intero CD;...
- Page 77 Funzionamento Riproduzione di un CDG (Continua) Nota: • Premere il tasto STOP DUE VOLTE per interrompere e cancellare il programma. PAUSE: Durante la riproduzione, se si desidera interrompere momentaneamente il disco, premere il tasto PLAY/PAUSE/ COPPIA; il led PLAY/PAUSE lampeggerà. Premere nuovamente per riprendere la riproduzione normale.
- Page 78 Funzionamento Utilizzo di un Dispositivo Bluetooth Collegare l'unità cosi come descritto in precedenza. Premere il tasto ON/STANDBY per accendere l’unità. Premere ripetutamente il tasto FUNZIONE per selezionare il Bluetooth; “bt” lampeggerà sullo schermo poiché l’unità cerca automaticamente e associati ai dispositivi Bluetooth associati in precedenza (se associati in precedenza).
- Page 79 Funzionamento Utilizzo di un Dispositivo Bluetooth (Continua) Per controllare il dispositivo Bluetooth da questa unità, premere il tasto PLAY/PAUSE/COPPIA per avviare la riproduzione. Premere il tastoPLAY/ PAUSE/COPPIA durante la riproduzione per interrompere il brano. Regolare il volume ad un livello confortevole utilizzando il pulsante VOLUME MASTER sull’unità...
- Page 80 Funzionamento Utilizzo del Jack AUX IN. Collegare l'unità cosi come descritto in precedenza. Premere il tasto ON/ STANDBY per accendere l’unità. Premere ripetutamente il tasto FUNZIONE per selezionare la modalità AUX IN; sul display comparirà “AU”. Collegare l’unità esterna al Jack AUX IN sulla parte anteriore di questa unità.
- Page 81 Funzionamento Utilizzo del Jack AUX IN (Continua) Regolare il pulsante VOLUME MIC a piacimento. Verrà cosi aumentato il volume di entrambi i microfoni. Ruotare il pulsante ECHO per aggiungere un effetto eco alla voce. Girare verso MAX per aumentare l'effetto eco. Regolare l’equilibrio tra gli altoparlanti utilizzando il tasto BILANCIAMENTO.
-
Page 82: Guida Alla Risoluzione Dei Problemi
Guida alla risoluzione dei problemi Qualora l’unità dovesse mostrare dei problemi, eseguire le seguenti verifiche prima di rivolgersi all’assistenza: Alimentazione mancante • L’alimentazione non è accesa; premere il tasto ON/STANDBY per accendere l’unità. • Verificare che l'adattatore CA sia collegato in sicurezza nella parte posteriore dell’unità. •... -
Page 83: Specifiche Tecniche
Il marchio scritto e il logo Bluetooth® sono marchi registrati di proprietà di Bluetooth SIG, Inc. e l'uso di tali marchi e loghi da parte di The Singing Machine Company, Inc. è regolato da licenza. Altri marchi e nomi commerciali sono di proprietà dei rispettivi titolari. - Page 84 Visit Our Website: www.singingmachine.com Visite nuestro sitio web: www.singingmachine.com Visitez notre site internet : www.singingmachine.com Besuchen Sie unsere Webseite: www.singingmachine.com Visitate il nostro sito web: www.singingmachine.com Singing Machine is distributed in the UK and Europe by: Singing Machine - Distribuido en Reino Unido y Europa por: Singing Machine est distribué...
Need help?
Do you have a question about the SML363BK and is the answer not in the manual?
Questions and answers