Advertisement
Quick Links
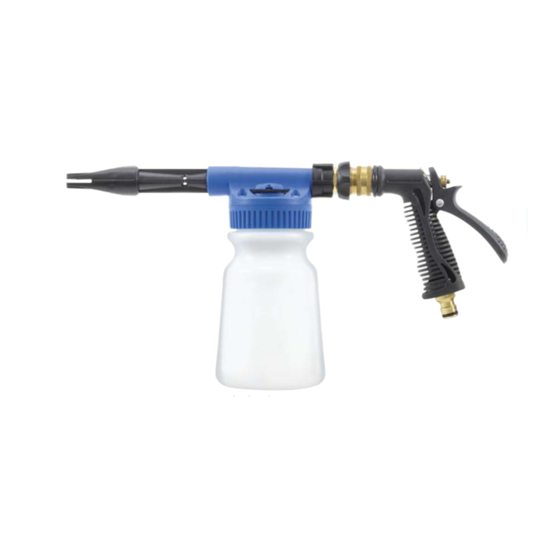
Bedienungsanleitung easyfoam365+ foam gun / Schaumkanone
Artikel-Nr.: 106 996 500
Beschreibung
Die Schaumkanone dient dazu, Schaummittel, die zum Aufschäumen
geeignet sind, aufzuschäumen. Zum Reinigen, Entfetten oder Desinfizieren, wenn Schaum über längere
Zeit einwirken soll. Anwendung im Supermarkt, Fleischschneideräume und Ausrüstung.
Bereiche für die Handhabung und Zubereitung von Lebensmitteln,
institutionelle, industrielle oder öffentliche Toiletten,
Duschräume und Umkleideräume. Für Tierkäfige,
Molkereiausrüstung, Lastwagen, Autos und andere Geräte.
Allgemeine Sicherheitshinweise
•
Zur Gewährleistung eines sicheren Betriebs darf die Schaumkanone
nur gemäß dieser Betriebsanleitung betrieben werden.
•
Bewahren Sie diese Betriebsanleitung für den späteren Gebrauch auf.
•
Beachten Sie auch die Sicherheitshinweise für das Reinigungsmittel.
•
Reinigungsmittel nicht miteinander vermischen.
•
Bei der Arbeit geeignete Schutzbekleidung, Augenschutz und Schutzhandschuhe tragen.
•
Die Schaumkanone niemals auf Personen oder andere Lebewesen richten.
•
Beachten Sie die entsprechen den Sicherheits- und Verarbeitungsvorschriften.
•
Sprühen Sie kein Wasser oder keine Lösung in eine Steckdose. Dies kann zu einem schweren Stromschlag führen.
•
Führen Sie Ihre Hände nach dem Umgang mit dem Produkt nicht in den Mund.
NEW
Nehmen Sie das Produkt nicht in den Mund.
•
Waschen Sie Ihre Hände, nachdem Sie dieses Produkt berührt haben. Das Messing in diesem Produkt enthält Blei,
CAR FOAM GUN
eine Chemikalie, von der bekannt ist, dass sie Krebs, Geburtsfehler oder andere reproduktive Schäden verursacht.
embly
Zusätzlich sind für den jeweiligen Anwendungsfall die erforderlichen Sicherheits- und
Info
2.
○
phon pipe
○
7 into the connector
Align four small protuberant parts of foaming stick
6
with
Rechtsvorschriften zu beachten. Erweiternd gilt dies auch für sämtliches Zubehör.
pressed-air pipe under the mixing
○
four grooves of mixing head
5 , and then insert the foaming
○
stick into
B .
Bestimmungsgemäße Verwendung
•
Die Schaumkanone dient zum Zudosieren von Schaummittel zu Wasser, dem anschließenden Aufschäumen
und dann dem Auftragen des Schaumes. Durch Drücken des Griffes entsteht ein horizontaler oder vertikaler Fächer-
strahl, je nach Drehung der Schaumdüse. Die Schaumkanone sollte immer aufrecht gehalten werden.
•
Als Medium dürfen nur Fluide der Gruppe 2 der Druckgeräterichtlinie (DGRL) verwendet werden.
•
Das Gehäuse ist aus PP-GF40 gefertigt und ist nicht geeignet für das Schäumen mit starken Säuren
(pH-Wert < 4), z. B. Ameisensäure, Flußsäure usw.
•
Das Gerät darf nur mit einem Wasserdruck bis 6 bar betrieben werden.
•
Das Gerät ist nicht dafür bestimmt, durch Personen mit eingeschränkten physischen, sensorischen und geistigen Fä-
higkeiten mangels Erfahrung und/oder mangels Wissen benutzt zu werden, es sei denn, sie werden durch eine, für ihre
●
ge Method
Attentions
Sicherheit zuständige Person beaufsichtigt oder erhielten von ihr eine Anweisung, wie das Gerät zu benutzen ist.
•
Kindern ist generell der Betrieb mit diesem Gerät untersagt.
ad the instruction manual carefully and assemble the
1.Joint with the tap water faucet. Please confirm the connections
m gun properly.
tight carefully to avoid any leak.
ht amount of washing fluid.(The capacity of the bottle
2.Please discharge the Hose Kit from the water faucet and Foam
Bei Nichtbenutzung bitte nicht verbrauchte Chemikalie in den Originalbehälter zurückgeben. Flasche gut ausspülen, mit Was-
)
Gun when you don't use it . Pack the House Kit after getting rid
ssemble the Hose Kit to the tap water pipe and New
of water and clear it and then keep it in the incidental thread
ser oder dem entsprechenden Lösungsmittel auffüllen und einige Minuten lang sprühen, um die Öffnung in der Mischkammer
n in right way.
splice bushing.
auszuspülen.
diagram and adjust the graduation according to the
3.When the tap water faucet is open up , pls don't demount the
In Fällen, in denen eine Chemikalie besonders ätzend oder viskos ist, kann es erforderlich sein, den Mischkopf in Wasser
tube or hold the Foam gun in improper way.
oder Neutralisationsmittel zu tauchen. Dies sollte eine Verunreinigung des Mischkopfes und die Ansammlung von getrockne-
tap water faucet.
4.Never mix with other kinds of detergents.
controlling pole of Foam Gun with nozzle aimming at
5.Please don't use it on human being.
ten Chemikalien verhindern.
t and spray foam.
6.It is better to wear rubber gloves and protective glasses when
Reinigen Sie die Schaumkanone äußerlich mit klarem Wasser, sonst besteht die Gefahr, dass sich Anhaftungen festsetzen
a proper time and then offload the foam gun and wash it.
you use it.
und die Schaumkanone in ihrer Funktion beeinträchtigen.
the dirty water with rubber cleaner and then wipe it with
7.Please don't use it for other purpose.
Die Schaumkanone niemals bei geöffnetem Wasserleitungshahn demontieren. Unsachgemäße Verwendung, Wartung oder
or scrap cotton yarn.
8.Please read the attentions of washing products and emergency
Missbrauch ist nicht zulässig. Bestellnummern der Ersatzteile finden Sie umseitig.
hold the controlling pole of gun closely and control the
measures.
after close the tap water faucet.
Seite 1, Ver. 08.2019
3.
○
4.
Tighten the quick connector
○
2 and then
5.
Fill an amount of detergent into the bottle
Install the quick coupling of pistol grip
1
○
attach it
onto the quick connector of mixing head
5
to the pistol grip.
and then
tightly.
9.Please pay attention to the possible liquid leak when lay down the
Foam Gun which loaded with detergent.
●
Maintenance
In order to avoid failures, the NEW Foam gun must be cleaned
after use.
1. Fill clean water into the cleaned bottle to clean the mixing head
a few minutes.
2. To prevent the coagulation of detergent after drying, please
clean the mixing head after immersion in water.
Bedienungsanleitung easyfoam365+ foam gun / Schaumkanone
Artikel-Nr.: 106 996 500
●
Assembly
1.
Plug the siphon pipe
○
7 into the connector
Montage
○
A of compressed-air pipe under the mixing
head
○
7 .
5
1. Stecken Sie
●
den Ansaug-
Usage Method
Schlauch in den
1.Please read the instruction manual carefully and assemble the
Anschluss unter-
New Foam gun properly.
halb des blauen
2.Infuse right amount of washing fluid.(The capacity of the bottle
Mischkopfes.
is 900ml.)
3.Please assemble the Hose Kit to the tap water pipe and New
Das Sieb zeigt
Foam Gun in right way.
nach unten.
●
Disassembly Picture
4.To layout diagram and adjust the graduation according to the
ratio.
5.Open the tap water faucet.
6.Hold the controlling pole of Foam Gun with nozzle aimming at
the object and spray foam.
7.Lay it for a proper time and then offload the foam gun and wash it.
8.Remove the dirty water with rubber cleaner and then wipe it with
clean rag or scrap cotton yarn.
fix the bottle to the mixing head.
9.You must hold the controlling pole of gun closely and control the
moisture after close the tap water faucet.
1
Schaumdüse
Mischkopf
2
3
Anschluss Schaumdüse
4
Unterseite Mischkopf
5
Ansaug-Schlauch (Ersatzteil R+M Nr. 106 996 503)
SN
Parts Name
6
Flasche (Ersatzteil R+M Nr. 106 996 502)
1
Hand grip Black (including 3.4)
2
Quick coupling
7
Griff (Ersatzteil R+M Nr. 106 996 501)
3
Quick connector
4
Washer (Head)
8
Messing-Eingangsnippel (Ersatzteil R+M Nr. 728 311)
5
Mixing head
6
Foaming stick
7
Siphon pipe
8
Bottle
9
Mischkopf-Einstellungsrad
Der Dosierkopf hat 5 Einstellungen für das Mischungsverhältnis und AUS
Process of washing vehicle:
A
1.First flush the vehicle wholly with this water gun.
1:128
2.Connect the foamed gun head with the water gun. Spray out
3,8
foam well proportioned onto the vehicle body.
3.Wipe the vehicle body with sponge
Technische Daten
4.Offload the foamed gun head and washing the vehicle body
clearly with water gun.
Druck
5.Wipe the vehicle body with clean rag. The vechile would
Max. Volumenstrom
look brand-new.
www.rm-suttner.com
Seite 2, Ver. 08.2019
NEW
CAR FOAM GUN
2.
3.
Align four small protuberant parts of foaming stick
○
6
with
Install the quick coupling of pistol grip
onto the quick connector of mixing head
four grooves of mixing head
○
5 , and then insert the foaming
○
B .
tightly.
stick into
1
2
2
2. Stecken Sie die
Schaumdüse in
den Mischkopf und
achten Sie auf den
Ausgang, der einen
horizontalen oder
3. Schieben Sie den schwarzen
vertikalen Sprüh-
Plastik-Anschluss der Schnellkupp-
strahl erzeugen
●
lung am Griff zurück und lassen Sie
Attentions
kann.
den Mischkopf am Messing
1.Joint with the tap water faucet. Please confirm the connections
anschluss dicht einrasten.
tight carefully to avoid any leak.
2.Please discharge the Hose Kit from the water faucet and Foam
Gun when you don't use it . Pack the House Kit after getting rid
of water and clear it and then keep it in the incidental thread
splice bushing.
3.When the tap water faucet is open up , pls don't demount the
tube or hold the Foam gun in improper way.
4.Never mix with other kinds of detergents.
1
2
5.Please don't use it on human being.
6.It is better to wear rubber gloves and protective glasses when
you use it.
7.Please don't use it for other purpose.
9
8.Please read the attentions of washing products and emergency
measures.
3
4
5
6
The assembly drawing of Foam Gun:
B
C
D
E
0
a. Foam gun pipe b.Foam gun body
1:64
1:32
1:20
1:10
aus
d.water gun
7,6
15,2
22,8
45,6 (l/min.)
1. Connect the water gun with the foam gun body.
2. Connect the foam gun body with gun pipe
3. Finish a completed foam gun to washing vehicle
4. Connect the water gun jointer with the Hose Kit
2,5 - 6 bar
5. Connect the Hose Kit with Tap water faucet and then you can
5,5 Liter/min
use it now.
4.
○
5.
○
1
Tighten the quick connector
2 and then
Fill an amount of detergent into the bottle
○
5
attach it
to the pistol grip.
and then
fix the bottle to the mixing head.
1
2
7
6
8
4. Befüllen Sie die Flasche mit dem
gewünschten Schaummittel und
9.Please pay attention to the possible liquid leak when lay down the
platzieren Sie die Flasche unter den
Foam Gun which loaded with detergent.
zusammengesetzten Mischkopf.
Drehen Sie die Flasche zu.
●
Der Messing-Eingangsnippel wird
Maintenance
an der Unterseite des Griffs einge-
schraubt.
In order to avoid failures, the NEW Foam gun must be cleaned
after use.
1. Fill clean water into the cleaned bottle to clean the mixing head
7
a few minutes.
2. To prevent the coagulation of detergent after drying, please
clean the mixing head after immersion in water.
8
●
c. Washing liquid container
Water pressure:2.5 bars to 6 bars.
●
Can use the Tuning Dial to adjust the dilution ratio.
Position of
O
A
B
C
Tuning dial
off
1:128
1:64
1:32
Standard ratio
www.rm-suttner.com
D
E
1:20
1:10
Advertisement

Related Manuals for R+M Suttner 106 996 500


Summary of Contents for R+M Suttner 106 996 500
- Page 1 Bedienungsanleitung easyfoam365+ foam gun / Schaumkanone Bedienungsanleitung easyfoam365+ foam gun / Schaumkanone CAR FOAM GUN Artikel-Nr.: 106 996 500 Artikel-Nr.: 106 996 500 Beschreibung ● Assembly Die Schaumkanone dient dazu, Schaummittel, die zum Aufschäumen geeignet sind, aufzuschäumen. Zum Reinigen, Entfetten oder Desinfizieren, wenn Schaum über längere ○...
- Page 2 User Manual easyfoam365+ foam gun User Manual easyfoam365+ foam gun CAR FOAM GUN Article-Nr.: 106 996 500 Article-Nr.: 106 996 500 Description ● Assembly The foam gun is used for creating foam with foaming agents, which are suitable for producing foam.
Need help?
Do you have a question about the 106 996 500 and is the answer not in the manual?
Questions and answers