Table of Contents
Advertisement
Available languages
Available languages
Quick Links
Installation and operating instructions
Notice de montage et de mise en service Montage- en bedrijfsinstructies
Instrucciones de montaje y uso
EA-Nr.:
76 12982 001291
FAR-Best.-Nr.: 70-1306 10 36
FAID100
EA-Nr.:
76 12982 001307
FAR-Best.-Nr.: 70-1316 10 36
FAID101
EA-Nr.:
76 12982 001789
FAR-Best.-Nr.: 70-1326 10 36
FAID102
EA-Nr.:
76 12982 001314
FAR-Best.-Nr.: 70-1336 10 36
FAID103
Franke Aquarotter GmbH, Germany
18-05.207f-Exp.fm/27.02.13
Istruzioni per il montaggio e l'uso
Monta i instrukcja obs ugi
Advertisement
Chapters
Table of Contents

Related Manuals for Franke FAID100


Summary of Contents for Franke FAID100
- Page 1 76 12982 001291 FAR-Best.-Nr.: 70-1306 10 36 FAID100 EA-Nr.: 76 12982 001307 FAR-Best.-Nr.: 70-1316 10 36 FAID101 EA-Nr.: 76 12982 001789 FAR-Best.-Nr.: 70-1326 10 36 FAID102 EA-Nr.: 76 12982 001314 FAR-Best.-Nr.: 70-1336 10 36 FAID103 Franke Aquarotter GmbH, Germany 18-05.207f-Exp.fm/27.02.13...
- Page 2 ..............3 Please refer to the graphics in the German Installation and Operating Instructions..............11 Les graphiques sont disponibles dans la notice de montage et de mise en service allemande..............20 Por favor, consulte los gráficos en las instruc- ciones alemanas de montaje y uso.
-
Page 3: Table Of Contents
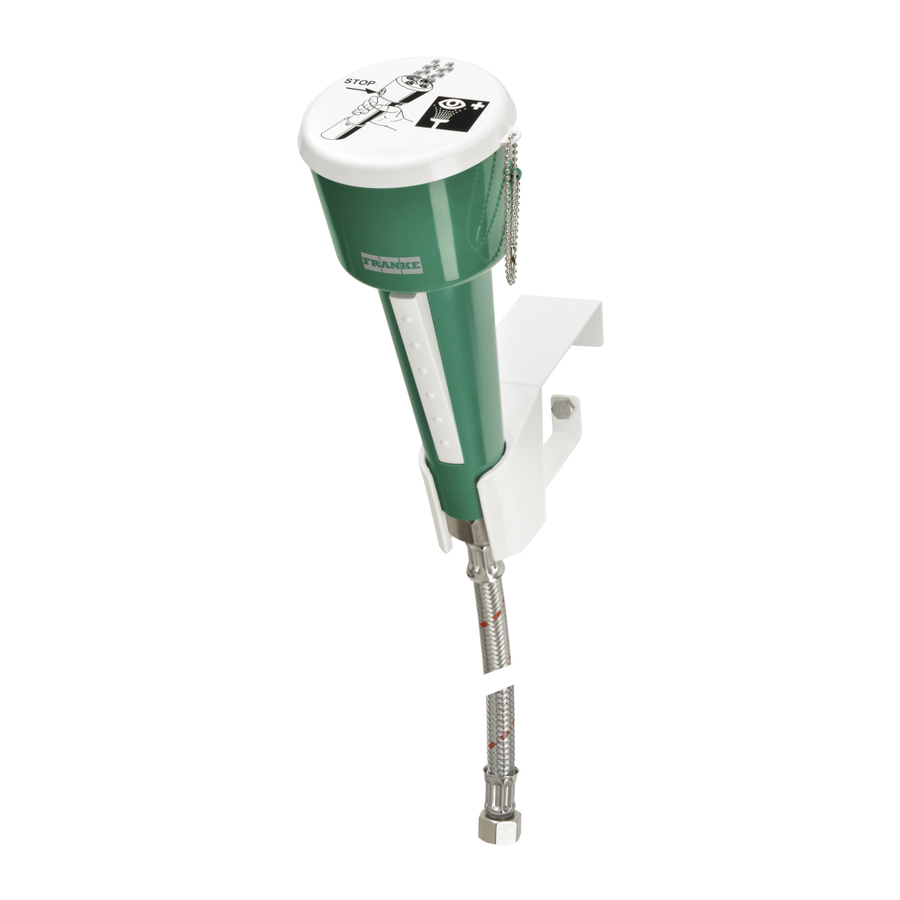
0English Eye- and face-wash fountain for installing on walls or tables 76 12982 001291 ..Table installation 76 12982 001307 ..Wall installation 76 12982 001789 ..Wall installation on laboratory furniture 76 12982 001314 ..Wall installation with spiral hose Please refer to the graphics in the German Installation and Operating Instructions. -
Page 4: Abbreviations And Units
Abbreviations and Units Width A/F EA-Nr. European Article Number FAR-Best.-Nr. Franke Aquarotter Order Number Conversion 1 mm = 0.03937 inches 1 inch = 25.4 mm All length specifications in the graphics are in mm. Warning! Failure to observe can result in injury or even death. -
Page 5: Application
Application Emergency shower fittings are first aid facilities that are prescribed for workplaces where hazardous materials are handled. Technical Specifications Design: Green/white plastic hand shower in a table mounting (brass coated in EPS) or wall mounting made of plastic inclined forward at 20°, with stainless steel covered water connection hose or spiral connection hose, dust protection cap with user instructions... -
Page 6: Dimensions
Dimensions Installation Example A: for table installation B: for wall installation C: for wall mounting and wall duct 10. Assembly instructions (70-1306 10 36) ☞ Important! • Before installing, flush the pipes in compliance with DIN 1988. • Attach the emergency shower according to EN 15154 part 2. 10.1 Insert the table mounting (a) with O-ring in the table plate (b). -
Page 7: Assembly Instructions (70-1326 10 36)
☞ Important! The filter (d) contains the connection seal. ☞ Ensure that the filter is positioned correctly. 12. Assembly instructions (70-1326 10 36) ☞ Important! • Before installing, flush the pipes in compliance with DIN 1988. • Attach the emergency shower according to EN 15154 part 2. 12.1 Mark the drill holes. -
Page 8: Function
14. Function Stationary use 14.1 Press the trigger button. • Water flows. ☞ The trigger button remains in position so that the user can keep his eyes open with both hands. 14.2 Press the red stop button to stop the water flow. Mobile use ☞... -
Page 9: Replacing The Flow Rate Regulator
☞ Ensure correct installation position. 16.7 Replace the filter (c). ☞ Important! The filter contains the connection seal. 16.8 Reassemble in the reverse order. 17. Replacing the Flow Rate Regulator 17.1 Close the isolating valve. 17.2 Take the eye-wash fountain (a) from the wall mounting (b). 17.3 Loosen the union nut (c). -
Page 10: Replacement Parts
20. Replacement Parts Order no.: 70 - 1306 10 36 70 - 1316 10 36 70 - 1326 10 36 Designation Order No. 1 Complete hand shower ..87-100-20.205 2 Spray head (4x) ....87-013-03.065 3 Dust protection cap with ball chain. - Page 11 0Français Douche pour les yeux et le visage pour montage mural ou sur table 76 12982 001291 ..Montage sur table 76 12982 001307 ..Montage mural 76 12982 001789 ..Montage mural sur un meuble de laboratoire 76 12982 001314 ..Montage mural avec tuyau en spirale Les graphiques sont disponibles dans la notice de montage et de mise en service allemande.
-
Page 12: Abréviations Et Unités
Abréviations et unités Ouverture de clé EA-Nr. Numéro d’article européen FAR-Best.-Nr. Numéro de commande Franke AQUAROTTER Conversion 1 mm = 0,03937 pouce 1 pouce = 25,4 mm Les longueurs sont toujours indiquées en mm dans les graphiques. Explication des symboles Avertissement ! Le non-respect des consignes peut entraîner un danger mortel ou des blessures... -
Page 13: Remarques Importantes
Remarques importantes • Seul un spécialiste est habilité à effectuer le montage, la mise en service et l’entretien de l’installation, en conformité aux instructions du manuel livré, aux règlements légaux en vigueur et aux règles techniques en usage. • Observer les conditions techniques de raccordement des entreprises locales de distribution d’eau et d’énergie. -
Page 14: Volume De Livraison
Volume de livraison N° de comm. Positions Pos. Désignation 70 - 1306 10 36 1, 2, 6 Douche pour les yeux avec capuchon de protection contre la poussière 70 - 1316 10 36 1, 3, 6, 8, Support pour table avec set de fixation 70 - 1326 10 36 1, 3, 4, 6,... -
Page 15: Montage (70-1306 10 36)
10. Montage (70-1306 10 36) Important ! • Avant le montage, rincer les conduites conformément à la norme DIN 1988. • Installer la douche de secours selon EN 15154 partie 2. 10.1 Monter le support pour table (a) avec joint torique sur le plateau de la table (b). 10.2 Visser l’écrou (c). -
Page 16: Montage (70-1326 10 36)
12. Montage (70-1326 10 36) Important ! • Avant le montage, rincer les conduites conformément à la norme DIN 1988. • Installer la douche de secours selon EN 15154 partie 2. 12.1 Marquer les perçages. 12.2 Percer selon les marquages. 12.3 Mettre les chevilles en place. -
Page 17: Maintenance Et Entretien
14.2 Pour stopper l’écoulement, appuyer sur la touche d’arrêt rouge. Utilisation mobile ☞ En fonction de la longueur du tuyau de raccordement, la douche pour les yeux peut être sortie du support mural. 15. Maintenance et entretien Contrôler le fonctionnement de la douche pour les yeux une fois par mois. (Directives pour laboratoires BG Il est recommandé, à... -
Page 18: Remplacement Du Régulateur De Débit
17. Remplacement du régulateur de débit 17.1 Fermer le pré-verrouillage. 17.2 Retirer la douche pour les yeux (a) du support mural (b). 17.3 Desserrer l’écrou-raccord (c). 17.4 Extraire le régulateur de débit en le soulevant à l’aide d’un fil courbé et le remplacer. ☞... -
Page 19: Pièces De Rechange
20. Pièces de rechange N° de comm. : 70 - 1306 10 36 70 - 1316 10 36 70 - 1326 10 36 Désignation N° de comm. 1 Douche manuelle complète ..87-100-20.205 2 Pomme de vaporisation (4x) ..87-013-03.065 3 Capuchon de protection contre la poussière avec chaînette à... - Page 20 0Español Ducha ocular y de cara para el montaje en la pared o en la mesa 76 12982 001291 ..montaje en la mesa 76 12982 001307 ..montaje en la pared 76 12982 001789 ..montaje en la pared en mueble de laboratorio 76 12982 001314 ..
-
Page 21: Abreviaciones Y Unidades
Abreviaciones y unidades Ancho de llave EA-Nr. Número de artículo europeo FAR-Best.-Nr. Núm. de pedido Franke Aquarotter Conversión 1 mm. = 0,03937 pulgadas 1 pulgada = 25,4 mm. En los gráficos se especifican todas las longitudes en mm. Aclaración gráfica ¡Aviso! -
Page 22: Advertencias Importantes
Advertencias importantes • El montaje, la puesta en servicio y el mantenimiento, solamente deben ser llevados a cabo por un técnico especializado según las instrucciones adjuntas y observando las prescripciones legales y las reglas técnicas generalmente reconocidas. • Se han de cumplir las condiciones técnicas de conexión de las empresas locales de suministro de agua y energía. -
Page 23: Volumen De Suministro
Volumen de suministro Nº de pedido Posiciones Pos. Denominación 70 - 1306 10 36 1, 2, 6 Ducha ocular con capuchón antipolvo 70 - 1316 10 36 1, 3, 6, 8, Soporte para la mesa con set de montaje 70 - 1326 10 36 1, 3, 4, 6, Soporte mural 70 - 1336 10 36... -
Page 24: Montaje (70-1306 10 36)
10. Montaje (70-1306 10 36) ¡Importante! • Antes del montaje enjuagar las tuberías según DIN 1988. • Colocar la ducha de emergencia según la norma EN 15154, parte 2. 10.1 Montar el soporte de la mesa (a) con la junta tórica en la mesa (b). 10.2 Atornillar la tuerca (c). -
Page 25: Montaje (70-1326 10 36)
12. Montaje (70-1326 10 36) ¡Importante! • Antes del montaje enjuagar las tuberías según DIN 1988. • Colocar la ducha de emergencia según la norma EN 15154, parte 2. 12.1 Marcar las perforaciones. 12.2 Taladrar considerando las marcas realizadas. 12.3 Colocar los tacos. 12.4 Fijar el soporte mural (b)con los tornillos. -
Page 26: Mantenimiento Y Limpieza
14.2 Para detener el flujo de agua, presionar la tecla de -stop. Uso móvil ☞ En función de la longitud del tubo flexible de conexión se puede extraer la ducha ocular del soporte de la pared. 15. Mantenimiento y limpieza Comprobar el buen funcionamiento de la ducha ocular una vez al mes. -
Page 27: Cambiar El Regulador Volumétrico De Paso
17. Cambiar el regulador volumétrico de paso 17.1 Cerrar el bloqueo de seguridad. 17.2 Sacar la ducha ocular (a) del soporte de la pared (b). 17.3 Soltar la tuerca de racor o moleteada (c). 17.4 Extraer el regulador de caudal con un alambre torcido y cambiarlo. ☞... -
Page 28: Piezas De Recambio
20. Piezas de recambio Nº de pedido: 70 - 1306 10 36 70 - 1316 10 36 70 - 1326 10 36 Denominación Núm. de pedido 1 Ducha de mano completa ..87-100-20.205 2 Dispersor (4x) ....87-013-03.065 3 Capuchón de protección antipolvo con una cadena . - Page 29 0Nederlands Oog- en gezichtsdouche voor wand- en tafelmontage 76 12982 001291 ..Tafelmontage 76 12982 001307 ..Wandmontage 76 12982 001789 ..Wandmontage aan laboratoriummeubels 76 12982 001314 ..Wandmontage met spiraalslang De tekeningen kunt u in de Duitse montage- en bedrijfsinstructies vinden. Inhoudsopgave Afkortingen en eenheden .
-
Page 30: Afkortingen En Eenheden
Afkortingen en eenheden Sleutelwijdte EA-Nr. Europees artikelnummer FAR-Best.-Nr. Franke Aquarotter-bestelnummer Omrekening 1 mm = 0,03937 inch 1 inch = 25,4 mm Alle lengtegegevens in tekeningen zijn in mm aangegeven. Verklaring van de symbolen Waarschuwing! Het niet in acht nemen van de instructie kan tot levensgevaar of lichamelijk letsel leiden. -
Page 31: Belangrijke Aanwijzingen
Belangrijke aanwijzingen • Montage, inbedrijfstelling en onderhoud mogen alleen door de vakman volgens de meegeleverde instructies en volgens de wettelijke voorschriften en erkende regels van de techniek worden uitgevoerd. • De technische voorwaarden voor aansluiting van de plaatselijke water- en energiemaatschappijen moeten in acht worden genomen. -
Page 32: Omvang Van De Levering
Omvang van de levering Bestelnr. Posities Pos. Omschrijving 70 - 1306 10 36 1, 2, 6 Oogdouche met stofkap 70 - 1316 10 36 1, 3, 6, 8, Tafelhouder met bevestigingsset 70 - 1326 10 36 1, 3, 4, 6, Wandhouder 70 - 1336 10 36 1, 3, 5, 7,... -
Page 33: Montage (70-1306 10 36)
10. Montage (70-1306 10 36) ☞ Belangrijk! • Voor de montage dienen de buisleidingen conform DIN 1988 te worden gespoeld. • Nooddouche conform EN 15154 deel 2 aanbrengen. 10.1 Tafelhouder (a) met O-ring in het tafelblad (b) plaatsen. 10.2 Moer (c) vastdraaien. 10.3 Oogdouche gemonteerd met slang en afdichting in de tafelhouder steken. -
Page 34: Montage (70-1326 10 36)
12. Montage (70-1326 10 36) ☞ Belangrijk! • Voor de montage dienen de buisleidingen conform DIN 1988 te worden gespoeld. • Nooddouche conform EN 15154 deel 2 aanbrengen. 12.1 Boringen markeren. 12.2 Volgens de markeringen boren. 12.3 Pluggen aanbrengen. 12.4 Wandhouder (b) met de schroeven bevestigen. 12.5 Oogdouche (a) in de wandhouder steken (zie hoofdstuk 11.). -
Page 35: Onderhoud En Verzorging
Mobiel gebruik ☞ Afhankelijk van de lengte van de aansluitslang kan de oogdouche uit de wandhouder worden getrokken. 15. Onderhoud en verzorging Werking van de oogdouche één keer per maand controleren. (Richtlijnen voor laboratoria BG Als preventieve maatregel ter vermindering van microbiologische contaminatie is het aan te bevelen, het vulwater van de armatuur regelmatig (bijv. -
Page 36: Debietregelaar Vervangen
17. Debietregelaar vervangen 17.1 Voorafsluiting sluiten. 17.2 Oogdouche (a) uit de wandhouder (b) nemen. 17.3 Wartelmoer (c) losdraaien. 17.4 Debietregelaar met een gebogen draad eruit tillen en vervangen. ☞ Op de inbouwpositie letten. ☞ Afdichting niet vergeten. 17.5 De montage gebeurt in omgekeerde volgorde. 18. -
Page 37: Reserveonderdelen
20. Reserveonderdelen Bestelnr.: 70 - 1306 10 36 70 - 1316 10 36 70 - 1326 10 36 Omschrijving Bestelnr. 1 Handdouche compleet..87-100-20.205 2 Sproeikop (4x) ....87-013-03.065 3 Stofkap met kogelketting . - Page 38 0Polski Natrysk na oczy i twarz do montażu naściennego lub stołowego 76 12982 001291 ..montaż stołowy 76 12982 001307..montaż naścienny 76 12982 001789..montaż naścienny do mebli laboratoryjnych 76 12982 001314 ..montaż naścienny z przewodem spiralnym Prosimy przyjąć rysunki z niemieckiej instrukcji montażu i obsługi. Spis treści Skróty i jednostki .
-
Page 39: Skróty I Jednostki
Skróty i jednostki Rozwartość klucza EA-Nr. Europejski numer artykułu FAR-Best.-Nr. Numer zamówienia Franke Aquarotter Przeliczanie jednostek 1 mm = 0,03937 cala 1 cal = 25,4 mm Wszystkie długości na rysunkach podano w mm. Legenda Ostrzeżenie! Nieprzestrzeganie może spowodować zagrożenie dla życia lub ryzyko urazu. -
Page 40: Ważne Uwagi
Ważne uwagi • Montaż, uruchamianie i konserwacja muszą być przeprowadzane przez specjalistę zgodnie z dostarczoną instrukcją, regulacjami prawnymi i ogólnie przyjętymi normami technicznymi. • Należy przestrzegać technicznych warunków podłączenia lokalnych zakładów wodociągowych i energetycznych. • Natrysk na oczy zawiera niekontrolowany zawór zwrotny zgodny z DIN EN 1717. W zależności od miejsca zastosowania oraz oczekiwanej kategorii cieczy konieczne mogą... -
Page 41: Zakres Dostawy
Zakres dostawy Nr zamówienia Pozycje Poz. Opis 70 - 1306 10 36 1, 2, 6 Natrysk na oczy z nasadką pyłochronną 70 - 1316 10 36 1, 3, 6, 8, Wspornik stołowy z zestawem mocującym 70 - 1326 10 36 1, 3, 4, 6, 8 Wspornik ścienny 70 - 1336 10 36... -
Page 42: Montaż (70-1306 10 36)
10. Montaż (70-1306 10 36) ☞ Ważne! • Przed instalacją należy przepłukać przewody rurowe zgodnie z DIN 1988. • Przymocować natrysk bezpieczeństwa zgodnie z normą DIN EN 15 154 część 2. 10.1 Włożyć uchwyt stołowy (a) z pierścieniem uszczelniającym o przekroju okrągłym w płytę stołową... -
Page 43: Montaż (70-1326 10 36)
12. Montaż (70-1326 10 36) ☞ Ważne! • Przed instalacją należy przepłukać przewody rurowe zgodnie z DIN 1988. • Przymocować natrysk bezpieczeństwa zgodnie z normą DIN EN 15 154 część 2. 12.1 Zaznaczyć otwory. 12.2 Wywiercić otwory zgodnie z zaznaczeniami. 12.3 Wstawić... -
Page 44: Konserwacja I Pielęgnacja
Korzystanie ruchome ☞ Zależnie od długości przewodu przyłączeniowego można wyciągnąć natrysk na oczy z wspornika ściennego. 15. Konserwacja i pielęgnacja Raz w miesiącu sprawdzać prawidłowe funkcjonowanie natrysku na oczy. (dla laboratoriów BG Jako środek zapobiegawczy w celu zmniejszenia kontaminacji mikrobiologicznej zaleca się... -
Page 45: Wymiana Regulatora Wielkości Przepływu
17. Wymiana regulatora wielkości przepływu 17.1 Zamknąć odcięcie. 17.2 Wyjąć natrysk na oczy (a) z wspornika ściennego (b). 17.3 Odkręcić nakrętkę (c). 17.4 Wyjąć regulator wielkości przepływu zagiętym drutem i wymienić. ☞ Zwrócić uwagę na poprawność położenia montażowego. ☞ Nie zapomnieć uszczelki. 17.5 Montaż... -
Page 46: Części Zamienne
20. Części zamienne Nr zamówienia: 70 - 1306 10 36 70 - 1316 10 36 70 - 1326 10 36 Oznaczenie nr zamów. 1 Natrysk ręczny kompletny ..87-100-20.205 2 Główka prysznicowa (4x)..87-013-03.065 3 Nasadka ochrony przeciwpyłowej z łańcuchem kulkowym . - Page 47 Notizen...
- Page 48 : +216-(0)71-702-272 t: +213-(0)21 60 13 60 e: info@franke-ge.com e: info@handassagroup.com.tn e: customer@bfi xgroupe.com Franke Ges.m.b.H Franke Mutfak ve Banyo Sistemleri San. ve Franke Ges.m.b.H Oberer Achdamm 52 Tic. A.S Oberer Achdamm 52 6971 Hard / Austria Gebze Organize Sanayi Bölgesi...
Need help?
Do you have a question about the FAID100 and is the answer not in the manual?
Questions and answers