
Related Manuals for British Fires BROCKENHURST


Summary of Contents for British Fires BROCKENHURST
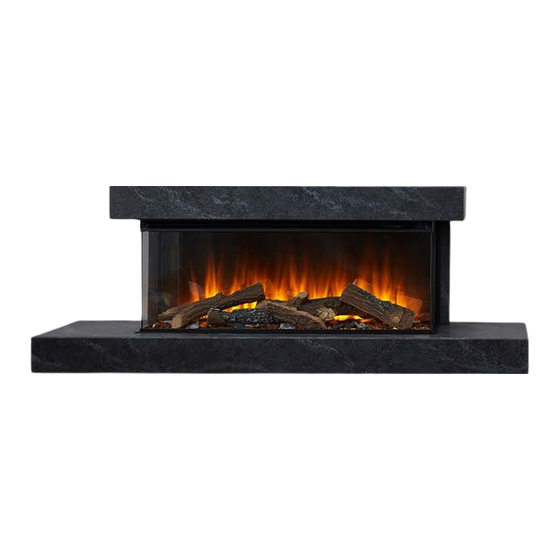
- Page 1 INSTALLATION & USER INSTRUCTIONS BROCKENHURST ELECTRIC SUITE © 2019 British Fires...
-
Page 2: Table Of Contents
INSTALLATION & USER INSTRUCTIONS Section Contents Page Important Notes 02–03 Installation Requirements Appliance Data for Brockenhurst Electric Suite Component Checklist Site Requirements Clearances To Combustibles Unpacking The Appliance Installation 07–12 Preparing The appliance 10.0 Forest View Fuel Bed Layout 10.1 Slate Fuel Bed Layout 10.2... -
Page 3: Important Notes
Continued on next page its service agent or similarly qualified persons in order to avoid © 2019 British Fires... -
Page 4: Installation Requirements
1.0 IMPORTANT NOTES 2.0 INSTALLATION REQUIREMENTS Continued The appliance is supplied with a pre-wired three pin plug (13 Amp fuse rated) and 1.8 metres of DO NOT clean the appliance with abrasive electrical cable. It is therefore necessary for a chemicals. -
Page 5: Appliance Data For Brockenhurst Electric Suite
3.0 APPLIANCE DATA Brockenhurst Electric Suite This fire is fitted with LED’s (Light Emitting Diode) in Weight (kg) 50kg place of conventional bulbs. LED’s generate the same Dimensions H 536 x W 1400 x D 404 (mm) light levels as conventional bulbs, but use a fraction of Supply Voltage and Rating Power 220–240V AC, 50Hz... -
Page 6: Component Checklist
4.0 COMPONENT CHECKLIST 5.0 SITE REQUIREMENTS It should be noted that the appliance creates warm convected air Quantity Description currents. These currents move heat from the room surroundings to, Heater unit and up the wall surfaces adjacent to the heater. Wall bracket Top Suite Shelf If the appliance is to be secure on a dry lined or timber framed... -
Page 7: Clearances To Combustibles
This appliance is heavy. Always seek assistance whilst Please read completely through the instructions and verify that unpacking and/or during installation. Please read all the all listed parts are present before assembly. instructions before continuing to unpack or install appliance. © 2019 British Fires... -
Page 8: Installation
8.0 INSTALLATION British Fires assumes absolutely no responsibility for injuries and damages that may occur due to improper installation or handling. The wall where the appliance is to Remove any protective film coatings from the finished/decorative be installed must be capable of long- term support of the total load of the surfaces of the appliance, if any. - Page 9 Once the frame work has been constructed and secured to the wall and the appliance is in its end position, ensure that there is power to the appliance before any cladding/plasterboard is installed. CAUTION: Do not keep the appliance connected to the electrical supply at this time. © 2019 British Fires...
- Page 10 8.0 INSTALLATION Before Installing the appliance onto the wall with the Top Suite Shelf surround, secure the side trims each side of the appliance Bottom Suite Shelf as shown below. Bottom Shelf Brackets Suite Support Legs Secure the small and large trims on both ends of the appliance in line with the corresponding holes of the firebox.
- Page 11 Tap the 6x wall anchors into the pre--drilled holes with a hammer until they are flush with the wall. Secure the mounting bracket to the wall by using all 6x wall-fixing screws. Re-install the appliance back onto the wall bracket. © 2019 British Fires...
- Page 12 8.0 INSTALLATION With the appliance on the wall offer the floating shelf brackets to either sides of the appliance lining up all 4x holes on the floating bracket with the 4x holes on the sides of the firebox. Then screw 8x firebox screws into the holes securing the brackets to the appliance.
- Page 13 Underneath the appliance, screw the surround screws up through the bottom surround and into the legs of the surround top section and the other 2 screws either side, up through the bottom of the surround through the floating shelf brackets. © 2019 British Fires...
-
Page 14: Preparing The Appliance
9.0 PREPARING THE APPLIANCE For a two or three-sided installation Crosshead screws We strongly recommend that two people are used to remove the glass, both using protective gloves. To remove the front glass from the appliance, use a cross headed screwdriver to remove the screws from either end of the top bracket of the appliance, holding the glass... -
Page 15: Forest View Fuel Bed Layout
IMPORTANT – Place the logs carefully on the fuel bed so you do not make contact with the rear and side glass. Contact with glass may cause damage. Using the contents from the Husk bag, cover the area on the frosted bed that is still exposed, making sure the crystals are still visible. © 2019 British Fires... -
Page 16: Slate Fuel Bed Layout
10.1 SLATE VIEW FUEL BED LAYOUT Slate View Evenly scatter the small crystals over the frosted base as shown in image 1, left. The crystals should be spread out across the whole base and form a layer covering the whole area. Take the two types of the slate effect pieces and spread these evenly throughout, on top of the bed of crystals. -
Page 17: Diamond Light Fuel Bed Layout
Take the larger crystals and place these in position as shown in image 2, left. For the best results, remove a small amount of the small crystals and place the larger crystal directly on the frosted base. © 2019 British Fires... -
Page 18: Pairing The Remote Control
11.0 PAIRING THE REMOTE CONTROL 12.0 OPERATING THE APPLIANCE Pairing the remote control Within 1 minute of turning the power on by the main The ON/OFF switch is located on the front, top right hand side of the appliance. Press the O/I button once to turn the fire on. ON/OFF switch (located on the front, top right hand side of the appliance), press and hold and the buttons on the remote control for 3 seconds, to... - Page 19 (the down light symbol will be lit 10) Date Set when it is turned on). To choose from Monday to Sunday or week timer mode option. Option 7) Time and Week Settings mode:1-2-3-4-5-6-7-A-oF. Press to enter the time and week timer settings. © 2019 British Fires...
-
Page 20: Operating The Appliance
12.0 OPERATING THE APPLIANCE Continued Standby Button: Heating Operations: Turns the appliance ON/OFF Press the heater button to turn 3) Fan delay function: After the This appliance has a non-self- standby, the default settings are: the heating function on and off and appliance is turned off, the fan will reset ting overheat protection heater set to 82°F/27°C, the... - Page 21 The current clock must be set after the initial power-on or power- off, otherwise the clock will remain “00:00” status and you won’t be able to set the week timer function. © 2019 British Fires...
- Page 22 12.0 OPERATING THE APPLIANCE Continued Heat settings: Use remote control’s Heater button enter the temperature setting, logo of the display lighten and will After entering the week timer to select the temperature. The then press the & button to automatically run the preset setting, press the button for 3 system default parameters are:...
-
Page 23: Safety Cut-Out System
NOTE: During the cut-out test the fire will a brush attachment. The LED light automatically display ‘88’. strips are designed and tested to last 20,000 hours. CAUTION: Always disconnect the appliance from the mains supply outlet socket before undertaking any cleaning or maintenance! © 2019 British Fires... -
Page 24: Troubleshooting Guide
15.0 TROUBLESHOOTING GUIDE My Wall Inset Electric Fire... Remedy is not switching on Ensure mains switch is on. Replace the fuse in the plug. is not emitting any heat The fire is fitted with an energy saving thermostat. If the temperature in the room is higher than the temperature selected on the fire, then the thermostat will stop the heater from turning on. -
Page 25: Servicing
Excluding fuses, use only g e n u i n e m a n u f a c t u r e r s s p a r e p a r t s available from your supplier. © 2019 British Fires... -
Page 26: Appliance Dimensions
17.0 APPLIANCE DIMENSIONS Dimensions: Product specifications: Product features: 1400mm Heat output: 1400 W Easy to install MDF Solid Suite 404mm Supply voltage: 220–240 V AC 3-pin plug with 1.8m long cord 1020mm Rating power: 50 Hz All fuel bed items included 536mm Fuse rating: 13 Amp... -
Page 27: Three Year Guarantee - Terms And Conditions
FREE 3-YEAR GUARANTEE WITH REGISTRATION have approved such work in advance of it being carried out. At British Fires we pride ourselves on quality and performance, so much The guarantee period will not be extended even if we repair or replace so that each of our appliances is eligible for a three-year guarantee any appliance or part. - Page 28 Model covered by these instructions: Patent applied for: British Fires and layout of this booklet is owned by British Brockenhurst Electric Suite ( EF40-32A ) GB 1820239.0 Christchurch, Dorset Fires. You are not permitted to copy or All instructions...
Need help?
Do you have a question about the BROCKENHURST and is the answer not in the manual?
Questions and answers