Table of Contents
Advertisement
Quick Links
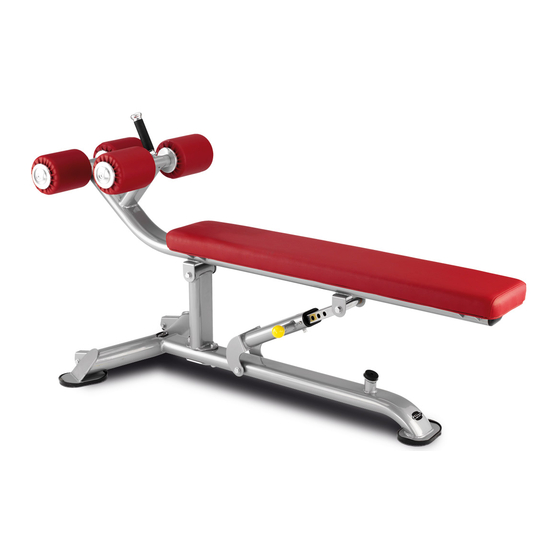
L835 Banco abdominales crunch
Tratamiento de pintura de tres capas. Se compone de una imprimación anti-corrosión que garantiza
•
la durabilidad de estas máquinas. Tras ello se aplica una capa de polvo epoxi y un acabado de laca o
barniz que le da un aspecto actual, profesional y altamente desarrollado.
Asiento con núcleo de inyección e ignífugo según norma M2. A diferencia de los clásicos aglomerados
•
de esponja, el núcleo de inyección presenta las ventajas de la uniformidad, la prevención de
deformaciones y una mayor protección contra bacterias.
Diseño con perfil más bajo y sólido, para una línea visualmente másimpactante y elegante.
•
Estructura elevada 50mm sobre el suelo y patas con protecciones de goma. Permite introducir la
•
boca del aspirador y limpiar sin rallar la pintura. Con estabilizadores regulables para ajustar cada punto
de apoyo a los desniveles del suelo.
Doble rodillo para el apoyo y sujeción de las piernas. Actúa como apoyo y sujeción para el usuario,
•
evitando el riesgo de lesiones debidas a posturas incorrectas.
Estructura de 4 milímetros de espesor enacero calidad ST-37/40. Garantía de alta durabilidad
•
Ajuste de la inclinación del respaldo. Permite la realización de ejercicios variados.
•
Tubos con bordes redondeados
•
de sección elíptica
para evitar cortes o golpes.
Músculos trabajados:
Especificaciones:
Longitud: 173,8 cm
Anchura: 72,5 cm
Altura: 89,9 cm
Peso: 41 Kg
Advertisement
Table of Contents

Related Manuals for BH Hipower TR Series


Summary of Contents for BH Hipower TR Series
- Page 1 L835 Banco abdominales crunch Tratamiento de pintura de tres capas. Se compone de una imprimación anti-corrosión que garantiza • la durabilidad de estas máquinas. Tras ello se aplica una capa de polvo epoxi y un acabado de laca o barniz que le da un aspecto actual, profesional y altamente desarrollado. Asiento con núcleo de inyección e ignífugo según norma M2.
- Page 2 L835 Instrucciones de montaje y utilización Instructions for assembly and use Instructions de montage et d’utilisation Hinweise zur Montage und Benutzung...
-
Page 3: Instrucciones De Seguridad
L835 INSTRUCCIONES DE SEGURIDAD.- Rogamos leer estas instrucciones atentamente, antes del montaje y del primer uso. Obtendrá importantes informaciones para su seguridad, así como para el uso y para el mantenimiento del aparato de ejercicio. Guarde cuidadosamente las instrucciones para su información, así como para los trabajos de mantenimiento o los pedidos de piezas de repuesto. -
Page 4: Safety Instructions
SAFETY INSTRUCTIONS Please read these instructions carefully before assembling and using the equipment. They contain important information for your safety and for the use and maintenance of the exercise equipment. Keep the instructions safe for future reference and maintenance tasks as well as for ordering spare parts. -
Page 5: Instructions De Sécurité
INSTRUCTIONS DE SÉCURITÉ - Nous recommandons de lire attentivement ces instructions avant de procéder au montage et d’utiliser l'appareil pour la première fois. Ce manuel contient des informations importantes relatives à la sécurité, à l’usage et à l’entretien de la machine d’exercice. Conserver soigneusement ces instructions à... - Page 6 SICHERHEITSHINWEISE.- Bitte lesen Sie diese Hinweise vor der Montage und ersten Benutzung des Geräts aufmerksam. Hier finden Sie wichtige Informationen zu Ihrer Sicherheit, zur Benutzung und zur Wartung Ihres Trainingsgeräts. Bewahren Sie diese Hinweise zum Nachschlagen und zum Zwecke der Wartung oder Bestellung von Ersatzteilen auf.
- Page 7 Saque la unidad de la caja, compruebe e identifique las piezas con respecto al listado de la Fig.A y B, para asegurarse de que no falta ninguna pieza del equipo. Take the unit out of its box, check and identify the parts against the list in Fig.A and B, to ensure that there are no missing parts.
-
Page 8: Instrucciones De Montaje
Fig.B Nº M-12x80 M-12x140 M-10x30 M-10x30 M-8x10 M-12 M-10 M-12 INSTRUCCIONES DE MONTAJE NOTA: La descripción de las piezas con respecto a las figuras, corresponden siempre a la posición de la persona en el equipo para la realización del ejercicio. INSTRUCTIONS FOR ASSEMBLY NOTE: The description of the parts with respect to the figures, always corresponds to the position the person adopts on the equipment when exercising. - Page 9 Fig.1 Apoye en el suelo el soporte principal (1). Sitúe el soporte (2) y atorníllelo con los tornillos (24) junto con las arandelas (35) y las tuercas (32). Rest the main support (1) on the ground. Position the bracket (2) and secure using screws (24) along with the washers (35) and nuts (32).
- Page 10 Fig.2 Introduzca la “U” del soporte telescópico de respaldo (3) en el soporte principal (1). Atorníllelo con el tornillo (23) junto con las arandelas (35) y la tuerca (32). Place the “U” bracket on the telescopic backrest support (3) onto the main support (1). Fit screw (23) along with the washers (35) and nut (32) and tighten.
- Page 11 Fig.3 Introduzca la “U” del soporte de respaldo (4) en el soporte principal (1). Atorníllelo con el tornillo (23) junto con las arandelas (35) y la tuerca (32). Introduzca la “U” del soporte de respaldo (4) en el soporte telescopico (5). Atorníllelo con el tornillo (23) junto con las arandelas (35) y la tuerca (32).
- Page 12 Fig.4 Posicione el respaldo (8) sobre el soporte (4) atorníllelo con los tornillos (26) junto con las arandelas (36). Position the backrest (8) on the support (4), secure using screws (26) along with the washers (36). Positionner le dossier (8) sur le support (4) et visser les vis (26) et les rondelles (36). Positionieren Sie die Rückenlehne (8) an der Stütze (4) und schrauben Sie sie mit den Schrauben (26) und den Unterlegscheiben (36) fest.
- Page 13 Fig.5 Introduzca el eje (6) en el alojamiento del soporte (4), céntrelo y atornille el prisionero (29). Posicione en el eje (6) la arandela (15), el rodillo (17) la arandela (15) y (18) como muestra la figura adjunta y atorníllelo con el tornillo (27). Realice el mismo montaje para el lado derecho.
-
Page 14: Very Important
MUY IMPORTANTE: Una vez realizado el montaje, compruebe que todos los tornillos que han sido montados en esta maquina, están fuertemente apretados. VERY IMPORTANT: After assembling the unit, check that all of the screws have been fitted to the machine and that they are tightened securely. - Page 15 L835...
- Page 16 Fax: +351 234 729 519 902 170 258 e-mail: info@bhfitness.pt Fax: +34 945 56 05 27 e-mail: hipower@bhfitness.com BH HIPOWER MEXICO BH HIPOWER NORTH AMERICA BH HIPOWER FRANCE BH Exercycle de México S.A. 20155 Ellipse de CV Foothill Ranch Eje 132 / 136...
Need help?
Do you have a question about the TR Series and is the answer not in the manual?
Questions and answers