Advertisement
Available languages
Available languages
Quick Links
Advertisement

Subscribe to Our Youtube Channel
Related Manuals for Motorola solutions VCM-5


Summary of Contents for Motorola solutions VCM-5
-
Page 3: Important Safety Instructions
Seek guidance from vehicle manufacturer on mounting equipment in vehicles. Operational Caution 1. To reduce risk of injury, use only Motorola Solutions approved items with the Vehicle Charger Mounting Adapter. 2. It is essential to mount the equipment in locations where it will not cause any injury in the event of a collision. -
Page 4: Safety And General Information
6. Do not transport or store flammable gas, flammable liquids or explosives in the compartment of your vehicle that contains your equipment. 7. To avoid possible interference with blasting operations, turn your radio OFF before entering an area where you may be close to electrical blasting caps, in a “blasting area”... -
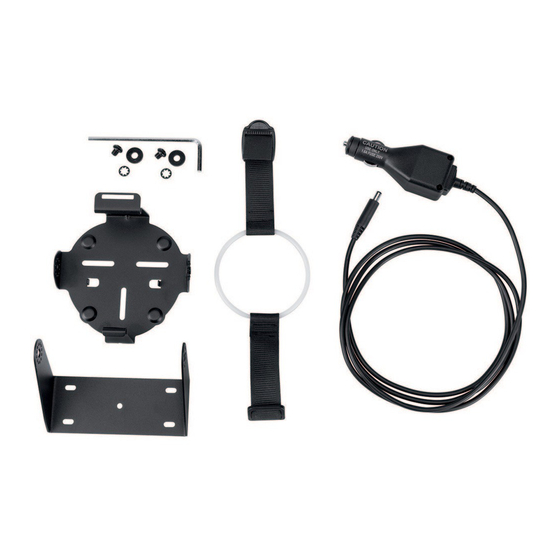
Page 5: Supplied Items
• Bracket “A” for mounting in the vehicle: 1 piece • Cloth Band Assembly to fix the radio (including Adjusters): 1 piece • Screw Kit to mount VCM-5 bracket to Bracket “A” (screws, toothed washers, and plain washers): 2 pieces for each • Hexagon Wrench: 1 piece •... - Page 6 Figure 2: Installing Cloth Band and Flat-Shaped Adjuster 4. Insert the front section of the CD-58 Desktop Charger into the VCM-5 bracket until it locks in place with a click. Ensure that the small protrusions of the VCM-5 bracket is fixed correctly into the holes which are located at the bottom of the CD-58 Desktop Charger.
- Page 7 Figure 3: Inserting CD-58 Desktop Charger into VCM-5 Bracket Note: The CD-58 Desktop Charger must not be inclined and/or rotated. Inclined Rotated Figure 4: CD-58 Inclined and Rotated 5. Use the Hexagon Wrench to mount the VCM-5 bracket to Bracket “A” with the screws and washers.
- Page 8 Figure 5: Mounting VCM-5 Bracket to Bracket “A” Note: Adjust the angle of the Charger Stand to a convenient and accessible position. You can also secure the Charger Stand with Bracket “A” directly to the vehicle. Figure 6: Securing Charger Stand with Bracket “A” to Vehicle...
- Page 9 6. Insert the DC plug from the E-DC-32 Cigarette Lighter Adapter into the DC jack at the rear panel of the CD-58 Desktop Charger. Route and secure the E-DC-32 Cigarette Lighter Adapter cable in the vehicle, then plug the E-DC-32 Cigarette Lighter Adapter into the cigarette lighter jack of the vehicle.
- Page 10 8. Hook the Adjuster to the hook of the VCM-5 bracket. Ensure that the ring section of the Cloth Band goes over the Channel knob of the radio. Hook Figure 9: Hooking Adjuster to VCM-5 Bracket 9. Adjust the Cloth Band so that the ring section is on top and at the center of the radio.
- Page 11 Adjust Adjust Figure 10: Securing Cloth Band Over the Radio...
- Page 12 Notes...
- Page 13 Notes...
- Page 14 © 2017 and 2021 Motorola Solutions, Inc. All rights reserved. MOTOROLA, MOTO, MOTOROLA SOLUTIONS and the Stylized M logo are trademarks or registered trademarks of Motorola Trademark Holdings, LLC and are used under license. All other trademarks are the property of their respective owners.
-
Page 15: Важливі Правила Техніки Безпеки
1. Задля зменшення ризику травмування використовуйте з монтажним адаптером автомобільного зарядного пристрою тільки Ув аг а! вироби, схвалені компанією Motorola Solutions. 2. Обладнання необхідно встановлювати таким чином, щоб у разі зіткнення воно не завдало травм. 3. Подушка безпеки транспортного засобу виштовхується з... - Page 16 6. Не перевозьте й не зберігайте легкозаймисті рідини, гази чи вибухонебезпечні речовини та обладнання в одному відсіку транспортного засобу. 7. Щоб не утворити перешкод під час виконання вибухових робіт, ВИМИКАЙТЕ радіостанцію, перш ніж наближатися до електродетонаторів, місць проведення вибухових робіт або...
- Page 17 перегородкою, за допомогою люверса або схожого засобу. Вступ Монтажний адаптер автомобільного зарядного пристрою VCM-5 — це мобільний монтажний кронштейн, розроблений для використання з настільним зарядним пристроєм CD-58. До комплектації VCM-5 також входить адаптер прикурювача E-DC-32. Комплектація Перед установленням монтажного адаптера впевніться в...
- Page 18 Рис. 2: Установлення тканинного ремінця та плаского регулятора 4. Вставляйте передню секцію настільного зарядного пристрою CD-58 в кронштейн VCM-5, доки не почуєте клацання, що свідчить про успішну фіксацію. Упевніться, що невеликі виступи кронштейна VCM-5 належним чином закріплені в отворах у нижній частині настільного...
- Page 19 Рис. 3: Установлення настільного зарядного пристрою CD-58 у кронштейн VCM-5 Примітка. Настільний зарядний пристрій CD-58 необхідно встановлювати прямо, без нахилу чи повороту. Нахил Поворот Рис. 4: CD-58 нахилено або повернуто 5. Використовуйте шестигранний ключ, щоб закріпити кронштейн VCM-5 на кронштейні A за допомогою гвинтів і шайб.
- Page 20 Рис. 5: Установлення кронштейна VCM-5 на кронштейні A Примітка. Відрегулюйте нахил підставки зарядного пристрою для забезпечення надійного кріплення й зручного використання. Зауважте, що підставку зарядного пристрою можна закріпити безпосередньо на транспортному засобі за допомогою кронштейна A. Рис. 6: Закріплення підставки зарядного пристрою на...
- Page 21 6. Вставте вилку кабелю адаптера прикурювача E-DC-32 у роз’єм постійного струму на задній панелі настільного зарядного пристрою CD-58. Прокладіть і зафіксуйте кабель адаптера прикурювача E-DC-32 у транспортному засобі, потім вставте адаптера прикурювача E-DC-32 у роз’єм для прикурювача в транспортному засобі. Установіть радіостанцію...
- Page 22 8. Зачепіть регулятор за гак кронштейна VCM-5. Упевніться, що кільцева секція тканинного ремінця тканини проходить над перемикачем каналів радіостанції. Гак Рис. 9: Зачеплення регулятора за гак кронштейна VCM-5 9. Відрегулюйте тканинний ремінець таким чином, щоб його кільцева секція була розташована над центром...
- Page 23 Відрегулюйте Відрегулюйте Рис. 10: Закріплення тканинного ремінця над радіостанцією...
- Page 24 Примітки...
- Page 25 Примітки...
- Page 26 © Motorola Solutions, Inc., 2017 і 2021. Усі права захищено. MOTOROLA, MOTO, MOTOROLA SOLUTIONS і стилізований логотип M є торговими марками або зареєстрованими торговими марками компанії Motorola Trademark Holdings, LLC та використовуються за ліцензією. Усі інші торгові марки належать відповідним власникам.
- Page 28 EU Contact: Motorola Solutions, Czerwone Maki 82, 30-392 Krakow, Poland *MN004234A01* MN004234A01-AC Printed in...
Need help?
Do you have a question about the VCM-5 and is the answer not in the manual?
Questions and answers