
Subscribe to Our Youtube Channel
Related Manuals for Logic LG-HSW401-4K


Summary of Contents for Logic LG-HSW401-4K
- Page 1 User Manual LG-HSW401-4K HDMI2.0 4x1 Switcher All Rights Reserved Version: LG-HSW401-4K_2020V1.0 www.logicav.in...
- Page 2 HDMI2.0 4x1 Switcher Preface Read this user manual carefully before using the product. Pictures are shown in this manual for reference only. Different models and specifications are subject to real product. This manual is only for operation instruction, please contact the local distributor for maintenance assistance.
- Page 3 HDMI2.0 4x1 Switcher SAFETY PRECAUTIONS To ensure the best performance from the product, please read all instructions carefully before using the device. Save this manual for further reference. Unpack the equipment carefully and save the original box and packing material for ...
-
Page 4: Table Of Contents
HDMI2.0 4x1 Switcher Table of Contents 1. Product Introduction ....................1 1.1 Features ......................1 1.2 Package List ...................... 2 2. Technical Specification ....................3 3. Panel Description ......................4 3.1 Front Panel ......................4 3.2 Rear Panel ......................5 4. -
Page 5: Product Introduction
HDMI2.0 4x1 Switcher 1. Product Introduction The LG-HSW401-4K is an ultrathin auto switcher with four HDMI video inputs and one HDMI output. This switcher supports HDMI video resolution up to 4Kx2K@60Hz 4:4:4 HDR and multichannel audio. Except passing EDID information from the display, there are multiple built-in EDID settings to simplify an installation. -
Page 6: Package List
HDMI2.0 4x1 Switcher 1.2 Package List 1x HDMI2.0 4x1 Switcher 2x Mounting Ears 4x Mounting Screws 4x Plastic Cushions 1x RS232 Cable (3.5mm to DB9) 1x IR Remote 1x IR Receiver 1x Power Adapter (5V DC 1A) ... -
Page 7: Technical Specification
HDMI2.0 4x1 Switcher 2. Technical Specification Video Input Input (4) HDMI Input Connector (4) Female type-A HDMI HDMI Input Resolution Up to 4Kx2K@60Hz 4:4:4 HDMI Standard HDCP Version Video Output Output (1) HDMI Output Connector (1) Female type-A HDMI HDMI Output Resolution Up to 4Kx2K@60Hz 4:4:4 HDMI Standard HDCP Version... -
Page 8: Panel Description
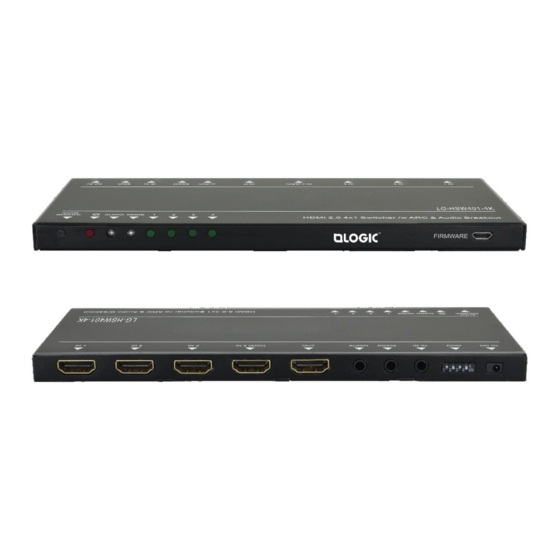
HDMI2.0 4x1 Switcher 3. Panel Description 3.1 Front Panel AUTO SOURCE AUDIO MODE FIRMWARE ① Auto/Source Button: Press to switch to next input source. Press and hold at least three seconds to switch between manual mode and auto mode. -
Page 9: Rear Panel
HDMI2.0 4x1 Switcher 3.2 Rear Panel IN 1 IN 2 IN 3 AUDIO RS232 IR IN EDID DC 5V ① IN 1~4: Four type-A female HDMI input ports to connect HDMI sources. The input 4 port supports ARC. ② OUT: Type-A female HDMI output port to connect HDMI display. ③... -
Page 10: System Connection
HDMI2.0 4x1 Switcher 4. System Connection 4.1 Usage Precaution Make sure all components and accessories included before installation. System should be installed in a clean environment with proper temperature and humidity. All of the power switches, plugs, sockets, and power cords should be insulated and ... -
Page 11: Source Button Control
HDMI2.0 4x1 Switcher 5. Source Button Control 5.1 Manual Switching When the switcher is in manual switching mode, the Switching Mode LED will be green, and please press Auto/Source button to switch to the next input. 5.2 Automatic Switching To enable automatic switching, press and hold the Auto/Source button for three seconds. -
Page 12: Ir Remote Control
HDMI2.0 4x1 Switcher 6. IR Remote Control Please connect an IR receiver to the IR input port; the IR remote is used for signal switching and it can also be used to control source and display devices based on CEC function. -
Page 13: Rs232 Control
HDMI2.0 4x1 Switcher 7. RS232 Control Connect the switcher to the control device (e.g. PC) with RS232 cable and set the parameters in the right manner, the control device is capable to control this switcher by RS232 commands. 7.1 RS232 Control Software Installation: Copy the control software file to the computer connected with this switcher. - Page 14 HDMI2.0 4x1 Switcher The interface of the control software is shown as below: Parameter configuration area Monitoring area, indicates if the command sent works. Command sending area Please set the parameters of COM number, bound rate, data bit, stop bit and the parity bit correctly, then the RS232 commands can be sent in Command Sending Area.
-
Page 15: Rs232 Command
HDMI2.0 4x1 Switcher 7.2 RS232 Command Note: All commands must be ended with “<CR><LF>”. 7.2.1 Signal Switching Function Command Feedback Example Switch to HDMI input 1. >>HDMI1 <<HDMI1 >>HDMI2 <<HDMI2 Switch to HDMI input 2. >>HDMI3 <<HDMI3 Switch to HDMI input 3. >>HDMI4 <<HDMI4 Switch to HDMI input 4. -
Page 16: Display Device Control
HDMI2.0 4x1 Switcher >>SRCSkipBackward Previous Section <<SRCSkipBackward >>SRCMenu Open the menu setting >>SRCMenu >>SRCBack Go back >>SRCBack >>SRCOk Confirm (OK) >>SRCOk >>SRCExit Exit >>SRCExit >>SRCUp Up direction >>SRCUp >>SRCDown Down direction >>SRCDown >>SRCLeft Left direction >>SRCLeft >>SRCRight Right direction <<SRCRight 7.2.3 Display Device Control Note: The display device is required to support CEC. -
Page 17: Audio Selection
Select ARC audio channel. <<AUDExternal Select the HDMI audio input >>AUDInternal >>AUDInternal channel. 7.2.5 System Control Function Command Feedback Example >>RESET System reset. >>RESET <<AUDExternal << LG-HSW401-4K << V1.0.0 << -------- >>SYSInfo Get system information. <<HDMI1 <<Auto Switch <<AUDExternal <<EDID0 www.logicav.in... -
Page 18: Edid Management
HDMI2.0 4x1 Switcher 8. EDID Management 8.1 Predefined EDID Setting The rear panel boasts a 4-pin DIP switch to set the predefined EDID. The ten types of embedded EDID and their corresponding switch status are shown in the below list. Switch Video Audio... -
Page 19: User Defined Edid Setting
HDMI2.0 4x1 Switcher 8.2 User Defined EDID Setting Except directly invoking the embedded EDID, the specific EDID can be customized. There are five EDID can be customized following the below operations. Rename the user defined EDID according the following format. EC_xx_xxxx_xxx.bin EC: Represents EDID. -
Page 20: Arc Mode
HDMI2.0 4x1 Switcher 9. ARC Mode Audio Return Channel (ARC) allows audio from a display to pass “upstream” through an HDMI cable to an audio processing device, such as an AV amplifier. When ARC mode is active on the switcher, the ARC stream will pass to the active HDMI source device if it can process the signal. -
Page 21: Firmware Upgrade
HDMI2.0 4x1 Switcher 10. Firmware Upgrade Please follow the steps as below to upgrade firmware by the Micro-USB port on the rear panel: 1) Prepare the latest upgrade file (.bin) and rename it as “USERAPP.bin” 2) Connect the switcher to the PC with USB cable, and then power on the switcher. The PC will automatically detect a U-disk named of “BOOTDISK”. -
Page 22: Troubleshooting & Maintenance
HDMI2.0 4x1 Switcher 11. Troubleshooting & Maintenance Problems Potential Causes Solutions Colour losing or no video signal output in HDMI display. The connecting cables may Check whether the cables not be connected correctly are connected correctly No HDMI signal output in this switcher while local or it may be broken. -
Page 23: Customer Service
HDMI2.0 4x1 Switcher 12. Customer Service The return of a product to our Customer Service implies the full agreement of the terms and conditions hereinafter. There terms and conditions may be changed without prior notice. 1) Warranty The limited warranty period of the product is fixed three years. 2) Scope These terms and conditions of Customer Service apply to the customer service provided for the products or any other items sold by authorized distributor only.
Need help?
Do you have a question about the LG-HSW401-4K and is the answer not in the manual?
Questions and answers