
Related Manuals for Elmo EV-2000AF


Summary of Contents for Elmo EV-2000AF
- Page 1 VISUAL PRESENTER INSTRUCTION MANUAL Please read this instruction manual carefully before using this Visual Presenter and keep it for future reference.
-
Page 2: Important Safeguards
IMPORTANT SAFEGUARDS Read Instructions – All the safety and operating instructions should be read before the appliance is operated. Retain Instructions – The safety and operating instructions should be retained for future reference. Heed Warnings – All warnings on the product and in the operating instructions should be adhered to. - Page 3 Damage Requiring Service – Unplug this product from the wall outlet and refer servicing to qualified service personnel under the following conditions: When the power-supply cord or plug is damaged. If liquid has been spilled, or objects have fallen into the product.
-
Page 4: Before You Use
BEFORE YOU USE Use the Visual Presenter under the rated electrical conditions and TV system. Do not leave the Presenter under direct sunlight or by heaters, or the Presenter may be discolored, deformed, or damaged. Do not place the Presenter in any humid, dusty, windy or vibrating location. Use the Presenter in the following environmental conditions: Temperature : 5°C~40°C (41°F~104°F) -
Page 5: Table Of Contents
CONTENTS 1. PART NAMES AND FUNCTIONS ........5 Appearance. -
Page 6: Part Names And Functions
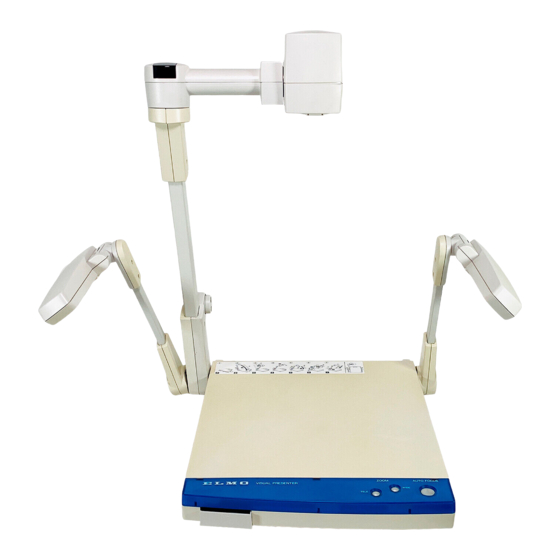
1. PART NAMES AND FUNCTIONS Appearance 10. Camera Head Arm 3. Camera Head 9. Infrared Sensor 5. Lighting Unit 4. Close-up Lens Holder (Attach this holder for normal 2. Column use. Swing away this holder for viewing a far-away object.) 6. -
Page 7: Front Operation Panel
Front Operation Panel Name Zoom Buttons Auto Focus Button Rear Panel 14. AC Outlet 13. Power cord Receptacle [AC IN] AC IN 15. Power Switch Name Power Cord Receptacle [AC IN] To connect to the power cord. AC Outlet Power Switch [POWER] Video-out Terminal [OUTPUT ·... -
Page 8: Wireless Remote Control
Wireless Remote Control 18. 2X 20. POSI / NEGA 21. COLOR / B&W 23. TELE 24. WIDE 28. IRIS NORMAL Button Name Directions POSI/NEGA COLOR/B&W LAMP TELE WIDE NEAR IRIS NORMAL IRIS OPEN IRIS CLOSE POSI/NEGA COLOR/B&W LAMP FOCUS ZOOM NEAR TELE WIDE... -
Page 9: Camera Head And Column
Using the unit with the shutter selection switch set to [50] may reduce the flickering. This switch is factory-set to 60Hz. : ELMO USA Tech Support (800)947-3566 for further assistance. Others : Call to ELMO CANADA (Canada) or the ELMO exclusive distributors. DC12V 32. Output Terminal VIDEO OUT CONT. -
Page 10: Wireless Remote Control
2. WIRELESS REMOTE CONTROL Point the infrared emitting part of the wireless remote control unit at the infrared sensor of the Presenter, located on the top of the column, and press the button for the desired function. The receivable range may be narrowed when the Presenter is placed under sunlight, near an inverter fluorescent lump or in any other unfavorable surroundings. -
Page 11: Setting Up
3. SETTING UP (1) Raise the column. Raise up the column once, and fall it until it is locked. Note: The lighting arm (L) cannot be independently raised. Note: Unless the column is fully raised up, it may not be locked when it is fallen. (2) Raise the lighting arm (R) unit, and turn the camera head to direct the lens unit to the stage. -
Page 12: Connection To The Monitor Tv
Connection to the monitor TV Note: Be sure to turn OFF the power supply to all equipment before making any connections to protect the Presenter and all the connected equipment. Note: Hold the cable plug part when connecting or disconnecting the cables. Connection to the composite video-in terminal Use the supplied RCA video/audio cable or a BNC cable available on the market. -
Page 13: Operation Procedures
4. OPERATION PROCEDURES Simple steps for presenting printed material (1) Turn ON the power switch. Note: Before turning ON the power switch, connection to the monitor should have been completed. Note: If the power switch is turned ON immediately after being turned OFF, the Presenter may not operate. -
Page 14: Convenient Use Of The Camera
Convenient use of the camera When the camera head arm is turned as shown in the right figure, material outside the stage can be photographed. When the camera head unit is set in the horizontal position, wall view, distant view, etc. can be photographed. -
Page 15: Storing The Presenter
Storing the Presenter (1) Turn OFF the power switch, and unplug the power cord and the video cable. (2) Close the lighting unit and the lighting arm unit. (3) Turn the lighting unit to the position shown in the right figure. -
Page 16: Various Functions
5. VARIOUS FUNCTIONS Lighting The lighting for presenting printed matter or other material is installed on standard. Each time the lighting button [LAMP] on the wireless remote control is pressed, the lighting operates in order of the L-side lamp alone lights up lamp goes off the L- and R-side lamps light up. -
Page 17: Focus
Focus Auto Focus To operate Auto-Focus, press the auto focus button [AF] on the front operation panel or wireless remote control, and the Auto-Focus will be activated. While the auto-focus is in operation, the indication lamp blinks until the object is brought into focus. The Presenter features a one-shot auto focus function. -
Page 18: Powered Manual Focus
Powered Manual Focus To focus on any part of the material, such as 3-D material, press the focus button [NEAR] or [FAR] on the wireless remote control. Note: The auto focus function works up to a height of approx. 15 cm (5.9 in.) above the stage surface on the maximum side of the zoom [TELE] (when a close-up lens is attached). -
Page 19: Color/B&W Selection
Color/B&W selection To present the B&W (Black&White) material such as documents in sharper image with no color blur on the monitor, set to color mode for normal use. To change to B&W mode, press the color/B&W selection button [COLOR/B&W] on the wireless remote control. -
Page 20: Rs-232C Specifications
6. RS-232C SPECIFICATIONS The Presenter can be controlled by a PC connected to the Presenter through the RS-232C terminal [RS-232C]. Setting up (1) Connect the Presenter to a PC with an RS-232C connection cable. Note: When using an RS-232C cable available in the market, make sure of the connection shown in the next page. Note: To protect the Presenter and the PC, be sure to turn OFF all the power switches of all equipment before connecting. -
Page 21: Cable Connection
Cable connection Visual Presenter side (DSUB-9P) DSUB-9P(Female) 5 4 3 2 1 9 8 7 6 RI (CI) RS-232C connector specifications (DSUB-9P) Pin No. Code Transmitted Data Data Terminal Ready DOS/V side (DSUB-25P) Direction of data Name Visual Presenter Carrier Detect Received Data Signal Ground Data Set Ready... -
Page 22: Table Of The Communication Commands
Table of the communication commands Command Parameter Data Function Auto Focus + (NEAR) Focus adjustment – (FAR) 0 (STOP) Zoom + (TELE) adjustment – (WIDE) 0 (STOP) Iris adjustment + (OPEN) – (CLOSE) 0 (STOP) 1 (NORMAL) Lighting 0 (OFF) selection 1 (L:ON) 2 (L, R:ON) -
Page 23: Data Format Specifications
Data format specifications This command is executed in the form of 1-command/1 packet. The next command is not accepted until the previous processing is completed. · The communication command always starts with STX (Start of Text) [02H], and ends with ETX (End of Text) [03H]. -
Page 24: Transmission Specifications
Transmission specifications · Full duplex start-stop sync. mode · Start bit · Data bit · Stop bit · Parity bit · X parameter · Baud rate (Communication speed) Connection If the RS-232C cable is not correctly connected between the Presenter and the PC, no acknowledgement is transmitted. Connect the RS-232C cable correctly, and fix it firmly with the connector set screws before the operation. -
Page 25: Troubleshooting Hints
Image is too dark The image of printed matter is striped The image flickers If the trouble still remains after checking the above, consult your dealer or an authorized ELMO service center. Possible cause/countermeasure • Cable is not properly connected to the video-in terminal of monitor. -
Page 26: Specifications
8. SPECIFICATIONS General Item AC120V Power source 0.5A Rated current outlet 1 pce. (Max. 400W/Unswitched) Outside dimensions 500mm(W) X 612mm(D) X 99mm(H) (19.7 X 24.1 X 3.9 in.) - When folded 706mm(W) X 403mm(D) X 575mm(H) (27.8 X 15.9 X 22.6 in.) - When set up Weight 6 kgs (13.2 lbs) (main body only) Television system... -
Page 27: Supplied Accessories
Video cable Infrared wireless remote controller (RCW-402) Batteries (Type R03, AAA) Instruction manual Note: The specifications are subject to change without notice. Dimensions and weight are approximate. Trademark Acknowledgements , ELMO are registered trademarks of ELMO CO.,Ltd. Specifications Name Quantity... - Page 28 1478 Old Country Road, Plainview, NY 11803-5034 Tel : (516)501-1400 Fax : (516)501-0429 E-mail:elmo@elmousa.com Web : http://www.elmousa.com/ Canada Elmo Canada Mfg. Corp. 44 West Drive, Brampton, Ontario L6T 3T6 Tel : (905)453-7880 Fax : (905)453-2391 E-mail : info@elmocanada.com Web : http://www.elmcanada.com/ Germany Elmo (Europe) G.m.b.H...
Need help?
Do you have a question about the EV-2000AF and is the answer not in the manual?
Questions and answers