
Related Manuals for Sprague Gripper CTR-GAWL-150


Summary of Contents for Sprague Gripper CTR-GAWL-150
- Page 1 SPRAGUE INSTRUMENTS User Manual Wireless Cable Tension Meter Model: Gripper CTR-GAWL-150 PN# 1345-001 Wireless 26 Nov 2020...
-
Page 2: Table Of Contents
Table of Contents Overview ......................... 3 Contents in the Box ....................... 3 Display Unit ........................4 Display units Buttons ....................7 Battery Charging (Display & Sensor Units) ..............8 Charge Status Led Indications (Display & Sensor Units) ........... 8 Meter Reading ........................ 8 Sensor Unit Power ON .................... -
Page 3: Overview
Introduction This document describes about the SPRAGUE Instrument’s Wireless Cable Tensiometer (Gripper CTR-GAWL-150) specifications and user instructions. Overview Tensiometer is wireless strain measuring instrument. It uses Bluetooth technology for communication between the sensor and display unit. Sensor unit measures tension in cable which gets displayed on the display unit. -
Page 4: Display Unit
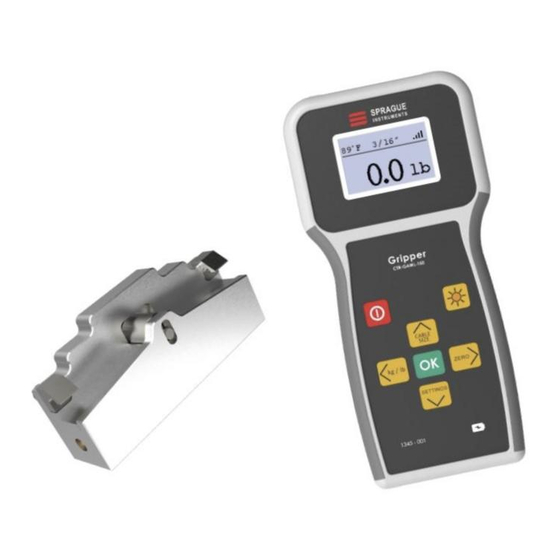
Descriptions Display Unit 1. Temperature indication 2. Tension Reading 3. Power ON/OFF Button 4. Cable Size/Up Navigation Button 5. Tension Unit Selection/ Left Navigation Button 6. Settings/Down Navigation Button 7. Charging Port 8. Charge Indication 9. Zero Set/Right Navigation Button 10. - Page 5 Specifications Property Details Scale Range 10 to 150 Pounds Scale Resolution 1 Pound Scale Tolerance +/- 2% of Full scale Unit of Measurement Metric – Kg, lbs – lb , Number of Calibrations Supported Cables Sizes 1/16, 1/32, 1/8, 5/32, 3/16 inches Ambient Temperature Selectable C and...
- Page 6 Sensor Unit • Charging Voltage 5VDC / Charge Status Indicator 500mAH – Li Po Rechargeable Battery • Power ~4000 Reading in Single Charge Sleep mode after 5 mins idle time • Dimension 105x40x27mm • Weight 240gm(approx.) • Housing Cast Iron...
-
Page 7: Display Units Buttons
Operations Display units Buttons Buttons Naming Functions • Press to ON Power ON/OFF Switch • Hold 3 Secs to OFF Tension Unit • Toggle lbs/Metric units for Tension Selection/Left and Temperature Navigation Switch • Back Button / Navigate Left direction Display Backlight •... -
Page 8: Battery Charging (Display & Sensor Units)
Battery Charging (Display & Sensor Units) Both Meter and Sensor unit uses rechargeable battery which can be charged through 5V@1A adapter. Charge Status Led Indications (Display & Sensor Units) Charge Status are indicated using dual color Led indications. For this Green and Blue color led are used. Status of charge can be described using following table. -
Page 9: Sensor Unit Power On
Sensor Unit Power ON • For start system operation, Power ON/OFF button need to be single pressed • Green led will turn on and it will start transmitting tension data • It will remain ON until not turned off Cable Size Selection Procedure •... -
Page 10: Calibration Procedure
Settings Calibration Procedure Meter needs to be calibrated for each cable sizes and different weights before they can be used. Following procedures describes the process of calibration • Going to Settings menu- Press Settings buttons • Display shows settings options as below. Use Up/Down button to select ‘Calibrate’. It will get highlighted in Bold with arrow pointing to it. -
Page 11: Device Info
• Add 10lb load. When ADC reference value is stable, press OK. This will confirm 10lb load is calibrated. Weight point will change to 2 which corresponds 20lb. Add Weight 20lb for calibration • When ADC value gets stable, press OK button. This will complete calibration for weight 20lb. Weight point will change to 3. - Page 12 • Use Up/Down key to set the desired value for the digit selected. • . Finally Press OK. Set id will be displayed as shown (sensor ID set to 00002)
Need help?
Do you have a question about the Gripper CTR-GAWL-150 and is the answer not in the manual?
Questions and answers