Table of Contents
Advertisement
Quick Links
Advertisement
Table of Contents

Related Manuals for Cytron SHIELD-Servo

Summary of Contents for Cytron SHIELD-Servo
- Page 1 SHIELD-Servo Servo Controller Shield User’s Manual V1.1 April 2018...
- Page 2 Installation (software) 6.1 Sample Program for Computer 6.2 S ample Program for CT-UNO Getting Started 7.1 U sing Shield-Servo with computer 7.2 S hield-Servo UART Protocol Warranty Created by Cytron Technologies Sdn. Bhd. – All Rights Reserved...
-
Page 3: Introduction And Overview
SHIELD-Servo offers reliable yet user friendly RC (Radio Control) Servo motor controller to hobbyist and students. Different from S C16A and S C08A , SHIELD-Servo is designed to control 8 independent RC (Remote Control) Servo motors simultaneously (or idenpendently) in a single board with a built in 5V 5Ampere switching regulator. - Page 4 Shield-Servo for easier communication between user’s circuit (microcontroller/Arduino) and Shield-Servo. By using UART function on Shield-Servo, user is able to have more extensive control of the Servo driver and Servo motor. User can leave most part of the Servo control algorithm to Shield-Servo.
- Page 5 Servo varies from one Servo manufacturer to another . Shield-Servo is designed to simultaneously generate 8 independent Servo control signals. The Servo controller can generate pulses from 0.5 ms to 2.5 ms, which is greater than the range of most Servos, and which allows for a Servo operating range of over 180 degrees.
-
Page 6: Packing List
s ales@cytron.io immediately. Shield-Servo comes with: • 1 x SHIELD-Servo board with every component is soldered properly and tested before board is shipped. User’s Manual and sample s ource codes (Arduino Sketch) can be downloaded from • https://www.cytron.io/p-shield-servo... -
Page 7: Product Specification And Limitations
Power Input Pins Function Description Label Definition Function VM is one of Shield-Servo power sources. VM will supplies power to Servo motor. This should be connected to possitive terminal of power source. Although Shield-Servo provides Servo Supply protection against wrong polarity for this input, user must... -
Page 8: Absolute Maximum Rating
Not connected to any pin. Common ground for both logic operation and also System Ground Servo power source. Absolute Maximum Rating Parameter Typical Unit VM Voltage VM Current Created by Cytron Technologies Sdn. Bhd. – All Rights Reserved... -
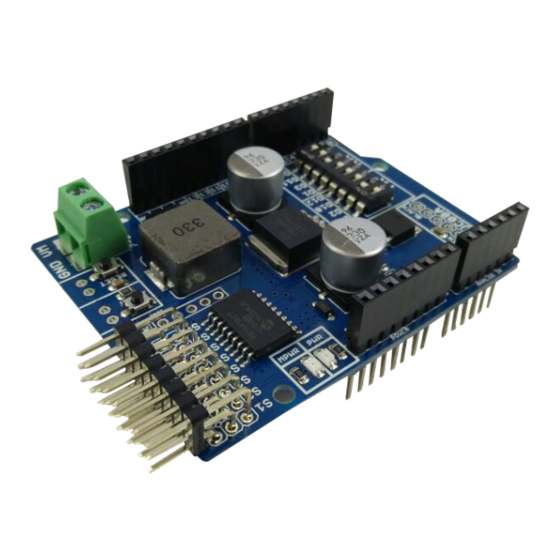
Page 9: Board Layout
A LED acting as indicator for Servo Power. This LED will indicate that Servo is being powered. Manufacturing test point for Shield-Servo. The header pin is not soldered since it is meant for production test point. Please DO NOT connect or shorted any of these pins. - Page 10 UC00A or UC00C, or other microcontroller. A push button acting as reset button for shield-servo controller, NOT Arduino reset button. If this button is pressed, shield-servo will be reseted to initial stage. Please DO NOT pressed this button during operation A push button to activate self test.
- Page 11 ROBOT . HEAD to TOE Product User’s Manual – S hield-Servo 4.1 DIMENSION Created by Cytron Technologies Sdn. Bhd. – All Rights Reserved...
-
Page 12: Installation Hardware
5. INSTALLATION (HARDWARE) 5.1 Setting up Shield-Servo Shield-Servo is designed to control 8 channels of RC Servo motor. Following steps will guide user in using this shield. Before connection can be made, please ensure power supply is connected correctly. In general, DC power supply only have 2 wire which is red and black. - Page 13 User may also use external switch to test servo motor functinality. Here is an example of Shield-Servo connected to switches. External switches can be use to test Shield-Servo and drive servo motors. S1 act as test switch and S2 is to reset Shield-Servo if pressed.
- Page 14 5.4 Connecting to Computer through UART Another concern in controlling Servo motor using a computer is the hard work needed to get started. However, with Shield-Servo, interfacing with a computer is as easy as 1 2 3. Just get yourself an ...
-
Page 15: Installation Software
6. INSTALLATION SOFTWARE There are 2 options of sample software being provided for Shield-Servo. The simplest way is to use sample program for Arduino, while another option is the use sample GUI program to control Servo motors through Shield-Servos. - Page 16 Product User’s Manual – S hield-Servo 4. A window as shown in the figure below pops up. 5. Before any setup can be done, please ensure hardware installation of Shield-Servo is being setup correctly and power to Servo motor is connected. If you are using UC00A/UC00C, driver must be installed.
- Page 17 Product User’s Manual – S hield-Servo 7. Click the “Connect” button and Shield-Servo GUI will show “COMxx connected”. 8. Now, Shield-Servo GUI is ready to control the Servo motor using Shield-Servo. User may on/off the motor, Active/deactive the individual motor, change position, set motor rotation speed, reset servo initial position using this GUI.
- Page 18 Ensure the hardware interface for microcontroller to Shield-Servo is setup properly. The power for Servo motor is also needed. f. Power indicator LED on Shield-Servo will turn ON when power is supply to board. g. Please refer to ...
-
Page 19: Getting Started
Power up Shield-Servo. When power is connected, power indicator LED will turn ON. c. Click Shield-Servo V1.0 application to start control Servo motor. Before the GUI is able to control Servo motor on Shield-Servo, connection must be made. Click on COM port, choose the last COM port, click connect. - Page 20 ROBOT . HEAD to TOE Product User’s Manual – S hield-Servo d. Once the status is connected, user is free to control Servo motor using Shield-Servo. e. Since the GUI VB.net source code is provided, user can refer to the source code and modify it or write a new program to create own GUI for own application.
- Page 21 Shield-Servo. This section explains the protocol for send/receive commands. Shield-Servo has two types of protocol, the 1st protocol is important which is uses to send command to Shield-Servo, further control a particular servo to a position with a defined speed.
- Page 22 The initial status for servo motor is deactivated. Host need to sends 2 byte command to shield-Servo to On/Off selected channels or all channels before running the servo motor. The command is being send in packet format. Each packet consists of 2 bytes. Servo motor channel is 0-8 (decimal value).
- Page 23 2nd and 3rd byte combined provides 13 bit data of servo position, 0-8000. The resolution of shield-servo is 0.25us. It will start from 0.5ms and increase the duty cycle of pulses according to value of position. Thus, following formula show the duty cycle of pulse generated.
- Page 24 2nd and 3rd byte is combined to provide 13 bit servo position. Please refer back Position and speed command section for description for these bytes. d. After received starting position command, Shield servo will reply one byte 0x04 to microcontroller. Created by Cytron Technologies Sdn. Bhd. – All Rights Reserved...
-
Page 25: Warranty
Cytron Technologies Sdn Bhd www.cytron.io No. 1, Lorong Industri Impian 1, Taman Industri Impian, 14000 Bukit Mertajam, Penang, Malaysia. Tel: +604 - 548 0668 Fax: +604 - 548 0669 Email: support@cytron.io sales@cytron.io Created by Cytron Technologies Sdn. Bhd. – All Rights Reserved...
Need help?
Do you have a question about the SHIELD-Servo and is the answer not in the manual?
Questions and answers