
Related Manuals for Nonda ZUS Pro Edition

Summary of Contents for Nonda ZUS Pro Edition
- Page 1 ® Smart Vehicle Health Monitor Pro Edition User Manual Please read this manual carefully before attempting installation and online activation. Pictures are for indication and illustration purposes only...
-
Page 2: Table Of Contents
Table of Contents Quick Start ....................................3 Introduction ....................................4 At a glance ....................................4 Getting Started ..................................... 5 Step 1: Account Preparation on Website ........................5 Step 2: APP Download ..............................5 Step 3: Locating OBD-II port ............................6 Compatibility .................................... -
Page 3: Quick Start
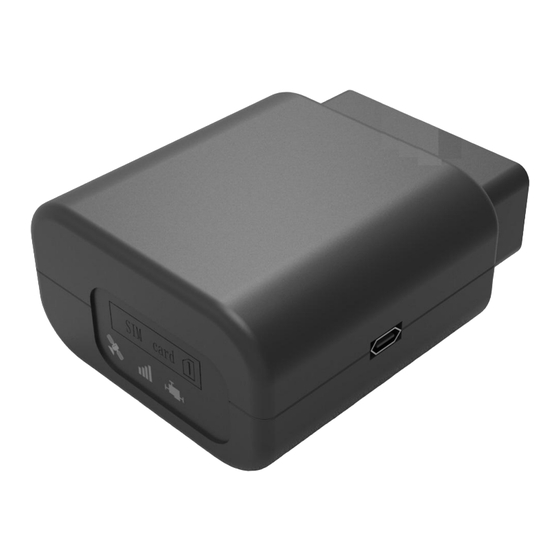
Quick Start GPS LED GSM LED OBD LED USB interface OBD connector Standard OBD Connector Connect to the 16 Pin on-board Diagnostic Link Connector (DLC). Mini USB interface Connect to PC through USB configuration cable. SIM Card slot and LED indicator light... -
Page 4: Introduction
Introduction ZUS smart vehicle health monitor network pro edition integrates GSM/GPRS module, high- performance G-sensor & 3G module. Enhanced based on the original version, the device can detect vehicle status and real-time driving behavior information. All the data collected will be transmitted to the cloud data platform through the wireless communication network for intelligent analysis and assessment. -
Page 5: Getting Started
OBD-II Port Plug this end into your vehicle's OBD-II port. Check below on how to locate the OBD-II port. Getting Started Step 1: Account Preparation on Website 1. Appoint an admin account holder for your organization. 2. Create an account on the web portal, https:// zus.ai. 3. -
Page 6: Step 3: Locating Obd-Ii Port
Step 3: Locating OBD-II port Refer to the diagram below to locate the OBD-II port. The most common location is left of the steering wheel and underneath the dashboard. Note that the vehicle's OBD-II port may be located behind a latch or contain a cover. If you can't find your OBD-II port, please search "OBD-II port + car make &... -
Page 7: Led Status
Please unplug and plug the device back into the OBD-II port, making sure it’s properly powered up. If the indicator LEDs are lit up or blinking, it means it’s properly powered up. b. If no LED is lit up or blinking, please contact cs@nonda.us. -
Page 8: Regulatory Compliance
If the Green LED keeps flashing for more than 10 mins, please unplug the device, wait 5 minutes, and then plug it back again and see if you are able to get a parking location in the app. If you still are not able to do so, please contact cs@nonda.us. Regulatory Compliance... -
Page 9: Eld Manual
ELD Manual ELD Mandate Overview It is important to know that ELDs do not fully automate driver logs but are a tool to simplify the process of data collection for a driver’s logs. For example, you still have to manually set your duty statuses to “Off Duty”, “Sleeper Berth”, and so on. -
Page 10: Setting Up
Setting up Installing the ZUS App on your Phone The ZUS OBD app is available from the Apple App Store and the Google Play Store. Using your Apple or Android device, go the app store and search for “ZUS”. Scanner set up Before beginning to work with the application, make sure that the vehicle supports OBD-II- standards. -
Page 11: How To Become An Eld Driver
6 Check in the box near to “I accept the terms and conditions” and tap on the button “next”. How to become an ELD driver 1. It is necessary to be a part of the fleet to become an ELD user. Select the “Connect to carrier”... -
Page 12: Eld Menu Options
ELD Menu Options 1 BT Connection - indicates Bluetooth status. 2 GPS connected - indicates GPS status (available, unavailable). 3 Engine on/off - indicates current status of engine. 4 AOBRD/ELD settings - set up a system to your requirements. 5 Check update - check scanner firmware update. 6 Unidentified driving. -
Page 13: Driving Status
Driving status 1 ELD-Driver automatically changes user’s status to “Driving” when a vehicle starts moving. 2 After pressing down the gas, the DRIVING status appears on the main Logbook screen, or any other screen of the application used at the moment. 3 The DRIVING status will be shown on every screen of the application. -
Page 14: Insert Past Duty Status
10 After completing these steps, you will see changes in the time-schedule and will be able to edit the timeline of the selected status. 11 Press “Save” to save changes. Insert past duty status 1 Go to the main screen «Logbook». 2 Open the needed logbook. -
Page 15: Sign Logs
IF THERE ARE NO DEFECTS, THEN OPTION “NO DEFECTS” WILL BE SELECTED AUTOMATICALLY. IF THERE ARE SOME DEFECTS, THEN OPTION “DEFECTS NEED TO BE CORRECTED” WILL BE SELECTED AUTOMATICALLY. IF THE DEFECTS WERE CORRECTED, THEN YOU WILL BE ABLE TO SELECT “DEFECTS CORRECTED”... -
Page 16: Related Functionality
Related Functionality To send Logbook complete the following steps: You can select and send all needed documents from the application to your email address. 1 In order to send the current Logbook, go to the main page of the Logbook. 2 Tap on the radio button next to the today’s Logbook. -
Page 17: Send Inspection Report
5. Complete the process by filling in the email address and pressing on the “Send” button similarly to sharing the Logbook. Send inspection report: 1 To send “Inspection Report” over email go from the navigation screen to the screen “Inspection Mode”. 2 Press on the button “Share”.
Need help?
Do you have a question about the ZUS Pro Edition and is the answer not in the manual?
Questions and answers