Table of Contents
Advertisement
Quick Links
Instruction manual
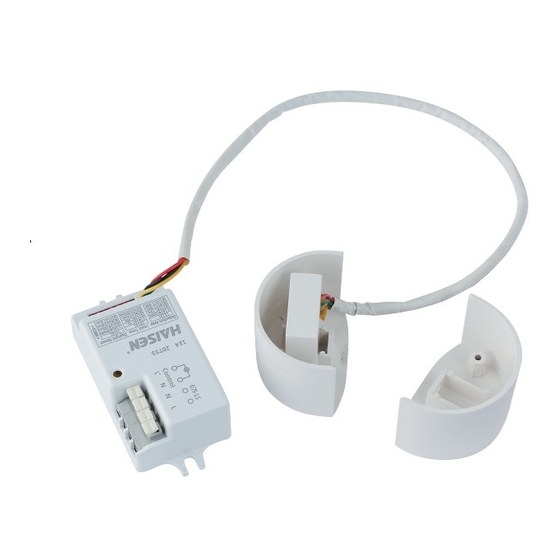
RULAR SENSOR
94056
Thank you for purchasing this light fitting. Please read
the instruction carefully before use to ensure safe and
satisfactory operation of this product. Please retain
these instruction for future reference.
1. Optional detection range, holdtime.
2. Detached Design.
3. Compact sized
On/off
Detection
Hold time
control
area
Detection coverage
Typical installation height 2.5-6m
This figure indicates the maximum distance at the highest mounting height with 100% sensitivity.
Ceiling Mounted
6
5
4
3
2
2
3
4
1
2
Mounting
3
height
4
5
6
7
www.saxbylighting.com
Wall Mounted
5
6
1
2
3
4
5
6
4
3
2
1
Mounting
height
1
2
3
4
Well covered
Technical data
Operating voltage
Switching capacity
Stand-by power
Detection area
Hold time
Microwave frequency
Microwave power
Mounting height
Detection range
Operating temperature
Motion detection
IP rating
Factory Default Setting: Detection area 100%/ Hold time 5s.
Mechanical structure
7
8
9
Installation hole
Covered
V2 21/04/2020
Saxby Lighting. BH17 7BY
10%/50%/75%/100%
5s/90s/5min/15min
5.8GHz±75MHz
<0.3mW
-20°C~+55°C
0.5~1.5m/s
IP20
Output
Input
N
Advertisement
Table of Contents

Related Manuals for Saxby Lighting 94056


Summary of Contents for Saxby Lighting 94056
- Page 1 Detection coverage Typical installation height 2.5-6m This figure indicates the maximum distance at the highest mounting height with 100% sensitivity. Ceiling Mounted Wall Mounted Installation hole Mounting height Mounting height Well covered Covered V2 21/04/2020 www.saxbylighting.com Saxby Lighting. BH17 7BY...
- Page 2 Application Dimensions (Unit: mm) 80.2 Light on when detect movement, After people leave, Light off after hold on time. Applications: Dim places such as Basement Parking, Underpass. 36.6 Attention 1. Please read the instructions carefully before using this product and keep it well for all users to read at any time.
- Page 3 04. Take appropriate length of brown and blue wires, connect sensor's L' / N' to L / N of LED driver input end. 05. Install the 94056 sensor controller and replace the end cap (sensor detector in the end cap).
- Page 4 Terminal Block 05. Take appropriate length of the brown and blue wires, connect NO.2 LED driver's L / N to two connectors separately. 06. Install the 94056 sensor controller and replace the end cap (sensor detector in the end cap). NO.1...
- Page 5 04. Take appropriate length of the brown and blue wires, connect sensor's L' / N' to LED driver input end's L / N. 94056 Sensor Terminal Block 05. Install the 94056 sensor controller and replace the end cap (sensor detector in the end cap). Driver Press the terminal with the tool supplied,...
- Page 6 04. Take appropriate length of the brown and blue wires, connect sensor's L' / N' to two connectors separately. 94056 Sensor Terminal Block 05. Install the 94056 sensor controller and replace the end cap (sensor detector in the end cap). NO.2 NO.1...
Need help?
Do you have a question about the 94056 and is the answer not in the manual?
Questions and answers