Advertisement
Available languages
Available languages
Quick Links
Advertisement

Related Manuals for Steren HER-430


Summary of Contents for Steren HER-430
- Page 1 Medidor de distancia láser V2.0 / 1016v...
- Page 2 La información presentada sirve únicamente como referencia sobre el producto. Debido a actualizaciones pueden existir diferencias. Consulte nuestra página web www.steren.com para obtener la versión más reciente de este manual. • Este aparato NO está destinado para ser utilizado por personas con capacidades diferentes, a menos que cuenten con la preparación y supervisión adecuadas.
- Page 3 Cuidado y mantenimiento • Elimine el polvo del lente y de la salida laser únicamente soplando. No toque el lente con los dedos. • En la limpieza, utilice solo paños limpios y suaves y, en caso necesario, humedézcalos con un poco de agua.
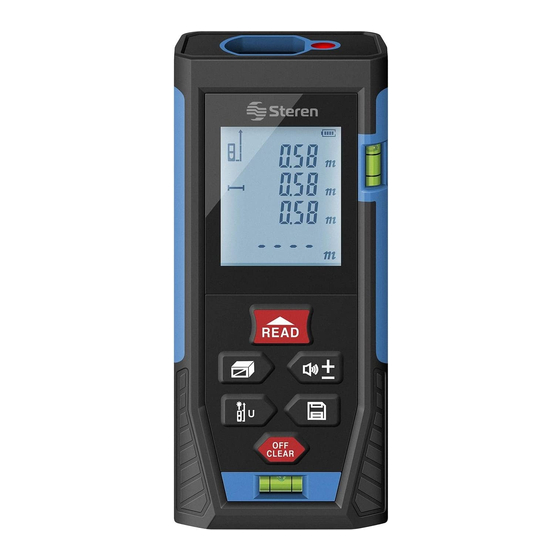
- Page 4 PARTES Nivel de gota Pantalla LCD Láser Lente READ Compartimento para baterías Nivel de gota...
- Page 5 TECLADO Encendido/Tomar medición Punto de referencia/Cambio de unidad Guardar Área/Volumen/Teorema de pitágoras Apagar/Limpiar pantalla Suma/Resta/Volumen...
- Page 6 ÍCONOS EN LA PANTALLA Grabación Láser encendido Estado de la batería Punto de referencia Medición máxima Área de visualización Área/Volumen/Teorema secundaria de pitágoras Medición mínima Medición continua Área de visualización principal...
-
Page 7: Antes De Empezar
ANTES DE EMPEZAR Principio de funcionamiento La distancia se determina a lo largo de un rayo láser de medición emitido hasta que choca en una superficie reflectante. Gracias al punto láser de medición se identifica perfectamente el objetivo de medición. El alcance depende de la reflectividad y de la calidad de la superficie del objetivo de medición. - Page 8 Colocar o reemplazar las baterías Cambie siempre el juego de baterías completo. Nunca mezcle baterías nuevas con usadas 1. Retire la cubierta del compartimento para baterías. 2. Inserte 2 baterías “AAA” tomando en cuenta la polaridad. 3. Ponga la cubierta nuevamente. Puede utilizar baterías recargables.
- Page 9 Configuración Encender/Apagar 1.Para encender el equipo, presione 2.Para apagarlo mantenga presionado El equipo se apagará automáticamente después de algunos minutos de inactividad Borrar datos 1. Presione para borrar los datos de la última medición.
- Page 10 Luz de fondo La luz de fondo se enciende y se apaga de manera automática. Mientras el medidor esté en uso la luz de fondo permanece encendida. Después de 15 segundos de inactividad la luz se apagará automáticamente. Sonido 1. Para activar o desactivar el sonido de las teclas presione Punto de referencia Es el punto donde comienza la medición;...
- Page 11 Cambio de unidad Con la lectura en ceros, mantenga presionado cada vez que requiera cambiar la unidad de medición: metros (m), pulgadas (in) o pies (ft). Longitud Área Volumen 0.000 m 0.000 m 0.000 m 0.00 m 0.00 m 0.00 m 0.00 ft 0.00 ft 0.00 ft...
- Page 12 Auto-calibración Con esta función puede ajustar la precisión del medidor. 1. Mantenga presionados al mismo tiempo hasta que en la pantalla aparezca CAL. 2. Con los botones puede ajustar la precisión del medidor en un rango de -9 a 9mm. 3.
- Page 13 FUNCIONAMIENTO Medición simple (distancia) Coloque el equipo en el lugar desde donde desea empezar a medir; utilice el nivel para tener una medición más estable y exacta. 1. Presione para encender el medidor. 2. Apunte el láser hacia el objetivo donde desea medir y presione nuevamente .
- Page 14 Mediciones continuas Desde la pantalla inicial 1. Bajo el modo de medición simple mantenga presionado Max/Min aparece en la pantalla. 2. Automáticamente se tomarán medidas consecutivamente, y los valores se mostrarán en la parte superior de la pantalla. La última medición simple aparecerá en el área de visualización principal de la pantalla. 3.
- Page 15 Medición de área Desde la pantalla inicial Ancho Para medir el área solo tiene que realizar dos mediciones. De- Largo fina cuál será el largo y ancho del espacio a medir. Después, siga estos pasos: 1. Presione , en pantalla aparece 2.
- Page 16 Medición de volumen Para medir el volumen son necesarias tres mediciones. Defina cuál será el largo, ancho y alto del espacio a medir. Después, siga estos pasos: Desde la pantalla inicial 1. Presione dos veces. Aparecerá en la pantalla el icono 2.
- Page 17 Medición indirecta (Teorema de Pítágoras) Este medidor es capaz de calcular distancias basadas en el teorema de Pitágoras. Esta función es ideal para medir algunas zonas difíciles o inaccesibles. Los resultados obtenidos solamente son correctos si se mantienen exactamente los ángulos rectos precisados en las respectivas mediciones.
- Page 18 Método 2 Desde la pantalla inicial 1. Presione 4 veces. En la pantalla aparecerá el ícono 2. Presione para medir la recta (a) 3. Presione nuevamente para medir la recta (b) Automáticamente obtendrá la medida de la hipotenusa (x)
- Page 19 Método 3 Desde la pantalla inicial 1. Presione 5 veces. En la pantalla aparecerá el ícono 2. Presione para medir la hipotenusa (a) 3. Presione nuevamente para medir la hipotenusa de en medio (b) 4. Presione nuevamente para medir la hipotenusa(c) El medidor calculará...
- Page 20 Método 4 Desde la pantalla inicial 1. Presione 6 veces. En la pantalla aparecerá el ícono 2. Presione para medir la hipotenusa (a) 3. Presione nuevamente para medir la recta de en medio (b) 4. Presione nuevamente para medir la hipotenusa (c). El medidor calculará...
- Page 21 Adición (suma) Desde la pantalla inicial 1. Realice una medición simple. (véase p.13) 2. Presione , Aparecerá el símbolo [+] 3. Presione para tomar una segunda medición. En el área principal de visualización se mostrará la suma de las dos cantidades.
- Page 22 Sustracción Desde la pantalla inicial 1. Realice una medición simple. (véase p.13) .El ícono [-] aparecerá en pantalla. 2. Presione dos veces 3. Apunte el medidor hacia el nuevo objetivo y presione El medidor mostrará el resultado de la resta de entre la primera y la segunda cantidad.
- Page 23 Grabación Desde la pantalla inicial Mantenga presionado para guardar el resultado de la medición en la memoria interna del medidor. El ícono aparecerá en pantalla. Puede almacenar hasta 30 mediciones. Explorar y borrar los datos almacenados Desde la pantalla inicial Presione para accesar a los distintos datos almacenados.
-
Page 24: Códigos De Error
CÓDIGOS DE ERROR Códigos Causa Solución Err1 Señal es muy débil Elija una superficie más refractante Err2 Señal es muy fuerte Elija una superficie menos refractante Err3 Poca batería Reemplace las baterías Err4 La temperatura está fuera de rango Utilice en una temperatura específica Err5 La medición de Pitágoras tiene un Asegúrese de que la hipotenusa es... -
Page 25: Especificaciones
ESPECIFICACIONES Las especificaciones pueden cambiar sin previo aviso Alimentación: 3 V - - - (2 pilas “AAA”) Temperatura de operación: 0 º - 40 ºC (32º - 104 ºF) Temperatura de almacenaje: -10 ºC a 60 ºC Láser: Clase II, 635 nm, <1mV... - Page 26 2.- Cuando el producto no ha sido operado de acuerdo con el instructivo de uso. 3.- Cuando el producto ha sido alterado o reparado por personal no autorizado por Electrónica Steren S.A. de C.V. El consumidor podrá solicitar que se haga efectiva la garantía ante la propia casa comercial donde adquirió...
- Page 27 50m laser distance meter V2.0 / 1016v...
- Page 28 IMPORTANT Before to use the product, please read carefully this manual to avoid any malfunction. The info in this manual is shown as reference. Due to updates can exist differences. Consult our website www.stern.com to obtain the most actual version of this manual.
- Page 29 Care and Maintenance • Remove dust from the lens and the laser output only blowing. Do not touch the lens with your fingers. • When cleaning, use only clean and soft cloth and, if necessary, moisten with a little water. •...
- Page 30 PARTS Level drop LCD screen Laser Lens READ Batteries compartment Level drop...
- Page 31 KEYS On/Measurement Point of reference/Change the measure unit Save Area/Volume/Phytagorean proposition Off/Screen clear Addition/Subtraction/Volume level...
-
Page 32: Icons On The Screen
ICONS ON THE SCREEN Recording Lasser on Battery status Reference point Max measuring Secondary Area/Volume/Phytago- display area rean proposition Min measuring Continous measuring Primary display area... -
Page 33: Before Starting
BEFORE STARTING Operating principle The distance is determined along a laser beam emitted measurement until impinges on a reflective surface. Thanks to laser measurement point is perfectly identifies the measurement objective. The range depends on the reflectivity and the quality of the lens surface measurement. Measuring rough surface In measurements on a rough surface an average value, resulting in a higher value for the center of that area peripheral laser beam it is measured. -
Page 34: Insert Or Replace Batteries
Insert or replace batteries Always replace the complete set of batteries. Never mix new and used batteries 1. Remove the battery compartment cover. 2. Insert 2 “AAA” batteries paying attention to correct polarity. 3. Place the cover again. You can use rechargeable batteries. - Page 35 Configuration On/Off 1. To turn it on the device, press and hold 2. To turn it off press and hold for a few seconds. The equipment will automatically turn off after a few minutes of inactivity Data delete 1. Press to delete the data of the last measure.
- Page 36 Backlight The backlight automatically turns on and off. While the meter is in use the light remains on. After 15 seconds of inactivity the light will off automatically. Sound 1. To enable or disable the sound of keys, press and hold Reference point Is the point where the measuring starts;...
- Page 37 Unit change Press and hold whenever you want to change the unit of measurement: meters (m), inches (in) or feet (ft). Length Area Volume 0.000 m 0.000 m 0.000 m 0.00 m 0.00 m 0.00 m 0.00 ft 0.00 ft 0.00 ft 0.0”...
-
Page 38: Self-Calibration
Self-calibration With this function you can adjust the accuracy of the meter. until CAL appears in the screen. 1. Press and hold at the same time 2. With tis buttons you can adjust the accuracy of the meter in a range of -9 to 9mm. 3. - Page 39 WORKING Single measuring (distance) Place the equipment in the place where you want to start measuring; Use the level to have a more stable and accurate measurement, turn it on and check that the reference point is the one you need. 1.
- Page 40 Continuous measuring From the initial screen 1. Under the single measuring mode, press and hold Max/Min appears in the screen. 2. The meter will take measures consecutively and the values will show in the high part of the screen. The last single measu- ring will appear in the main visualizing area.
- Page 41 Area measuring From the initial screen To measure the area only has to perform two measurements. Width Define what the length and width of the space to be measu- Long red. Then, follow these steps 1. Press , in the screen appears 2.
- Page 42 Volume To measure the volume three measurements are needed. Define what the length, width and height of the space to be measured. Then follow these steps: From the initial screen 1. Press two times. In the screen appears the icon. 2.
- Page 43 Indirect measurement (Pythagorean theorem) This meter is able to calculate distances based on the Pythagorean theorem. This function is ideal for measuring some difficult or inaccessible areas. The results are only correct if kept exactly the right angles specified in the respective measurements. There are 4 methods to measure using this feature;...
- Page 44 Method 2 From the initial screen 1. Press 4 times. The icon appears on the screen 2. Press to measure the line (a) 3. Press again to measure the line (b) Automatically get the measure of the hypotenuse (x)
- Page 45 Method 3 From the initial screen 1. Press 5 times. In the screen appears the icon. 2. Press to measure the hypotenuse (a) 3. Press again to measure the hypotenuse middle (b) 4. Press again to measure the hypotenuse (c) The meter will automatically calculate the height of the straight edge (x).
- Page 46 Method 4 From the initial screen 1. Press 6 times. In the screen appears the icon. 2. Press to measure the hypotenuse (a) 3. Press again to measure the line between (b) 4. Press again to measure the hypotenuse (c) The meter will automatically calculate the height of the straight edge (x).
- Page 47 Addition From the initial screen 1. Make a single measuring. (see p. 39). 2. Press ,, the [+] symbol appears in the screen. 3. Press to take a second measuring. In the primary visuali- zing area will shown the total of the two quantities. 4.
- Page 48 Subtraction From the initial screen 1. Performs a single measuring (see p. 39). twice. the icon [-] appears in screen. 2. Press 3. Press to take a second measuring. The screen will shown the result of the subtraction.
- Page 49 Recording From the initial screen Press and hold to save the result of the measuring into the internal memory of the meter. The icon appears. You can store up to 30 records. Explore and delete stored data From the initial screen Press to access the stored data.
-
Page 50: Error Codes
ERROR CODES Codes Cause Solution Err1 Signal is too wek Choose a surface with more reflectance Err2 Signal is too strong Choose a surface with less reflec- tance Err3 Low power Replace the batteries Err4 The temperature is over the range Use a specified temperature Err5 The Pythagorean measuring is wrong... -
Page 51: Specifications
SPECIFICATIONS Specifications may change without notice Input: 3 V - - - (Two “AAA” batteries) Operating temperature: 0 º - 40 ºC (32º - 104 ºF) Storage temperature: -10 ºC a 60 ºC Laser: Class II, 635 nm, <1mV... - Page 52 Number part: HER-430 Brand: Steren This Steren product is warranted under normal usage against defects in workmanship and materials to the original purchaser for one year from the date of purchase. CONDITIONS 1. This warranty card with all the required information, invoice or purchase ticket, product box or package, and product, must be presented when warranty service is required.
- Page 54 Centro de Atención a Clientes Customer Service Center 01 800 500 9000...
Need help?
Do you have a question about the HER-430 and is the answer not in the manual?
Questions and answers