Table of Contents
Advertisement
Quick Links
Advertisement
Table of Contents

Related Manuals for Matrix SATATYA PARAM NVR Series


Summary of Contents for Matrix SATATYA PARAM NVR Series
- Page 2 S E C U R I T Y S O L U T I O N S Matrix SATATYA PARAM NVR Video Surveillance Solution Quick Start...
- Page 3 Neither Matrix Comsec nor its affiliates shall be liable to the purchaser of this product or third parties for damages, losses, costs or expenses incurred by the buyer or third parties as a result of: accident, misuse or abuse of this product or unauthorized modifications, repairs or alterations to this product or failure to strictly comply with Matrix Comsec's operating and maintenance instructions.
-
Page 4: Table Of Contents
Contents Introduction ....................1 Know Your Enterprise NVR ................2 The User Interface ..................... 6 Technical Specifications of SATATYA PARAM NVR ........7 Application of SATATYA PARAM NVR ............. 9 Installing SATATYA PARAM NVR ............... 10 Package Contents ................... 10 Things You Will Need .................. -
Page 5: Introduction
This Quick Start is meant to help you get familiar with SATATYA PARAM NVR, install the device and configure its basic parameters. This is a common document for all the configurations of SATATYA PARAM NVR series. The terms Satatya Param NVR, Matrix SATATYA PARAM NVR, NVR and Network video recorder are used interchangeably. -
Page 6: Know Your Enterprise Nvr
Keeping in mind, the aspect of enterprise functionalities as well as the technological need of each and every organization, we offer the Matrix SATATYA PARAM NVR Series. Matrix offers SATATYA PARAM NVR Series as Integrated Hardware and Software Solution. It consists of SATATYA SAMAS Application ported on the SATATYA PARAM NVR Server. This perfect combination of a software application with a hardware platform, fulfills the business need of almost all the modern organizations. - Page 7 Variants of SATATYA PARAM NVR The SATATYA PARAM NVR Series has the following variants: NVR03208XCTS: SATATYA PARAM NVR having configuration of maximum 32 IP channels and 8 hard disks. NVR06408XCTS: SATATYA PARAM NVR having configuration of maximum 64 IP channels and 8 hard disks.
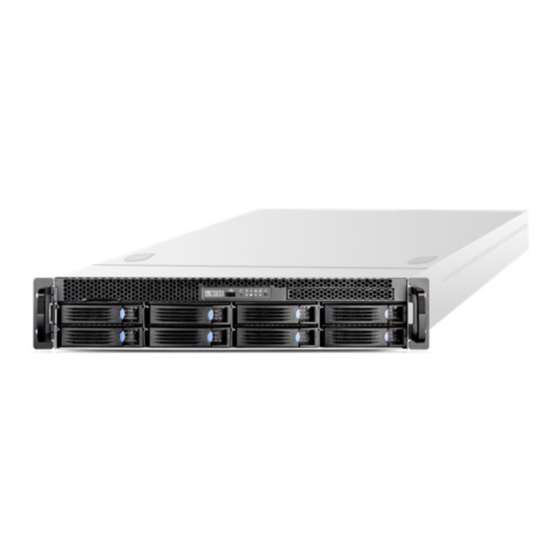
- Page 8 Push button for system reset HDD Activity LED Yellow (When HDD is busy) Power LED Blue (When power on) LAN1, LAN2 LED Green (When Internet is busy) Power Switch Push button for system power on Matrix SATATYA PARAM NVR Quick Start...
- Page 9 Switch, or to connect to the Internet over a DSL Modem or LAN 3, LAN 4 Router. General Specifications Parameters Description Power supply 220V AC Operating Temperature 0°C to +40°C Humidity 5% to 95% RH Non-Condensing Matrix SATATYA PARAM NVR Quick Start...
-
Page 10: The User Interface
SATATYA SAMAS Admin Client The SATATYA Admin Client enables you to configure — Users, Servers, Access Control, Features etc offered by the Matrix SATATYA SAMAS. To know more, refer to the SATATYA SAMAS Administrator’s Guide. SATATYA SAMAS Smart Client The SATATYA Smart Client enables access to live and stored video images of SATATYA PARAM NVR from a remote location through the Web. -
Page 11: Technical Specifications Of Satatya Param Nvr
Resolution Support 12MP, 8MP, 5MP, 3MP, 2MP, 720P, D1, CIF Compression H.265, H.264, MJPEG Onvif Profile Support Onvif S IP Camera Supports Matrix Brand, Third Party - Onvif Profile S Supported Active Directory Support Matrix SATATYA PARAM NVR Quick Start... - Page 12 Buzzer Notification, SMS Notification, Calling from Mobile App,Share files data, Trigger Aux Output SYSTEM SETUP LED Indication System Power; Ethernet Connection 1 & 2, SATA Connectivity, OS Drive Connectivity Power On & Reset Switch Matrix SATATYA PARAM NVR Quick Start...
-
Page 13: Application Of Satatya Param Nvr
Application of SATATYA PARAM NVR Matrix SATATYA PARAM NVR Quick Start... -
Page 14: Installing Satatya Param Nvr
• A rack to mount the SATATYA PARAM NVR in a rack. Safety Instructions • The Matrix device is intended for indoor use and can only be Rack Mounted. Equipment must thus be installed into a controlled, dry, clean and secure environment where temperature and humidity are within product specifications. - Page 15 • Do not cut off the power or move the unit when hard drives are operating. Doing so may cause damage and loss of data. • Make sure you have complete the wiring and installation of all the devices you want to connect to SATATYA PARAM NVR. Matrix SATATYA PARAM NVR Quick Start...
-
Page 16: Recommendations
• Make sure the throughput is 512 mbps down-link and 512 mbps up-link. • Make sure both the Power Supplies are connected. If one Power Supply is connected it will result in degraded performance. Matrix SATATYA PARAM NVR Quick Start... -
Page 17: Hardware Installation Of Satatya Param Nvr
• You are recommended to first install the hard disk(s and make the required cable connections. Refer to “Opening the Top Cover” “Installing the Hard Disk”. • For Rack mounting, refer to “Rack Mounting” instructions. SATATYA PARAM NVR Dimensions Matrix SATATYA PARAM NVR Quick Start... - Page 18 • Place your hand on the front top cover and pull it out. Installing the Hard Disk SATATYA PARAM NVR series supports maximum eight Hard disks. The storage capacity of each hard disk is upto 18 Terabytes. By default, no Hard disk is provided with the system. You can install them as per your requirement.
- Page 19 HDD and the emboss. Rack Mounting There are two rails — inner rail and outer rail. You can install the rails into the racks using the round holes or square holes. Follow the instructions given below: Matrix SATATYA PARAM NVR Quick Start...
- Page 20 • Release and detach the inner rail from the outer rail. • Align the inner rail with the system. Matrix SATATYA PARAM NVR Quick Start...
- Page 21 • Fasten it with the P-head to make sure it is well locked and the inner rail does not loosen from the system. • Attach the outer rail to the rack. • Make sure the bearing retailer in locked forward. Horizontally install the system half way into the slide rail. Matrix SATATYA PARAM NVR Quick Start...
- Page 22 You can use Round Hole pins or Square hole pins. Align the holes of the system with those of • the rack and insert the screws. Tighten them to fix the system in place. Matrix SATATYA PARAM NVR Quick Start...
-
Page 23: Software Installation Of Satatya Param Nvr
The Software Installation of SATATYA PARAM NVR included two steps: • “Configuring RAID” • “Installing SATATYA SAMAS Components” Make sure you have the Administrator rights. Configuring RAID Follow the steps for configuring RAID. • Click Intel, click Intel Rapid Storage Technology enterprise. Matrix SATATYA PARAM NVR Quick Start... - Page 24 Click Create Volume. • Click Select and then select the desired RAID option — 0, 1, 5, 10. Click Next. • Matrix SATATYA PARAM NVR Quick Start...
- Page 25 • Click Configure. The list of HDD’s appears. Select the desired HDD’s and click Next. Click Confirm. If you wish to clear the data in the disks, select the Proceed with deleting • data check box. • Click Create Volume. Matrix SATATYA PARAM NVR Quick Start...
- Page 26 The Volume is created After the Volume is created, click Initialize. • Matrix SATATYA PARAM NVR Quick Start...
- Page 27 After the completion of the initialization process the Status displays Normal. After the Volume is created, the next step is to display the same. To do so, following the steps given below: • Click Create and format hard disk partitions. Matrix SATATYA PARAM NVR Quick Start...
- Page 28 The Disk Management window opens. • Matrix SATATYA PARAM NVR Quick Start...
- Page 29 Right-click on Unallocated and click the New Simple Volume option. • Matrix SATATYA PARAM NVR Quick Start...
- Page 30 The New Simple Volume Wizard opens. • • Click Next. Matrix SATATYA PARAM NVR Quick Start...
- Page 31 • Under Specify Volume Size, keep the default values of the parameters. • Click Next. Matrix SATATYA PARAM NVR Quick Start...
- Page 32 • Click Next. • Under Format Partition, select the option Format the volume with the following settings. In Volume Label, configure the name you wish to assign to the Volume. Matrix SATATYA PARAM NVR Quick Start...
- Page 33 • Click Next. Matrix SATATYA PARAM NVR Quick Start...
- Page 34 • To complete, click Finish. • Click My PC/Computer this new volume appears as a new drive. Now, you can proceed further with the installation of the SATATYA SAMAS components. Matrix SATATYA PARAM NVR Quick Start...
- Page 35 IVA Server Hardware/Software Minimum Recommended Intel Core i5 Intel Core i7 or higher 8 GB 8-12 GB or higher Network 100 Mbps 1 Gbps Hard disk Space 10 GB free space 100 GB free space Matrix SATATYA PARAM NVR Quick Start...
- Page 36 Microsoft Microsoft Crystal Microsoft .NET Windows Visual C++ SQL Server Reports Servers/Clients Framework Installer 2015-2019 2008 R2 Runtime 4.5 and above Redistributable 13.0 - 14.24.28127 IVA Server Smart Client Multi Monitor Client Media Player Matrix SATATYA PARAM NVR Quick Start...
- Page 37 The SATATYA SAMAS Software Installation setup is available at: ftp://matrixtelecomsolutions.com/SecurityProducts/SATATYA/SATATYA SAMAS. For credential assistance, contact Matrix Channel Partners or Matrix Support Team at Support@MatrixComSec.com To start with the software installation, follow the steps given below: Right click on SATATYA_SAMAS_Installer and click Run as administrator.
- Page 38 The License Agreement screen appears as shown below. Select the check box to accept the terms and conditions and click Next to continue the installation process. Click Install to initiate the installation process. Now select the Installation Drive from the drop-down list. Matrix SATATYA PARAM NVR Quick Start...
- Page 39 • Select the desired components from the list that are to be installed. Click Next to continue. • The list of the following will be displayed: • components that will be installed • components that are already installed • components that will not be installed Matrix SATATYA PARAM NVR Quick Start...
- Page 40 • Click Install. The system will start installing the selected components. Matrix SATATYA PARAM NVR Quick Start...
- Page 41 You can create and upgrade the SAMAS Database using Database (DB) Utility. The DB Utility can be opened either by clicking on the Click Here link just after completion of the installation or by navigating through C:\Program Files\Matrix\SATATYA SAMAS Management Server.
- Page 42 The database utility setup page appears as shown below. Click Change Settings and select the New Database check box. Specify the Database Connection Settings as described below. • Database Type: The database type supported is MS SQL Server. Matrix SATATYA PARAM NVR Quick Start...
- Page 43 Once the SAMAS database has been created using the above procedure, the administrator needs to subsequently only use the Upgrade option as and when required. Do not select New Database. Click Upgrade to upgrade the database. Matrix SATATYA PARAM NVR Quick Start...
- Page 44 Database Utility. The Database Utility can be opened either by clicking on the Click Here link just after completion of the installation or by navigating through C:\Program Files\Matrix\SATATYA SAMAS Management Server.
- Page 45 • In Backup Path, the path of the backup file is displayed where the MS SQL has been installed. This path cannot be changed. • Click Backup. The system will start the backup process as shown below. Matrix SATATYA PARAM NVR Quick Start...
- Page 46 To Uninstall or Reinstall the SATATYA SAMAS components, click SATATYA_SAMAS_Installer. The setup window appears as shown below. For successful uninstallation or reinstallation of SATATYA SAMAS, it is recommended that all the services are stopped before performing the task. Matrix SATATYA PARAM NVR Quick Start...
- Page 47 • To Uninstall the SAMAS components, Click Uninstall. Then select the check boxes of the desired components or click Select All to uninstall all the components. • Then click Next and then click Uninstall. The selected components will be uninstalled. Matrix SATATYA PARAM NVR Quick Start...
- Page 48 SAMAS at diverse locations using a simple Web URL from any standard Web Browser. On your Web Browser, enter the URL in the following format: http://<Management Server IP Address>:<Admin Client_Port>/downloader.html Matrix SATATYA PARAM NVR Quick Start...
- Page 49 The SATATYA SAMAS Downloader appears as shown below: Select a Component from the Components section to initiate the download and follow the instructions to complete the installation. User can also download all Product Manuals if required. Matrix SATATYA PARAM NVR Quick Start...
-
Page 50: Setting-Up The Satatya Param Nvr Servers Using The Manager Utilities
Server Based License Dongle. Crystal Reports Runtime 13.0 which is required for report generation and must be installed where Management Server is installed. Matrix does not provide this software for installation. Step 1: Configure License Server Settings using the License Server Manager Utility. - Page 51 The Management Server is responsible for centralized authentication, logging (events, actions, user activities, etc.) and configuration of the security system consisting of video surveillance devices. • Navigate through C:\Program Files\Matrix\SATATYA SAMAS Management Server. • Click Management Server Manager. Right-click on the Management Server icon in the Windows taskbar.
- Page 52 License Server machine. IP Address: Enter the IP address of the License Server machine where the Licensed Dongle is connected. Port: Specify the Listening Port on which License Server communicates with the Management server. Matrix SATATYA PARAM NVR Quick Start...
- Page 53 • Port: Specify the Listening port on which License Server communicates with the Management server. Make sure the same Port number is entered in the License Server. By default, Management Server runs on the IP Address of the system where it is installed. Matrix SATATYA PARAM NVR Quick Start...
- Page 54 License Verification with Device Based mode. For the configuration, Open your COSEC Device web page using the browser and login using the credentials. Open Settings > Server Settings and the following page appears on your screen: Matrix SATATYA PARAM NVR Quick Start...
- Page 55 The Port number entered on Management Server Manager page should be same as entered for COSEC Device License Server. Open Management Server Manager page and the MAC Address of COSEC Device will be displayed for the entered Port Number as shown below: Matrix SATATYA PARAM NVR Quick Start...
- Page 56 • Navigate through C:\Program Files\Matrix\SATATYA SAMAS Recording Server. • Click Recording Server Manager. Right-click on the Recording Server icon in the Windows taskbar.
- Page 57 • IP Address or Server Name: Enter either the Private or Public IP address of Management Server or enter Host Name, Domain Name or Server Name of ISP1 and ISP2. • Port: Enter either Private or Public Port. Matrix SATATYA PARAM NVR Quick Start...
- Page 58 (PN1), then ISP will fall-back to IP2, allowing the RS to re-establish the connection via ISP2 (PN2). • Now when PN1 connectivity is resumed, then the connection will be switched over from the PN2 to PN1. Matrix SATATYA PARAM NVR Quick Start...
- Page 59 Also, it is not necessary that both client and RS are located in the same network, they may be located in two different networks. So to serve both the scenarios, SAMAS allows to configure preferred networks, where user can add private as well as public networks of RS. Matrix SATATYA PARAM NVR Quick Start...
- Page 60 Server. In this field, you can also enter Host Name, Domain Name or Server Name of ISP1 and ISP2. • Port: Enter either Private or Public Port on which RS listens client request. For Private Network, enter the ‘Recording Server Port’. Matrix SATATYA PARAM NVR Quick Start...
- Page 61 The E-mail and SMS Notification Server is responsible for configuration of Mail Server and SMS Service provider to send E-mail and SMS notifications to the User. • Navigate through C:\Program Files\Matrix\SATATYA SAMAS Notification Server. • Click Notification Server. Right-click on the Notification Server icon in the Windows taskbar.
- Page 62 Accounts of Admin Client. The Notification Server Manager window appears as shown below: E-mail Settings For the E-mail Settings, configure the following parameters. SMTP Server: Specify the IP Address or Name of the configured SMTP Server. Matrix SATATYA PARAM NVR Quick Start...
- Page 63 You can add a Service Provider other than the ones provided by default. To do so, • Select Custom as the Service Provider option. Maximum 99 service providers can be added. • Click Add Matrix SATATYA PARAM NVR Quick Start...
- Page 64 “User”, “Password” etc. Argument Value: Select a value to be mapped against the defined API Argument. Select “Custom” to define a custom static value. Click Add Argument to save the new argument and value. Matrix SATATYA PARAM NVR Quick Start...
- Page 65 Argument Separator: Define a character that can be used as a valid separator between arguments used to construct the API URL. E.g. “&”. Request Method: Select a method by which the request is to be sent. Request Preview: Displays the preview of the updated API request. Matrix SATATYA PARAM NVR Quick Start...
- Page 66 Branch Office - 192.168.104.17 and Recording Server with cameras is located at the Server Room - 192.168.104.23 To view cameras in the Server Room from Branch Office, specify the License Server Port (where SAMAS Dongle is connected) in the License Server Manager of Branch Office PC. Matrix SATATYA PARAM NVR Quick Start...
- Page 67 IP Address as 192.168.104.17 and port as 8090 of MS. The RS will send request to MS to activate. From the Admin Client the RS has to be activated and then cameras of the RS can be viewed in the Smart Client. Matrix SATATYA PARAM NVR Quick Start...
- Page 68 For the Version details about each Server, right-click on the particular Server icon on the Windows taskbar and click About as shown below. To configure the IVA Server, refer to the SATATYA SAMAS Installation Guide. Matrix SATATYA PARAM NVR Quick Start...
-
Page 69: Ssl Settings
Thus, to secure communication between the components of SAMAS, SSL is required. You need to enable the Secure connection from the Management Server Manager page while configuring the Management Service settings. For SSL, make sure the certificate is uploaded. Matrix SATATYA PARAM NVR Quick Start... - Page 70 • Valid From: It displays the validity From date and time of the certificate. • Valid To: It displays the validity To date and time of the certificate. Click OK to save the SSL certificate or click Cancel to discard. Matrix SATATYA PARAM NVR Quick Start...
-
Page 71: Connecting Satatya Param Nvr
• Connect the Ethernet cable from your computer/LAN Switch to the LAN Port on the Rear panel. • To connect SATATYA PARAM NVR to the Internet, connect its LAN port either directly to the DSL Modem or Router or over a LAN Switch. Matrix SATATYA PARAM NVR Quick Start... - Page 72 • To specify the IPv4 settings manually, • Under Edit IP settings, select Manual, then turn on IPv4. • To specify the IP address, in the IP Address, Subnet prefix length and Gateway boxes, type the IP address settings. Matrix SATATYA PARAM NVR Quick Start...
- Page 73 • When you select Automatic (DHCP), the IP address settings and DNS server settings are set automatically by your router or other access point. • When you select Manual, you can manually, set your IP address settings and DNS server address. • Select Save. Matrix SATATYA PARAM NVR Quick Start...
-
Page 74: Configuring The Satatya Param Nvr
To access the Admin Client, make sure the Management Server is installed and configured, so that the connection between the Admin Client and Management Server (MS) can be established. Follow the steps below: • Expand the panel as shown below for performing the network configurations. Matrix SATATYA PARAM NVR Quick Start... - Page 75 • For that, enter Private IP and Port of MS. The port that is to be configured is the “Admin Client Port” of MS which is same as that configured in MS manager as shown below. Matrix SATATYA PARAM NVR Quick Start...
- Page 76 You can specify three Public network IPs and Ports. The port that is to be configured is ISP port that has been mapped with the Admin Client Port” of MS. Contact the Administrator regarding port forwarding configurations. Matrix SATATYA PARAM NVR Quick Start...
- Page 77 Gujarat while the other branch is located in Mumbai. • Also, the MS and Admin Client1 has been installed in the same network at the Central location (Gujarat), while Admin Client 2 has been installed at remote location (Mumbai). Matrix SATATYA PARAM NVR Quick Start...
- Page 78 The first login can be performed using the default administrator username “admin” Now, click the Login button to enter the application. While logging into Admin Client, you can select the Remember Password check box for the application to remember your password for the next login. Matrix SATATYA PARAM NVR Quick Start...
- Page 79 Select the mode of sending the 6-digit verification code i.e. OTP to the user via registered mobile number or via registered email address. Click Send Code button and the following screen appears. Matrix SATATYA PARAM NVR Quick Start...
- Page 80 Thus, the user can now use the new credentials to login to Admin Client. At the time of first login, you will be prompted to set a new password. Create a strong password and make sure you note it down in a secure place for future reference. Matrix SATATYA PARAM NVR Quick Start...
- Page 81 Select the I accept the terms and conditions of End User License Agreement (EULA) check box and click Submit The SATATYA SAMAS Admin Client Homepage appears as shown below: For configuring, refer to the SATATYA SAMAS Administrator’s Guide. Matrix SATATYA PARAM NVR Quick Start...
- Page 82 Accessing the Smart Client To access the Smart Client application, navigate to the Matrix Smart Client application from the Start button of Windows desktop from the following path: Start> Programs> Matrix> SATATYA SAMAS> Smart Client OR double click on the Smart Client icon on the desktop.
- Page 83 • For that, enter Private IP and Port of MS. The port that is to be configured is the “Media Client Port” of MS which is same as that configured in MS manager as shown below. Matrix SATATYA PARAM NVR Quick Start...
- Page 84 You can specify three Public network IPs and Ports. The port that is to be configured is ISP port that has been mapped with the “Media Client Port” of MS. Contact the Administrator regarding port forwarding configurations. Matrix SATATYA PARAM NVR Quick Start...
- Page 85 Gujarat while the other branch is located in Mumbai. • Also, the MS and Smart Client1 has been installed in the same network at the Central location (Gujarat), while Smart Client 2 has been installed at remote location (Mumbai). Matrix SATATYA PARAM NVR Quick Start...
- Page 86 After configuring the required preferred networks, enter the Username and Password for authentication of the user and click on Login button. At the time of first login to SATATYA SAMAS, user will be prompted to set a new password. Matrix SATATYA PARAM NVR Quick Start...
- Page 87 Select the mode of sending the 6-digit verification code i.e. OTP to the user via registered mobile number or via registered email address. Click Send Code button and the following screen appears. Matrix SATATYA PARAM NVR Quick Start...
- Page 88 The Verification code is valid till 10 minutes only. Enter the New Password and Confirm Password and click Login to enter the system with new credentials. Thus, the user can now use the new credentials to login to Smart Client. Matrix SATATYA PARAM NVR Quick Start...
- Page 89 The Smart Client home page appears as shown below: Customized logo will be shown on the Title Bar of each tabs instead of MATRIX logo if it is configured in SAMAS Admin Client. Refer SATATYA SAMAS Administrator Manual for the configuration of custom logo, in General Settings > System Settings > Logo Personalization.
- Page 90 Accessing the Media Player (from separate workstation system) The Matrix SAMAS Media Player provides the user with an interface to view the records stored in Backup Storage. With the Media Player, user can scan the video records, perform basic playback functions viz.
-
Page 91: Appendix
After end-of-life of the Matrix products, if you are unable to dispose-off the products or unable to locate e-waste recyclers, you may return the products to Matrix Return Material Authorization (RMA) department. - Page 92 S E C U R I T Y S O L U T I O N S MATRIX COMSEC Pvt. Ltd. Head Office: 394-GIDC, Makarpura, Vadodara - 390010, India. Ph: (+91)1800-258-7747 E-mail: Support@MatrixComSec.com www.matrixvideosurveillance.com...
Need help?
Do you have a question about the SATATYA PARAM NVR Series and is the answer not in the manual?
Questions and answers