Table of Contents
Advertisement
Quick Links
#1, 1431 – 40 Ave NE, Calgary, AB, Canada, T2E 8N6
Pioneer Petrotech Services Inc.
Tel: (403)282-7669, Fax: (403)282-0509
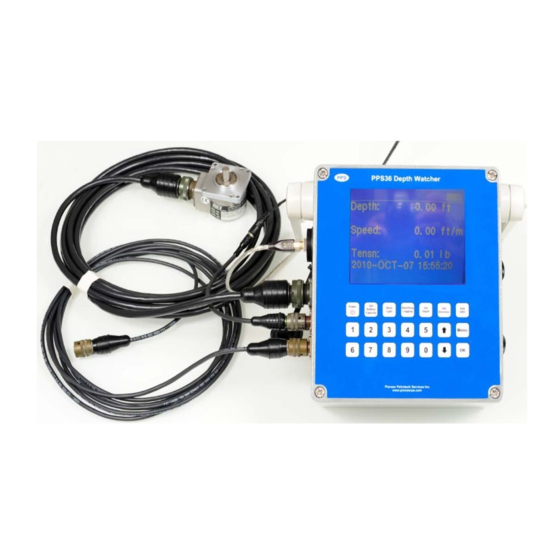
PPS36 Depth Watcher
U s e r M a n u a l ( R e v . 1 . 4 )
Pioneer Petrotech Services Inc.
Unit Q, 1235 - 40th Ave. NE
Calgary, AB T2E 6M9, Canada
Phone: 1-888-PP-GAUGE (774-2843)
E-mail: infopps@pioneerps.com
Website:
www.pioneerps.com
PPS36 User Manual
Page 1 of 30
Advertisement
Table of Contents

Related Manuals for PPS PPS36


Summary of Contents for PPS PPS36
- Page 1 #1, 1431 – 40 Ave NE, Calgary, AB, Canada, T2E 8N6 Pioneer Petrotech Services Inc. Tel: (403)282-7669, Fax: (403)282-0509 PPS36 Depth Watcher U s e r M a n u a l ( R e v . 1 . 4 ) Pioneer Petrotech Services Inc.
-
Page 2: Table Of Contents
Delete Jobs (see Figure 10) ................21 2.4.7. Change Units (see Figure 10) ................. 21 2.4.8. Sound On/Off (see Figure 10) ................. 23 2.4.9. Set Sample Rate (see Figure 10)..............23 2.4.10. Select Channels (see Figure 10)..............23 PPS36 User Manual Page 2 of 30... - Page 3 Tel: (403)282-7669, Fax: (403)282-0509 2.4.11. Set Time/Date (see Figure 11) ................ 23 3. Standalone Operation ..............24 4. Real Time Monitoring ..............25 5. Maintenance ................. 26 6. Troubleshooting................27 7. Parts and Accessories ..............28 PPS36 User Manual Page 3 of 30...
-
Page 4: Revision History
Tel: (403)282-7669, Fax: (403)282-0509 Revision History Revision Date Comments 2010-09-20 Initial release 2010-12-17 Information about accessories 2011-02-03 Add sheave angle description, depth verify, troubleshooting, rechargeable batteries and charger. 2011-07-29 Add ¼ NPT three-T PPS36 User Manual Page 4 of 30... -
Page 5: Introduction
Tel: (403)282-7669, Fax: (403)282-0509 1. Introduction 1.1. Overview PPS developed PPS36 Depth Watcher (DW) to provide our customers with a cost effective solution for logging operations. The DW has capabilities to display and record depth, speed, tension, real time and data collected from user specific devices which are interfaced to remaining analog input channels of the DW. -
Page 6: Specifications
3 channels (4-20 mA input) Sampling rate 0.1s—1.8hours /sample Depth measurement Accuracy ±0.3ft (±0.1m). Alarm Settings Depth Up to 8 depth alarms Speed Tension Real Time monitoring Yes (a computer is necessary). Software Compatibility Windows 7/Vista/XP/NT/2000 PPS36 User Manual Page 6 of 30... -
Page 7: Functions Description
2. Functions Description 2.1. DW Box Identification USB Port Handle Bar Encoder Input External Power Input Channel B Input Tension Input Channel A Input Figure 1 Body Cover Battery Cap Battery Cartridge Figure 2 PPS36 User Manual Page 7 of 30... - Page 8 Touch MENU key can go into main menu or quit previous menu. Depth Record Icon Memory Bar Differential Tension Maximum Differential Tension Tension Mark Gauge Needle Tension Maximum Tension Unit Tension Mark Reset Differential Tension Mark Reset Maximum Tension Mark Figure 4 PPS36 User Manual Page 8 of 30...
-
Page 9: Connectors Definition
Pin A Pin B Pin C Pin D Pin E Pin F +5VDC Signal B+ Signal A+ 2.2.2. Channel A/B and Tension Connectors Pin A Pin B Pin C Pin D +12VDC Signal + PPS36 User Manual Page 9 of 30... -
Page 10: Shortcut Buttons
In Non-Record mode, touch Set Depth button to go into setting initial depth menu. Touch UP/DOWN to move cursor. Touch number key to enter desired number in the highlighted digit. Touch OK to accept change or touch MENU to return. PPS36 User Manual Page 10 of 30... -
Page 11: Set Direction
Touch OK to reverse Depth Direction or touch MENU return without saving. 2.3.7. Add GRD In Record mode, touch ADD GRD button and then touch OK to add a mark or touch MENU return without adding a mark in the recorded data. PPS36 User Manual Page 11 of 30... -
Page 12: Main Menu
Touch OK to accept change and the cursor will automatically moves to c. Calibrate. Or touch MENU to return. Select c. Calibrate and touch OK to calibrate, or else touch MENU to return. Select d. Exit Calibration and touch OK to return. PPS36 User Manual Page 12 of 30... - Page 13 Check if the measured distance matches the calculated one(final displayed number minus initial displayed value). If it is available, user can use gamma ray or CCL tool to verify the depth. PPS36 User Manual Page 13 of 30...
- Page 14 Check if the measured distance matches the calculated one(final displayed number minus initial displayed value). If it is available, user can use gamma ray or CCL tool to verify the depth. PPS36 User Manual Page 14 of 30...
-
Page 15: Calibrate Tension (See Figure 6)
Ф=90° Hydraulic weight cell Wireline or slickline to drum, tension T Sling to Hydraulic well head, Weight tension T Indicator Hydraulic Three through PPS36 Pressure sensor 4-20mA cable Figure 8 Bottom Sheave Configuration PPS36 User Manual Page 15 of 30... - Page 16 Touch OK to accept change and cursor will automatically move to c. Calibration. Or touch MENU to return. Select c. Calibration and touch OK to calibrate, or else, touch MENU to return. Select d. Exit Calibration and touch OK. PPS36 User Manual Page 16 of 30...
- Page 17 #1, 1431 – 40 Ave NE, Calgary, AB, Canada, T2E 8N6 Pioneer Petrotech Services Inc. Tel: (403)282-7669, Fax: (403)282-0509 Tension Verification Apply any load to the wireline or slickline. Compare PPS36 tension value and the Hydraulic Weight Indicator value. PPS36 User Manual Page 17 of 30...
- Page 18 Wireline or slickline to drum, tension T Sling to well head, tension T Load cell cable Wireline or slickline tension is given: Tw = ―――――― PPS36 Ф 2*cos―― Figure 9 Bottom Sheave configuration PPS36 User Manual Page 18 of 30...
- Page 19 Touch number key to enter sheave compensated value in the highlighted digit. Touch OK to accept change and cursor will automatically move to a. Set Maximum Load. Or touch MENU to return without saving. PPS36 User Manual Page 19 of 30...
-
Page 20: Calibrate Channel A (See Figure 6)
Use UP or DOWN to move cursor. Touch number key to enter desired number in the highlighted digit. Touch OK to accept change and return. Or touch MENU to return without saving. PPS36 User Manual Page 20 of 30... -
Page 21: Delete Jobs (See Figure 10)
Touch UP or DOWN to move cursor. (4 characters maximum including slash). Touch “5” or “0” to select character from “A” to “Z”. Touch OK to accept the unit. Or touch MENU to return without saving. PPS36 User Manual Page 21 of 30... - Page 22 Touch “5” or “0” to select char from “A” to “Z”. Touch OK to accept change. Or touch MENU to return. 4) Change Channel B Unit Please refer to 3) Change Channel A Unit. PPS36 User Manual Page 22 of 30...
-
Page 23: Sound On/Off (See Figure 10)
Year, Month, Date, Weekday, Hour, Minute, Second. Touch number key to enter desired number in a highlighted digit. Touch OK to accept change. Or touch MENU to return without saving. Figure 11 PPS36 User Manual Page 23 of 30... -
Page 24: Standalone Operation
This channel can be active in Select Figure 13 Channels menu. Each channel’s sample rate and unit can be changed; Time/date can be reset also. Figure 14 Figure 16 Figure 17 PPS36 User Manual Page 24 of 30 Figure 15... -
Page 25: Real Time Monitoring
(see figure 18 & 19). Stop real time monitor and the box will stop recording data. Data download (see figure 20 & 21). Figure 19 Figure 21 Figure 20 PPS36 User Manual Page 25 of 30... -
Page 26: Maintenance
If two set batteries (four cells) are used, the four cells are used in the same time and also change Figure 23 any one set batteries at one time without stopping recording if another set is capable to power DW. PPS36 User Manual Page 26 of 30... -
Page 27: Troubleshooting
Make sure that the USB driver is properly installed (For detailed information, please refer to DepthView software manual). For more information, please contact PPS for supports. Thank You! Pioneer Petrotech Services Inc. Unit Q, 1235 - 40th Ave. N.E. -
Page 28: Parts And Accessories
Part number Name Encoder cable 01-AC-1100-A (20feet) 4-20mA cable 01-AC-1101-A (15feet) Pressure sensor 01-AC-1106-A 1000psi SAFT LS33600 01-AC-0012-A5 +3.6v Li-SOCI2 cells SAFT VL 32600-125 cells SAFT VL 32600-125 Charger Power fly cable 01-AC-1102-A (3feet) PPS36 User Manual Page 28 of 30... - Page 29 Tel: (403)282-7669, Fax: (403)282-0509 +12Vdc power 01-AC-1115-A adapter (FWC3012F) Power extension 01-AC-1103-A cable(1 feet) 01-AC-1109-A Encoder T 01-AC-1105-A connector Encoder Assembly 01-AC-1117-A 01-AC-1114-A Load cell 01-AC-1116-A Load Cell cable USB2.0 High Speed cable PPS36 User Manual Page 29 of 30...
- Page 30 #1, 1431 – 40 Ave NE, Calgary, AB, Canada, T2E 8N6 Pioneer Petrotech Services Inc. Tel: (403)282-7669, Fax: (403)282-0509 01-AC-1174-A 1/4NPT Three-T Pelican case PPS36 User Manual Page 30 of 30...
Need help?
Do you have a question about the PPS36 and is the answer not in the manual?
Questions and answers