Table of Contents
Advertisement
Quick Links
Advertisement
Table of Contents

Related Manuals for Heraeus Labofuge 300


Summary of Contents for Heraeus Labofuge 300
- Page 1 Labofuge 300 Instructions for Use...
- Page 2 How to use this manual Use this manual to get acquainted with your centrifuge and its accessories. The manual helps you to avoid inappropriate handling. Overleaf you will find a graphic Make sure to keep it always close to the centrifuge. representation of the control panel with A manual that is not kept handy cannot provide a survey of the most important functions...
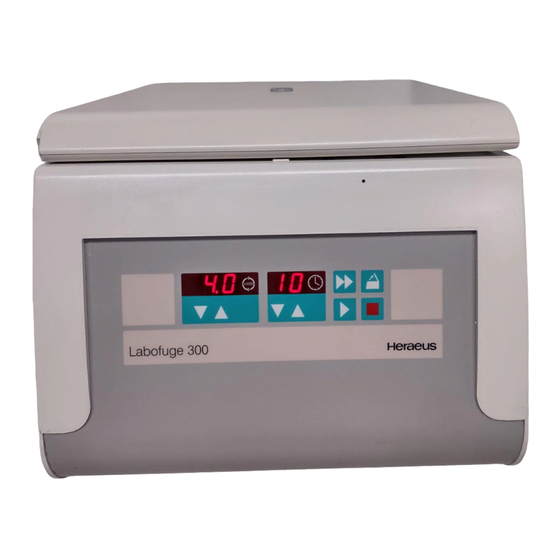
- Page 3 Quick run x1000 lid open stop start Labofuge 300 "set" keys back panel: socket for mains cable mains switch...
- Page 4 The control panel of the Labofuge 300 Short pressing of any of the "set" keys: switch from current to preset value Display Speed Resting state: preselected speed During run: current speed; rotating light: rotor turns Error codes (corrective measures see End: "End"...
-
Page 5: Table Of Contents
Maximum loading ..........19 Conformity to current standards......5 Filling the centrifuge tubes ........19 Safety instructions in this manual ......5 Placing the tubes in the rotor......20 The Labofuge 300 ........7 Entering parameters..........22 Selecting the speed ...........22 Safety systems............7 Selecting the run time........22 Properties ..............8... - Page 6 Contents Maintenance and care ......27 Maintenance operations to be carried out by the customer..............27 Cleaning ............27 Disinfection ............28 The Service of KENDRO........30 Warranty conditions ..........30 Troubleshooting ........31 Emergency lid release...........31 Problems you can handle yourself......33 In case you must call the Service ......37 Technical Data ............38 Electrical connections ...........39 Index ............
-
Page 7: For Your Safety
For your safety For your safety Proper use Heraeus centrifuges are manufactured according to The centrifuge is designed to separate liquid- current technical standards and regulations. Nonethe- suspended materials having different densities and less, centrifuges may pose dangers if particle size, respectively. The maximum sample density is 1.2 g/cm... -
Page 8: Handling
For your safety • Changes in mechanical or electrical components • Do not centrifuge toxic or radioactive substances may be carried out only by persons authorized to or pathogenic microorganisms unless you have this effect by Kendro Laboratory Products. taken proper precautions. •... -
Page 9: Conformity To Current Standards
For your safety Safety instructions in this manual Conformity to current standards Heraeus centrifuges are manufactured and tested This symbol denotes potential hazards to according to the following standards and regulations: persons. for all voltages: This symbol denotes potential damage to the centrifuge or parts in its immediate surroundings. - Page 10 For your safety for your notes...
-
Page 11: The Labofuge 300
Description The Labofuge 300 Safety systems The figure below shows a general view of the Labo- The Labofuge 300 is equipped with a number of safety fuge 300 with open lid and the rotor put into place. systems: • Housing and rotor chamber manufactured from im- pact-resistant plastic;... -
Page 12: Properties
Description Properties The Labofuge 300 is a laboratory centrifuge that is delivered with an 8-place swinging bucket rotor including 8 suspensions each for 7 ml and 15 ml respectively. With this combination, commercially available blood sampling and glass tubes can be centrifuged. -
Page 13: Functions And Features
Description Functions and features Part / function Description / feature design / housing galvanized sheet chassis with armored shell and plastic housing placed on top tank plastic drive induction drive without carbon brushes key and display board key and display elements covered by an easy-care protective foil control microprocessor-driven by Easycontrol II program memory... -
Page 14: The Easycontrol-User Interface
Description The Easycontrol-user interface Function Feature parameter memory • speed • run time speed selection adjustable in steps of 100 min in the range 300 min to 4000 min run time selection adjustable in minutes from 1 min to 99 min; "hd"-mode: permanent operation run time display in "quick run"... -
Page 15: Items Delivered
Description Items delivered Items delivered with the centrifuge comprise: • 1 swinging bucket rotor 76003265 8 suspensions 15 ml 8 suspensions 7 ml • a special cap nut for fixing the rotor • 10- mm tubular socket wrench for fastening the cap nut •... -
Page 16: Accessories
Accessories Accessories As an accessory, you can optionally order the fixed-angle rotor 75003760 in addition to the swing- ing bucket rotor. (See rotor program, Table 1.) Please consult Table 2 for a detailed list of acces- sories including technical data, order numbers and applications. -
Page 17: Rotor Program
Rotor program Rotor program Table 1: rotor program (1) swinging bucket rotor fixed angle rotor Rotor designation 8 x 15 / 7 ml 12 x 15 ml 7600 3265 7500 3760 order no. maximum permissible load [ g ] 8 x 18 / 8.5 12 x 18 maximum speed n [ min... -
Page 18: Adapters
Rotor program Adapters Table 2: accessories and suitable vessels for swinging bucket suitable vessel dimensions [ mm ] number color order no: rotor 7600 3265 per rotor diameter length suspension 15 ml - 16.5 - 113 7600 3262 (set of 8) buffering spacer for - 90 7600 3266... - Page 19 Rotor program Table 2: accessories and suitable vessels for fixed-angle rotor suitable vessel dimensions [ mm ] number color order no. 7500 3760 per rotor diameter length rubber pads 7500 3762 protective casing for 7500 3763 glasses adapters set 7 ml DIN and 7500 3227 5/7 ml blood consisting of:...
-
Page 20: Before Use
Before use • The centrifuge must be protected from heat and Before use direct sunshine. Transport and installation Mains connection Make sure that voltage and frequency correspond to the specifications on the instrument label. Damage to the centrifuge by jolting! Turn the mains switch on the back panel off (press Transport the centrifuge only in the "0");... -
Page 21: Operation
A detailed description of possible settings is given later on in this chapter. The rotors approved for the Labofuge 300 are de- tailed in the chapter "Accessories". Use only rotors with this instrument that are contained in this list. - Page 22 Operation Possible damage drive rotor! You may insert the rotor only if the temperature of the drive, the rotor and the cap nut is between 10 °C and 30 °C. Proceed as follows: 1. Open the lid and make sure that the rotor chamber and the rotor are clean.
-
Page 23: Loading The Rotor
The smaller the unbalance of the centrifuge, the bet- The Labofuge 300 can reach high rotational speeds ter the separation since separated zones are no implying enormous centrifugal force. The rotors are longer perturbed by vibration. It is therefore important designed in a way warranting high residual strength to balance the centrifuge tubes as well as possible. -
Page 24: Placing The Tubes In The Rotor
Operation properly loaded rotors Placing the tubes in the rotor The swinging bucket rotor must always be loaded completely and symmetrically! It is essential that you supply unused places with water-filled tubes. If you wish to partially load a fixed-angle rotor, you must ensure that opposite bores always receive tubes of equal weight (when centrifuging a single sample, place a centrifuge tube e.g. - Page 25 Operation After placing the tubes, close the centrifuge lid by firmly pressing it down. The lid must snap audibly into Uneven loading of the rotor can in place so that it cannot be opened manually any more. the extreme case cause damage to rotor and centrifuge.
-
Page 26: Entering Parameters
Operation Entering parameters then changes to permanent display. The speed is now stored. Selecting the speed The centrifuge can be set to a minimum of 300 min Selecting the run time and to a maximum of 4.000 min . The built-in micro- You can select a run time between 1 and 99 min or processor prevents higher or lower speed settings. -
Page 27: Continuous Operation
Continuous operation onds. Once the display changes to the continuous mode, the new settings become operative. To operate the Labofuge 300 in the continuous mode, you must press the key until the display changes to "hd“ (for "hold"). -
Page 28: Stopping The Centrifuge
Operation Stopping the centrifuge Short-time centrifugation For short-term operation, the Labofuge 300 is Stopping with preset time equipped with a "quick run" function. Normally the run time has been preselected, and all Short-term centrifugation is started by pressing the you have to do is wait until the centrifuge terminates "quick run"... -
Page 29: Removing The Rotor
Operation Removing the rotor RCF value To remove the rotor, you must follow the steps de- The relative centrifugal force (RCF) is given in multi- scribed for insertion in reverse order. ples of the earth gravity g. It is a dimensionless num- ber that allows one to compare the efficiency of sepa- ration or sedimentation of diverse instruments, since it Danger of irreparable motor damage! - Page 30 Operation for your notes...
-
Page 31: Maintenance And Care
Maintenance and care For cleaning you should use only agents approved by Maintenance and care KENDRO: Maintenance operations to be carried out − Caraform by the customer − deconex 16 NT For the protection of persons, the environment and − Extran MA 02 neutral the equipment you are obliged to clean the centrifuge −... -
Page 32: Disinfection
Maintenance and care − Gigasept FF Disinfection − HBV Pump-Spray − Incidin Liquid Spray Infectious material enters the centri- − Incidur Spray fuge if spills or tube breakage occur! Danger of infection upon contact! − Incidin plus − Kohrsolin iD Comply with the permissible filling volume! −... - Page 33 Maintenance and care 5. Treat the rotor and the rotor lid according to the instructions given for the disinfectant in question (soaking in liquid or spraying). You must strictly Disinfection with eau de Javelle or by observe the specified reaction times! autoclaving is not permitted! 6.
-
Page 34: The Service Of Kendro
Within the warranty period the centrifuge is repaired by the authorized service or skilled personnel. The or replaced free of cost if there are demonstrable service provided by Heraeus comprises checking: faults in materials or workmanship. • the electrical installation Conditions for a warranty are that: •... -
Page 35: Troubleshooting
Troubleshooting 3. Push a thin wire of about 7 cm length (e.g. a bent- Troubleshooting open paper clip) through the boring in the panel situated on the right between lid handle and the Emergency lid release top of the housing. Push the locking mechanism In case of a power failure you cannot open the lid back until the lid is unlocked. - Page 36 Troubleshooting 4. If the rotor still turns, close lid immediately and wait until it has come to a complete stop. Never brake the rotor using your hands or tools! 5. As soon as the rotor stands still, remove your samples and close the lid.
-
Page 37: Problems You Can Handle Yourself
Troubleshooting Problems you can handle yourself If problems other than those described in the following tables arise, you must consult the author- ized service. Error Behavior of the centri- Possible cause(s) and measures to be taken fuge Displays remain The motor stops. Mains failure or not connected dark The rotor stops without... - Page 38 Troubleshooting Error Behavior of the centri- Possible cause(s) and measures to be taken fuge Lid cannot be Pressing the "open lid" A) Lid not correctly engaged or lid warped. opened. key has no effect. 1. Check whether mains connection is OK and the instrument switched on (displays lit).
- Page 39 Troubleshooting Error Behavior of the centri- Possible cause(s) and measures to be taken fuge Motor does not start. Motor or rotor blocked. 1. Switch instrument off and on again using the mains switch. 2. Open the lid. 3. Check whether the rotor can turn freely. If you cannot thus relieve the malfunction, call our Service.
- Page 40 Troubleshooting Error Behavior of the centri- Possible cause(s) and measures to be taken fuge Message “Lid“ Drive stops. A) Lid was opened manually during the run. appears in Rotor stops without brak- 1. Press the lid shut again. The instrument stops without braking. display 2.
-
Page 41: In Case You Must Call The Service
Troubleshooting In case you must call the Service Should you require our Service, please tell us the order no. and serial number of your instrument. You find the pertinent information at the back of the in- strument near the socket for the mains plug. Moreover it is helpful for our service technician to know the software version. -
Page 42: Technical Data
Technical data Technical Data Feature Value environmental conditions indoor use max. elevation 2000 m above sea level max. relative humidity 80 % up to 31 °C; linearly de- creasing down to 50 % relative humidity at 40 °C. permissible temperature of the environment +2 °C to +40 °C run time 1 min to 99 min, hLd (hold) = permanent operation... -
Page 43: Electrical Connections
Technical data Feature Value standards manufactured and tested in accordance with EN 61 010-1, EN 61 010-2-020, EN 50 081-1, EN 50 082-1; Electrical connections order no. voltage frequency nominal cur- power consumption fuses inside instrument rent 7500 3230 230 V 50/60 Hz 1.25 A 180 W... - Page 44 Index...
-
Page 45: Index
Index cleaning 27 Index cleaning agents 27 conditions of warranty 30 contamination necessary measures 28 continuous operation 24 accessories control panel cap nut 11 readings 8 cleaning 27 corrosive substances tubular socket wrench 11 protective vessels for 4 adapter swinging bucket rotor 14 adapters fixed-angle rotor 15 aluminium rotors... - Page 46 Index maximum permissible load 19 frequency 16 fuses 39 Easycontrol user interface 8 Easycontrol user interface 10 EC Guidelines 5 electrical connections 39 hazardous substances 3 emergency lid release 7, 31 hazards environment symbols used for 5 permissible temperature 38 hints error messages symbol for 5...
- Page 47 Index lid cannot be opened 34 lid open during run warning 7 opening lid release manually 31 emergency 7 operation lid unlocking mechanism continuous 24 manual 31 short-time 24 lifetime Operation 17 of plastic rotor 11 organic solvents plastic tubes 23 not allowed for cleaning 27 lights original parts...
- Page 48 Index quick run function 24 safety distance for centrifuge 16 safety instructions 3, 4 safety measures 3 safety standards 5 radius of centrifugation safety systems for calculation of RCF value 25 built-in 7 RCF value 13, 25 safety zone 3, 16 readings sample density of control panel during run 8...
- Page 49 Index conformity to 5 user interface 10 starting the centrifuge 23 start-up 16 suspensions as standard equipment 11 vessel dimensions swinging bucket fixed-angel rotor 15 as standard equipment 11 swinging bucket rotor 14 swinging bucket rotor 13 voltage 16 adapter 14 loading 20 symbols for hazards and dangers 5...
-
Page 50: Appendix: Speed/Rcf Diagrams
Appendix: speed/RCF diagrams Speed/RCF diagram 76003265 swinging bucket rotor 8 x 15 ml / 7 ml 10000 RZB/RCF (r = 14 cm) RZB/RCF (r = 5.5 cm) 1000 = 3600 min RZB/RCF (r , n ) = 2028 1000 10000 Drehzahl (min ) –... - Page 51 Speed/RCF diagram 75003760 fixed-angle rotor 12 x 15 ml 10000 RZB/RCF (r = 9.6 cm) RZB/RCF (r = 4.0 cm) 1000 = 4000 min RZB/RCF (r , n ) = 1717 1000 10000 Drehzahl (min ) – speed (rpm)
- Page 52 Heraeus S.A. · Massamá · Tel. +351 (0) 214-387 630 · Fax +351 (0) 214-387 636 · heraeus@mail.telepac.pt Spain Heraeus S.A. · Madrid · Tel. +34 (0) 91-358 19 96 · Fax +34 (0) 91-358 20 67 · laboratorio@heraeus.es Sweden Axeb AB ·...
Need help?
Do you have a question about the Labofuge 300 and is the answer not in the manual?
Questions and answers