Table of Contents
Advertisement
Quick Links
BLACKBOX RECORDER
BBR64MADI &
BBR64Dante
User Manual
V 3.0 rev 1
Date: Nov 2013
Congratulations on your purchase of the JoeCo BlackBox Recorder. This document
will lead you through the basics of how to set up and use the product. The BlackBox
Recorder (BBR) has been designed to be as simple as possible to set up and operate.
Consequently you will find that this user manual is not a long document and can be
read from cover to cover in a short while. However, we strongly recommend that you
do read it just in case there are some aspects of the product that are not immediately
obvious.
This manual covers the following variants of the BlackBox Recorder: BBR64MADI and
BBR64DANTE and should be read in conjunction with the Quick Start guide.
More information is available in the LOGIN area of the JoeCo Website
www.joeco.co.uk
. Visitors can gain immediate access to more detailed information
whilst End Users, once approved, are eligible for software upgrades and other
downloads.
If you need information in a hurry, register as a Visitor and upgrade to an End User
later on.
© JoeCo Limited 2009 - 2013. E&OE. All rights reserved. All trademarks and names
are recognised as the property of their respective owners
BLACKBOX BBR64MADI & BBR64DANTE RECORDER - User Manual v3.0
Page | 1
Advertisement
Table of Contents

Subscribe to Our Youtube Channel
Related Manuals for JoeCo BLACKBOX BBR64Dante


Summary of Contents for JoeCo BLACKBOX BBR64Dante
-
Page 1: Blackbox Recorder
If you need information in a hurry, register as a Visitor and upgrade to an End User later on. © JoeCo Limited 2009 - 2013. E&OE. All rights reserved. All trademarks and names are recognised as the property of their respective owners BLACKBOX BBR64MADI &... -
Page 2: Table Of Contents
Using a PS2 keyboard ..................... 33 Safe’n’Sound Record Recovery................34 Troubleshooting ..................... 35 Summary Of Alert Messages ................37 JoeCo Conditions of Use ..................39 Software Licence Agreement ................. 41 Warranty Information .................... 44 Product Returns ..................... 47 Product and End User Registration ................ 48 Page | 2 BLACKBOX BBR64MADI &... -
Page 3: Important Safety Information
Important Safety Information WARNING - Read the following before proceeding : Read instructions: Retain these safety and operating instructions for future reference. Adhere to all warnings printed here and on the equipment. Follow the operating instructions printed in this User Guide. Do not remove covers: Operate the equipment with its covers correctly fitted. -
Page 4: Copyright Warning
Copyright Warning JoeCo’s recorder products are designed to enable you to record and reproduce material to which you own the copyright, or material which the copyright owner has granted you permission to record and/or reproduce. -
Page 5: Opening The Box
Opening the Box Box Contents Inside the box you will find the following: BlackBox Recorder Power Supply User Manual Quick Start Guide The BlackBox Recorder is not a standard multitrack recorder nor is it a digital audio workstation (DAW). -
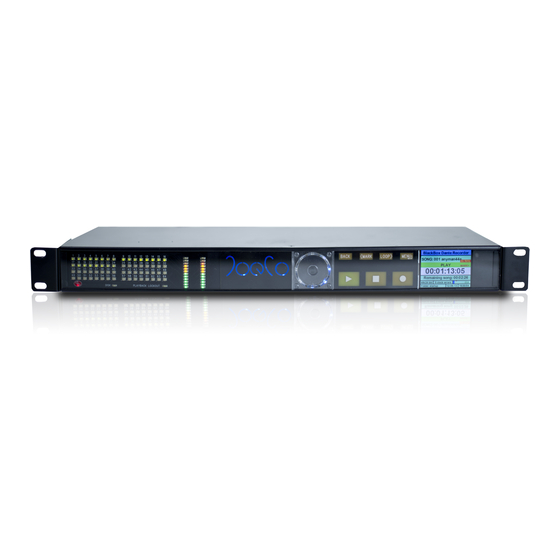
Page 6: Controls And Interfaces
There are also indicators for Disk activity and Playback Lockout which can prevent you from accidentally entering playback during the performance. To the right of the JoeCo logo is the control wheel which has a number of functions explained later in this manual. -
Page 7: Rear Panel
Rear Panel The rear panels of the BBR64MADI and BBR64DANTE BlackBox Recorders are as follows: The areas indicated in the diagram below are explained in more detail later in this manual. BBR64MADI MADI i/o Balanced Timecode Analogue inputs and Control Audio i/o on the BBR64MADI utilises either optical (SC connectors –... - Page 8 8 channels of, for example, audience mics using a separate mic pre amp and will use 8 of the available 64 channels. The cable loom conforms to the TASCAM standard for analogue i/o (pin out is available in the Visitor section of the Login area of the JoeCo website www.joeco.co.uk...
-
Page 9: Installation
Installation Deciding where to install In a live situation, it depends on whether the live engineer wants to be able to see the BBR interface or not and whether you intend to utilise the Virtual Sound Check facilities. If possible, it’s best to install it at eye level for ease of operating the menus. Wiring the BBR into your console When recording MADI, your choice of coaxial or optical SC cables will most likely be dictated by the console. -
Page 10: Deciding On A Disk Drive
In certain circumstances, you may want to supplement the digital inputs with up to 8 analogue inputs. This is primarily aimed at capturing the ambience of the venue or the audience itself. These additional 8 analogue inputs are balanced line level inputs and will normally be fed from separate microphone pre amps or spare channels on the console. -
Page 11: Connecting A Disk Drive
USB2 can carry up to 480Mbits/s of data and for recording 64 tracks of 48kHz/24bit the maximum data rate we need is around 80MBits/s so there’s normally plenty of headroom. JoeCo has already tested numerous USB2 drives from Western Digital, Glyph, Seagate, Verbatim, Samsung, Buffalo, Hitachi, Toshiba, G-tech and others and found them to work well. -
Page 12: Checking That Everything Works
Checking that everything works Once you have powered the unit up, configured the input and output, connected and powered up the disk drive you should be ready to record. Press the RECORD button and away you go! The basic screen should look something like this when first powered up with a drive attached. -
Page 13: Recording
Recording On power up, the BBR is ready to record within seconds of logging the drive – just press the RECORD button. The button flashes to show that it’s creating the files and then turns solid once in record. Once the unit is recording, the STOP button must be held down for a couple of seconds to end the recording. -
Page 14: Playback
Playback Normally, the last recording made will be immediately available for playback. Just press the PLAY button and it will flash while it loads the files into its memory buffers before entering play. However the BBR may be set to “PLAYBACK LOCKOUT”, indicated by the LED in the Metering area of the front panel, in which case the play button will have no effect. -
Page 15: File Names
Recent Songs As Songs are played or recorded, they will automatically be placed into the Recent Songs list which is located in the Song Select menu. This allows you to quickly access the Songs that you regularly play for sound checks etc. The Recent Songs list is stored on the disk itself so the list will change if you use a different disk. - Page 16 would expect. Finish by pressing “Enter” on the keyboard. (Escape will cancel any changes). The resulting tracks will be called nnn-tt.Song Name.WAV where “Song Name” is the new name that you typed. This will rename all the tracks of this song in this folder with this new Song Name. [Note: It is important for the BlackBox to keep the nnn-tt prefix so that it knows which audio files belong together as a Song and which track is to be played on each output channel.
-
Page 17: Virtual Sound Checking
Enter the Track Arm MENU or the Name Manager MENU and then select the Track Name Template MENU. Select “Copy names from song” and this will populate all the Track names for you automatically. All Songs that you record subsequently will use these Track names. -
Page 18: Monitoring
If the LOOP button is pressed between Markers, the BlackBox will continue in Playback until it reaches the next Marker, Loop back to the previous Marker and then recommence Playback. There will be a short break in Playback while the BlackBox loops back to the earlier Marker (i.e. -
Page 19: Summary Of Combined Controls In Main Screen
being the summing mix mentioned above and the individual track pairs being a pre- fade listen of each pair of tracks (panned hard left and right). The Monitor... section of the menu controls the level and pan settings in the MIX mode. The Monitor Menu allows you to set the BACK button to toggle the data wheel function between selecting the PFL / solo channel and controlling the headphone volume. -
Page 20: Using The Menu
To enter the menu, press the MENU button in the Control section of the front panel. Setting up adjustable parameters This list may not be exhaustive as JoeCo is constantly improving its products and may have added features to the software since this document was authored. However, Page | 20 BLACKBOX BBR64MADI &... - Page 21 this will give you a good idea of the basics and you can always get the most up to date information from the website. The currently selected Menu item is highlighted in Yellow. When a Menu item to be adjusted is selected, the display changes to yellow text on a red background.
- Page 22 Recent Songs... Provides a list of the most recently played Songs – useful if you’re on tour and want to use the same songs in each venue for sound checking Select Song Folder... Allows you to navigate to a particular folder. This automatically loads... Select Song...
- Page 23 Please spend some time talking to people further down the post production process to find out what they would like or recommend, or consult our FAQs on the JoeCo website.
- Page 24 Wordsize: 24bit or 16bit. Choose 24bit unless you’re really short on disk space or have been instructed that post production must have 16bit files. Control... The BlackBox Recorder can accept commands from an external control device such as a console, hardware controller or the JoeCoRemote iPad app.
- Page 25 Visitor area of the JoeCo website WiFi setup is used to configure the WiFi operation with the JoeCoRemote. More details are available on the JoeCo website Line-In Mon: This adjusts how the unit monitors the Line-In signals on all channels. The options...
- Page 26 not pleasant to listen to and will probably render your recording useless. You may not notice it live but you will hear it on the recording. Please leave yourself enough headroom when you’re recording a concert. If you’ve set the level correctly, the red meters should flash infrequently if at all.
- Page 27 It is also possible to control the internal mixer using MIDI commands – see the Visitor section of the JoeCo website for more information. BACK: This affects how you use the PFL bus. There are two settings: in toggles...
- Page 28 The final option in the menu allows you to partition the drive into one or more usable partitions. This subject is covered in much greater detail in the FAQ section of the JoeCo website www.joeco.co.uk/main/faqs Page | 28...
-
Page 29: Software Updates
Therefore, this document may be superseded in the future as other items are added to the menu structure. We will note any significant changes in the on-line version of the User Manual which will be found in the visitor area of JoeCo website. Go to www.joeco.co.uk... - Page 30 This allows you to license certain chargeable options, more details of which are available on the JoeCo website. You will need to advise JoeCo of the machine key along with your payment details before JoeCo can enable any optional software. You...
-
Page 31: Linking Multiple Blackbox Recorders Together
Linking multiple BlackBox Recorders together It is possible to link multiple BlackBox MADI or DANTE Recorders together to make recordings with more than 64 channels, or to make redundant copies by duplicating the signal path completely. Each BlackBox Recorder will still require its own USB2 disk drive as only 64 channels of data will be recorded to each drive. - Page 32 slave mode. The track numbers for each slave unit can be set using the Slave Tracks: menu item. The slave units automatically take their transport control signals from the link connection and will lock out the transport controls on all but the master unit. Slave units also dim their screen displays to make it obvious that they are being controlled remotely.
-
Page 33: Using A Ps2 Keyboard
Using a PS2 keyboard The BlackBox Recorder can accept a standard 102 key PS2 style keyboard. Most mini keyboards are not currently supported, especially those that require some setup drivers to be installed on the PC. The most consistently reliable keyboards we have found are the Microsoft 500 style PS2 keyboards which can be obtained in most countries for around US$10 (£6). -
Page 34: Safe'n'sound Record Recovery
Keyboard transport controls These are the numeric keypad keys (not the character keys) Enter PLAY Del/. STOP Ins/0 STOP AND RETURN TO ZERO RECORD MOVE TO NEXT CUE POINT MOVE TO PREVIOUS CUE POINT Keyboard navigation These are the cursor keys (not keypad) Right arrow ... -
Page 35: Troubleshooting
properly, Safe’n’Sound repairs them automatically, leaving all the files accessible by normal workstations. A note on Spotlight: It is worth noting that some indexing programs on standard computers, particularly Spotlight on Mac OS, rewrite the File Allocation Table to make the disk easier for a Mac to index. If you think that there might be a problem with the disk, give the BlackBox a chance to repair the files BEFORE Spotlight destroys them. - Page 36 Problem Things to try Check that the USB connector is plugged in BBR boots ok but does not log / find disk correctly to both the BBR and the disk drive Check disk drive power supply as above ...
-
Page 37: Summary Of Alert Messages
Summary Of Alert Messages "Hold STOP button to stop" displayed when STOP is pressed "PLAYBACK LOCKED OUT" can be displayed if PLAY is pressed and PLAYBACK LOCKOUT is on "CONNECT VALID DISK" displayed if PLAY or RECORD is pressed but disk is not connected "DISK BUSY"... - Page 38 "PLAY OUT OF RANGE" when in remote control or slave mode, PLAYBACK is attempted outside the timecode limits of the selected Song “DIGITAL INPUT MISSING” A source of digital audio is not correctly plugged in or has vanished “DIGITAL SLIP” A source of digital audio is not properly synchronised with the BlackBox and is slipping with respect to the chosen clock source...
-
Page 39: Joeco Conditions Of Use
You, the User, expressly acknowledge and agree that: To the maximum extent permitted by applicable law, use of the JoeCo Software is at your sole risk and that the entire risk as to satisfactory quality, performance and accuracy is with you. - Page 40 JoeCo Products must not be used for purposes that could infringe a copyright held by a third party or could, in any other way, be illegal. Any such use is entirely at the risk of the User and JoeCo and its authorised distributors and resellers have no responsibility or liability whatsoever for any claim arising from such use.
-
Page 41: Software Licence Agreement
Product under a temporary evaluation arrangement with its owner (which may be JoeCo or one of its authorised distributors or resellers), for a period determined by the owner, where the owner has... - Page 42 JoeCo software or services could lead to death, personal injury, or severe physical or environmental damage. Any such use is entirely at the risk of the user and the user must hold JoeCo harmless for any claim arising from such use.
- Page 43 Upon termination you will cease all use of the Software and destroy or return any copies of the Software to JoeCo. Sections 1, 3, 4, 5, 6, 8, 9, 10 and 11 of this Licence shall survive any such termination.
-
Page 44: Warranty Information
You acknowledge that, in agreeing to the terms of this Licence, you have not relied on any representation, undertaking or promise given or implied from anything said or written by JoeCo or by an authorised JoeCo distributor, reseller or representative prior to entering into this Licence except as expressly stated in this Licence. - Page 45 The purchaser will have the option (exercisable within thirty days of notification by JoeCo) to pay this fee and have the Product repaired and returned, or not pay this fee and have the Product returned un-repaired at their expense.
- Page 46 A waiver by JoeCo of any default shall not constitute a waiver of any subsequent default. No waiver by JoeCo of any of the terms of this Warranty shall be effective unless it is expressly stated to be a waiver and is communicated to you in writing.
-
Page 47: Product Returns
Please note that any Product returned due to incorrect delivery must be in a resalable condition to receive a credit note. Any Product which is returned to JoeCo or to one of its distributors or resellers without authorisation, i.e. one for which an RMA number has not been issued by JoeCo, will be returned to the purchaser at the purchaser’s expense. -
Page 48: Product And End User Registration
Once your registration has been submitted it will be forwarded to JoeCo personnel who will need to approve your application before issuing you with a password. JoeCo can only provide support for the current release of software. It is therefore imperative that you download and use the latest software release We hope you enjoy using your BlackBox Recorder –...
Need help?
Do you have a question about the BLACKBOX BBR64Dante and is the answer not in the manual?
Questions and answers