Advertisement
Thank you for purchasing a Sealey product. Manufactured to a high standard, this product will, if used according to these instructions,
and properly maintained, give you years of trouble free performance.
IMPORTANT: PLEASE READ THESE INSTRUCTIONS CAREFULLY. NOTE THE SAFE OPERATIONAL REQUIREMENTS, WARNINGS & CAUTIONS. USE
THE PRODUCT CORRECTLY AND WITH CARE FOR THE PURPOSE FOR WHICH IT IS INTENDED. FAILURE TO DO SO MAY CAUSE DAMAGE AND/OR
PERSONAL INJURY AND WILL INVALIDATE THE WARRANTY. KEEP THESE INSTRUCTIONS SAFE FOR FUTURE USE.
Refer to
instruction
manual
1. SAFETY
WARNING! Ensure Health & Safety, local authority, and general workshop practice regulations are adhered to when using this
‰
equipment.
maintain the gauge in good condition (use an authorised service agent).
9
Replace or repair damaged parts. Use genuine parts only. Unauthorised parts may be dangerous and will invalidate the warranty.
9
locate gauge in a suitable working area, keep area clean and tidy and free from unrelated materials.
9
WARNING! Use gauge on level and solid ground.
‰
Keep the gauge clean to ensure accurate performance.
9
Do NoT use outside in damp or wet weather conditions.
8
Do NoT allow untrained persons to operate the gauge.
8
Do NoT leave the gauge unattended.
8
WARNING! When setting front end alignment on commercial vehicles never make adjustments to drop arms or interconnecting links.
‰
doing so could result in serious tyre, wheel and steering problems.
Any alignment changes deemed necessary as a result of using this equipment must be made strictly in accordance with the vehicle
9
manufacturer's recommendations.
2.
INTRoDUCTIoN
I
Steel and cast aluminium construction. measures toe-in and toe-out by contact with wheel rims and using optical sight to align markers. Works on
practically all cars and light commercial vehicles with rim diameters between 200mm and 600mm.
3.
ASSEMBLY
I
3.1.
The gauge has been supplied in flat pack form for quick and easy assembly.
3.2.
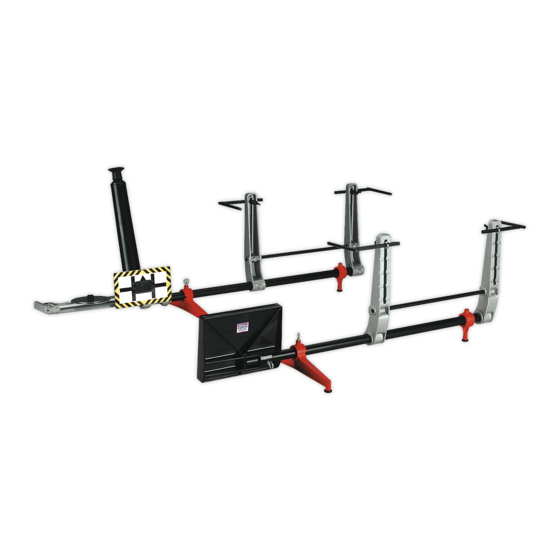
Take each ready assembled side frame in turn and slide on the balance leg (fig.1.8). Slide the balance leg back onto the alignment peg
and tighten the thumbscrew.
3.3.
Place the two frames opposite each other with each extended bar portion positioned to the right hand side. The frame nearest to you is
the one to which the periscope (fig.1.3.) unit should be attached.
3.4.
Place the periscope unit onto the tube and slide it to the left until it stops against the end of the tube. Tighten the two thumb screws on
the back of the unit to secure it to the main bar. Attach the target plate (fig.1.4.) to the periscope using the screws supplied.
3.5.
Slip the mirror unit (fig.1.2.) onto the main bar of the other frame and tighten the thumb screw to secure it.
3.6.
Attach a contact bar (fig.1.1.) to each of the upright arms. Firstly loosen the thumb screw on the contact bar holder and place through
the upright arm. Slide the square portion of a contact bar through the holder, tighten the thumbscrew to secure.
3.7.
each contact bar may be fitted either to the left or the right of its respective support arm. This is to allow the gauge to handle all tyres
on 8" to 24" diameter rims and to allow close contact when required e.g. when in use on a vehicle lift.
fig.1
© Jack Sealey limited
oPTICAL WHEEL ALIGNMENT GAUGE
GA40
model no:
Original Language Version
fig.2
GA40 | Issue:2 (H,F) 15/03/18
Advertisement
Table of Contents

Related Manuals for Sealey ga40


Summary of Contents for Sealey ga40
- Page 1 GA40 model no: Thank you for purchasing a Sealey product. Manufactured to a high standard, this product will, if used according to these instructions, and properly maintained, give you years of trouble free performance. IMPORTANT: PLEASE READ THESE INSTRUCTIONS CAREFULLY. NOTE THE SAFE OPERATIONAL REQUIREMENTS, WARNINGS & CAUTIONS. USE THE PRODUCT CORRECTLY AND WITH CARE FOR THE PURPOSE FOR WHICH IT IS INTENDED.
- Page 2 Twin Steering Axles : When checking wheel alignment on twin steering vehicles you will also need to use the optional equipment package comprising larger mirror and frame. order Item: GA43 fig.5 Original Language Version GA40 | Issue:2 (H,F) 15/03/18 © Jack Sealey limited...
- Page 3 Important: no liability is accepted for incorrect use of this product. Warranty: Guarantee is 12 months from purchase date, proof of which is required for any claim. Sealey Group, Kempson Way, Suffolk Business Park, Bury St Edmunds, Suffolk. IP32 7AR 01284 757500 01284 703534 sales@sealey.co.uk...
Need help?
Do you have a question about the ga40 and is the answer not in the manual?
Questions and answers