Table of Contents
Advertisement
Available languages
Available languages
Quick Links
Advertisement
Chapters
Table of Contents

Related Manuals for SEH FC1126


Summary of Contents for SEH FC1126
- Page 1 Fiber Adapter FC1126 User Manual MHAB-UM-FC1126 Version: 1.0 | 2017-10...
- Page 3 Overview This 'User Manual' describes the hardware installation of the FC1126. Table of contents Do you need assistance? Contact us! Monday to Thursday 8:00 a.m. to 4:45 p.m. and Friday 8:00 a.m. to 3:15 p.m. (CET) +49 (0)521 94226-44 support@seh.de...
-
Page 4: Safety Regulations
Safety Regulations English [en] Before starting the initial operation procedure of your device, please note the following safety regulations: • Read the documentation and make sure that your system meets the requirements listed therein. • The device must only be connected to the mains and to the network by qualified personnel. - Page 5 Français [fr] Avant de mettre en service votre périphérique, veuillez suivre ces quelques conseils de sécurité: • Lisez attentivement la documentation et assurez-vous que votre système satisfait bien toutes les exigences mentionnées. • Les périphériques ne doivent être connectés à l'imprimante et puis connectés au réseau que par des experts.
- Page 6 alla rete soltanto da personale qualificato. • Evitare il contatto con l'umidità e con il liquido. • Il dispositivo deve essere collegato e messo in funzione solo in condizioni perfette. • Assicurarsi che nessuno inciampa nei cavi. • Questo è un prodotto laser della categoria 1. Se non viene collegato nessun cavo al connettore SC o ST, una emissione invisibile di radiazione laser è...
- Page 7 • Apparaten får endast anslutas och tas i drift i felfritt tillstånd. • Lägg alla kablar på ett sådant sätt att personer ej trampar på dem eller snavar över dem. • Detta är en laserklass 1 produkt. Om ingen kabel ansluts till SC- resp. ST- kontakten kan osynlig laserstrålning tränga ut.
- Page 8 jotta vältyttäisiin staattisen sähkön purkauksilta ja niiden aiheuttamilta vaurioilta. Nederlands [nl] Voor ingebruikname apparaat dienen volgende veiligheidsvoorschriften in acht te worden genomen: • Lees de documentatie en vergewist u zich er van dat uw systeem voldoet aan de vermelde vereisten. •...
- Page 9 εκτίθεστε στην ακτινοβολία λέιζερ και μην κοιτάτε απευθείας σ’ αυτή. Τοποθετήστε τα προστατευτικά καλύμματα που διατίθενται στη συσκευασία στο φις SC ή ST εφόσον δε το χρησιμοποιείτε. • Πριν το βγάλετε από τη συσκευασία λάβετε τα απαραίτητα μέτρα, ώστε νααποφύγετε τυχόν φθορές από ηλεκτροστατική εκφόρτιση. Slovenčina [sk] Pred uvedením Vášho zariadenia tlačového servera do prevádzky zohladnite nasledovné...
- Page 10 vältida staatilisest elektrist tekkida võivaid kahjusid. Lietuvių kalba [lt] Prieš pradėdami naudoti savo prietaisą atkreipkite dėmesį į šiuos nurodymus dėl saugos: • Perskaitykite dokumentus ir įsitikinkite, ar jūsų sistema atitinka nurodytus reikalavimus. • Prijungti ir sujungti su tinklu prietaisą gali tik kvalifikuoti specialistai. •...
- Page 11 Slovenščina [sl] Pred zagonom svoje naprave upoštevajte naslednje varnostne predpise: • Preberite dokumentacijo in prepričajte se, da vaš sistem ustreza navedenim zahtevam. • Napravo se sme priključevati in povezovati na omrežje samo kvalificirano strokovno osebje. • Stroj ne sme priti v stik z vlago ali tekočino. •...
- Page 12 požadavkům. • Přístroj smí instalovat a připojit na sít’ pouze kvalifikovaný odborník. • Přístroj nesmí přijít do styku s vlhkostí nebo tekutinou. • Přístroj smí být instalován a provozován pouze v neporušeném stavu. • Instalujte všechny kabely tak, aby na ně nemohl nikdo stoupnout nebo o ně zakopnout.
- Page 13 • L-apparat ghandu jigi mqabbad u mhaddem biss jekk ikun f'kundizzjoni perfetta. • Aghmel ćert li hadd ma jirfes jew jaqa' fuq il-kejbils. • Dan hu prodott laser tal-klassi 1. Jekk l-ebda kejbil ma jkunx mqabbad mal- konnettur SC jew ST, jista' ikun hemm radjazzjoni inviżibbli permezz tal-laser. M'ghandekx tesponi lilek nnifsek ghar-radjazzjoni tal-laser u thares direttament fiha.
- Page 14 • Amplasaţi toate cablurile în poziţii în care pericolul de împiedicare este exclus. • Acesta este un produs cu laser de clasa 1. Dacă la fişa SC şi fişa ST nu este conectat niciun cablu, este posibilă o emisie invizibilă de radiaţie laser. Nu vă expuneţi fasciculului laser şi nu priviţi în acesta.
-
Page 15: Table Of Contents
Table of Contents Safety Regulations ........... . 1 General Information . -
Page 16: General Information
General Information Purpose With the Fiber Adapter FC1126 a printer or multi-function printer (MFP) manufactured by Hewlett Packard (HP) can be embedded into an existing fiber- optic network (1000BaseSX to 1000BaseT). Printer respectively MFP and Fiber Adapter must be compatible; see ’Supported ... -
Page 17: Scope Of Supply
Scope of Supply Please check the package content before getting started: Fiber FC1126 Adapters Adaptor Connector User The User Manual describes the installation of the manual FC1126. (This document) USB cable USB 2.0, connector A on mini-B connector Four screws 2 screws M3 × 5 mm 2 screws M3 ×... -
Page 18: Technical Data
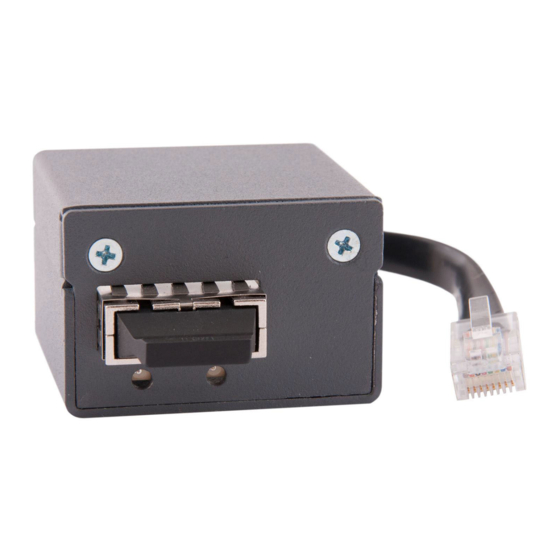
Technical Data 1. Activity LED (orange) 4. Printer connector (RJ-45, male) 2. Network connector (SC, female) 5. Hole with thre d 3. Link LED (green) 6. USB port (type: Mini-B) Properties Values Printer port logical: 1000BaseT Gigabit Ethernet (IEEE 802.3) physical: RJ-45 Network connection... -
Page 19: Led Display
LED Display The LEDs of the FC1126 provide information about its status. Action Color Description Activity blinks at orange Indicates the exchange of network irregular data packets. intervals Link permanently on green There is a connection to the fiber- optic network. -
Page 20: Installing The Fiber Adapter
Installing the Fiber Adapter General Information The Fiber Adapter is mounted to the printer mainboard. Important: Installation steps may vary slightly depending on printer model: The Fiber Adapter was developed for a series of supported printer models which vary in design. All printer model specifics cannot be provided for in this manual. -
Page 21: Tools You Need
Tools You Need • Flat screwdriver • Philips screwdriver • Additional product ‘HP Internal USB Ports’ B5L28A (depending on printer model) • Utility knife • Non-conductive mat (e.g. rubber mat) • Cardboard Step 1: Prepare the printer 1. Turn the printer off. 2. -
Page 22: Step 3: Prepare The Printer Mainboard
Step 3: Prepare the Printer Mainboard The printer mainboard panel features a pre-punched metal cut-out and holes near the RJ-45 connector. 1. Identify the pre-punched metal cut-out and holes. 2. Depending on printer model, the metal cut-out is concealed on the circuit board side by a hard disk drive. - Page 23 WARNING Incorrect positioning may impact the Fiber Adapter's security against interception! Position the Fiber Adapter as described and make sure that the RJ-45 connector and the panel cut-out are completely covered. WARNING The RJ-45 cable and USB cable may be damaged if pinched! Make sure that your cable management does not pinch or squeeze the cables.
-
Page 24: Step 5: Connecting The Usb Cable To The Printer Mainboard
Fiber Adapter. Step 5: Connecting the USB Cable to the Printer Mainboard To supply the Fiber Adapter with power, it is connected to the printer mainboard via USB connection. To do this, you connect the free end of the USB cable (connector A) to the next available USB port on the printer mainboard circuit board. -
Page 25: Step 7: Connect The Fiber Adapter To The Network
Step 7: Connect the Fiber Adapter to the Network 1. Remove the protective cap of the SC connector. Important: Do not throw away the protective cap! Put the protective cap on the SC connector if it is not in use. 2. - Page 26 Inhaltsverzeichnis Sicherheitshinweise........... 1 Allgemeine Informationen .
-
Page 27: Allgemeine Informationen
Allgemeine Informationen Verwendungszweck Der Fiber Adapter FC1126 ermöglicht es, einen Drucker oder ein Multifunktionsgerät (MFG) der Firma Hewlett Packard (HP) in ein vorhandenes Glasfaser-Netzwerk einzubinden (1000BaseSX zu 1000BaseT). Drucker bzw. MFG und Fiber Adapter müssen kompatibel sein; siehe ... -
Page 28: Lieferumfang
Installation beginnen: Fiber FC1126 Adapter Adapter Verbindungsstück Benutzer- Das Benutzerhandbuch (User Manual) beschreibt handbuch die Installation des FC1126. (Dieses Dokument) USB-Kabel USB 2.0, A-Stecker auf Mini-B-Stecker Vier 2 Schrauben M3 × 5 mm Schrauben 2 Schrauben M3 × 20 mm [de]... -
Page 29: Technische Daten
Technische Daten 1. Activity-LED (orange) 4. Druckeranschluss (RJ-45-Stecker) 2. Netzwerkanschluss (SC-Buchse) 5. Bohrung mit Gewinde 3. Link-LED (grün) 6. USB-Anschluss (Typ: Mini-B) Eigenschaften Werte Druckeranschluss Logisch: 1000BaseT Gigabit Ethernet (IEEE 802.3) Physisch: RJ-45 Netzwerkanschluss Logisch: 1000BaseSX Gigabit Ethernet (IEEE 802.3) Physisch: SC (Typ: MMF;... -
Page 30: Led-Anzeige
LED-Anzeige Durch die Interpretation des LED-Leuchtverhaltens kann der Zustand des FC1126 ermittelt werden. Aktion Farbe Beschreibung Activity unregelmäßiges orange Signalisiert den Austausch von Blinken Netzwerk-Datenpaketen. Link Dauer-An grün Eine Verbindung zum Glasfaser- Netzwerk ist vorhanden. Dauer-Aus Es besteht keine Verbindung zum Glasfaser-Netzwerk. -
Page 31: Einbau Des Fiber Adapters
Einbau des Fiber Adapters Allgemeine Informationen Der Fiber Adapter wird an das Drucker-Mainboard angebaut. Wichtig: Die Installationsschritte können abhängig vom Druckermodell leicht abweichen: Der Fiber Adapter wurde für eine Vielzahl von unterstützten Druckermodellen entwickelt, die sich im Aufbau unterscheiden. Alle Druckermodell-Eigenheiten können in dieser Anleitung nicht berücksichtigt werden. -
Page 32: Das Benötigen Sie
Das benötigen Sie • Schlitzschraubendreher • Kreuzschlitzschraubendreher • Zusatzprodukt 'HP Interne USB-Anschlüsse' B5L28A (abhängig vom Drucker- modell) • Cutter-Messer • nicht-leitende Unterlage (z. B. Gummimatte) • Pappe Schritt 1: Drucker vorbereiten 1. Schalten Sie den Drucker aus. 2. Ziehen Sie das Netzkabel vom Drucker ab. (Stromzufuhr unterbrechen) 3. -
Page 33: Schritt 3: Drucker-Mainboard Vorbereiten
2. Lösen Sie die Rändelschrauben, welche die Plastik-Verdeckung des Drucker- Mainboards befestigen. 3. Entfernen Sie die Plastik-Verdeckung des Drucker-Mainboards. 4. Entfernen Sie ggf. die Metall-Verdeckung des Drucker-Mainboards. Schritt 3: Drucker-Mainboard vorbereiten In der Blende des Drucker-Mainboards befinden sich ein vorgestanzter Metallausschnitt und kleine Löcher in der Nähe des RJ-45-Netzwerkanschlusses. - Page 34 ben dem Ausschnitt deckungsgleich übereinander liegen. WARNUNG Abhörsicherheit kann durch eine falsche Positionierung des Fiber Adapters beeinträchtigt werden! Positionieren Sie den Fiber Adapter wie angegeben und stellen Sie sicher, dass der RJ-45-Anschluss und der Ausschnitt in der Blende vollständig verdeckt werden. WARNUNG Das RJ-45-Kabel und das USB-Kabel können Schaden nehmen, wenn sie eingeklemmt werden!
-
Page 35: Schritt 5: Usb-Kabel An Drucker-Mainboard Anschließen
Netzwerkanschluss des Druckers. 8. Platzieren Sie den Fiber Adapter von außen über den Ausschnitt in der Blen- de. Dabei müssen die Bohrungen des Fiber Adapters und die Bohrungen ne- ben dem Ausschnitt deckungsgleich übereinander liegen. WARNUNG Abhörsicherheit kann durch eine falsche Positionierung des Fiber Adapters beeinträchtigt werden! -
Page 36: Schritt 7: Fiber Adapter Mit Dem Netzwerk Verbinden
Drucker-Mainboard einbauen 1. Führen Sie das Drucker-Mainboard zurück in den dafür vorgesehenen Steck- platz im Drucker. 2. Ziehen Sie die Rändelschrauben des Drucker-Mainboards fest. Verdeckung(en) des Drucker-Mainboards montieren 1. Führen Sie die Metall-Verdeckung des Drucker-Mainboards zurück in den dafür vorgesehenen Steckplatz im Drucker. 2. -
Page 37: Schritt 8: Drucker Einschalten
Schritt 8: Drucker einschalten 1. Schließen Sie das Netzkabel an den Drucker an. (Stromzufuhr herstellen) 2. Schalten Sie den Drucker ein. Drucker und Fiber Adapter sind funktionsbereit. Benutzerhandbuch [de]... -
Page 38: Regulatory Compliance Information
Regulatory Compliance Information Important: The latest version of the EC declaration of conformity can be downloaded from the homepage of SEH Computertechnik GmbH: http://www.seh-technology.com/services/ ce-notifications.html... - Page 40 Sales Contacts and Information: http://www.seh-technology.com/sales Downloads: http://www.seh-technology.com/services/downloads.html © 2017 SEH Computertechnik GmbH All trademarks, registered trademarks, logos and product names are property of their respective owners. The contents of this document are subject to change without notification. The product documentation gives you valuable information about your product.
Need help?
Do you have a question about the FC1126 and is the answer not in the manual?
Questions and answers