Table of Contents
Advertisement
Quick Links
Overview [en]
This
Hardware
provides a brief description of the
installation of the FC126. It contains
the following information:
Safety Regulations
Scope of Supply
Controls and Technical Data
Mounting the Fiber Adapter
Notifications
Please note the table of contents on
page 3. Should you have any further
questions, please contact our support
hotline.
Monday - Thursday
Friday
+49 (0)521 94226-44
@
support@seh.de
Hardware Installation Guide
Installation
Guide
8:00 a.m. to 4:45 p.m. and
8:00 a.m. to 3:15 p.m. (CET)
Fiber Adapter
FC126
Hardware Installation Guide
Überblick [de]
Dieser Hardware Installation Guide
beinhaltet eine kurze Beschreibung der
Installation des FC126. Sie erhalten die
folgenden Informationen:
Sicherheitsvorschriften
Lieferumfang
Bedienelemente und
technische Daten
Einbau des Fiber Adapters
Notifizierungen
Beachten Sie das Inhaltsverzeichnis
auf Seite 3. Falls Sie noch Fragen
haben,
kontaktieren
Support- Hotline.
Sie
unsere
1
Advertisement
Table of Contents

Related Manuals for SEH FC126


Summary of Contents for SEH FC126
- Page 1 This Hardware Installation Guide Dieser Hardware Installation Guide provides a brief description of the beinhaltet eine kurze Beschreibung der installation of the FC126. It contains Installation des FC126. Sie erhalten die the following information: folgenden Informationen: Safety Regulations Sicherheitsvorschriften ...
- Page 2 Date of Manufacture The serial number includes the date of manufacture. The serial number can be found on the type plate. Hardware Installation Guide...
-
Page 3: Table Of Contents
Table of Contents Inhaltsverzeichnis Safety Regulations ... .4 Sicherheitsvorschriften ..4 Scope of Supply ... . . 14 Lieferumfang. -
Page 4: Safety Regulations
Safety Regulations English [en] Before starting the initial operation procedure of your device, please note the following safety regulations: Read the documentation and make sure that your system meets the requirements listed therein. The device must only be connected to the mains and to the network by qualified personnel. - Page 5 Français [fr] Avant de mettre en service votre périphérique, veuillez suivre ces quelques conseils de sécurité: Lisez attentivement la documentation et assurez-vous que votre système satisfait bien toutes les exigences mentionnées. Les périphériques ne doivent être connectés à l'imprimante et puis connectés au réseau que par des experts.
- Page 6 Il dispositivo deve essere collegato alla stampante e quindi essere collegato alla rete soltanto da personale qualificato. Evitare il contatto con l'umidità e con il liquido. Il dispositivo deve essere collegato e messo in funzione solo in condizioni perfette.
- Page 7 Apparaten får endast installeras och anslutas till nätverket av kvalificerade personer. Apparaten får ej utsättas för fukt eller vätskor. Apparaten får endast anslutas och tas i drift i felfritt tillstånd. Lägg alla kablar på ett sådant sätt att personer ej trampar på dem eller snavar över dem.
- Page 8 Sijoita johdot kulkuväylän ulkopuolelle siten, ettei johtoihin voi kompastua. Tämä on 1. luokan laserlaite. Jos SC- tai ST-liittimessä ei ole johtoa, laite voi lähettää näkymätöntä lasersäteilyä. Älä altistu lasersäteilylle äläkä katso liittimeen. Sulje liitin mukana toimitetuilla suojatulpilla, jos et käytä liitintä. ...
- Page 9 Τοποθετείτε όλα τα καλώδια έτσι ώστε να μην υπάρχει κίνδυνος να τα πατήσει κανείς ή να σκοντάψει πάνω τους. Προϊόν λέιζερ κατηγορίας 1. Όταν κανένα καλώδιο δεν είναι συνδεδεμένο στο φις SC ή ST, εκπέμπεται ενδεχομένως μη ορατή ακτινοβολία λέιζερ. Μην εκτίθεστε...
- Page 10 Võtke seadme lahtipakkimisel tarvitusele kohased ettevaatusabinõud, et vältida staatilisest elektrist tekkida võivaid kahjusid. Lietuvių kalba [lt] Prieš pradėdami naudoti savo prietaisą atkreipkite dėmesį į šiuos nurodymus dėl saugos: Perskaitykite dokumentus ir įsitikinkite, ar jūsų sistema atitinka nurodytus reikalavimus. ...
- Page 11 Preberite dokumentacijo in prepričajte se, da vaš sistem ustreza navedenim zahtevam. Napravo se sme priključevati in povezovati na omrežje samo kvalificirano strokovno osebje. Stroj ne sme priti v stik z vlago ali tekočino. Naprava se sme priključevati in poganjati samo v nepoškodovanem stanju. ...
- Page 12 Toto je laserový výrobek třídy 1. Pokud není do zásuvky SC popř. ST připojen žádný kabel, jsou možná vyzařovány neviditelné laserové paprsky. Nevystavujte se účinkům laserového paprsku a nedívejte se do něj. Pokud zásuvku SC popř. ST nepoužíváte, nasaďte na ní přiloženou ochrannou krytku.
- Page 13 Български [bg] Преди пускане в експлоатация на уреда имайте предвид следните указания за безопасност: Прочетете документацията и се уверете, че Вашата система отговаря на изискванията. Уредът трябва да се свързва и включва в мрежа само от квалифициран персонал. ...
-
Page 14: Scope Of Supply
Scope of Supply Please check the package content before getting started: Fiber Adapter FC126 Hardware The Hardware Installation Guide provides a Installation brief description of the installation of the Guide FC126. (This document) USB cable USB 2.0, connector A on mini-B connector... -
Page 15: Controls And Technical Data
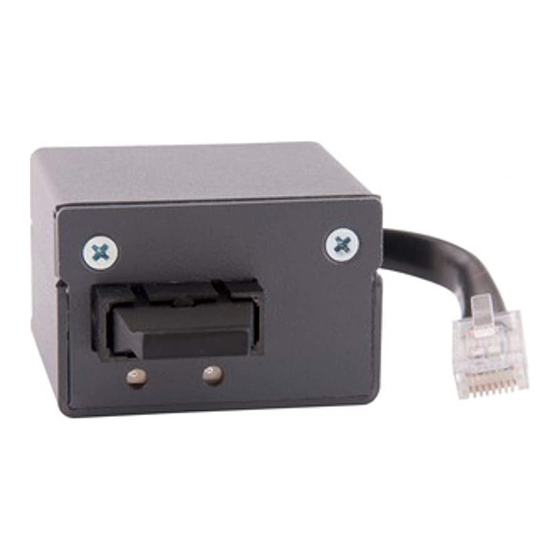
Controls and Technical Data 6 5b 1) Activity LED (orange) 4) Printer port (RJ-45, male) 2) Network connector (SC, female) 5a) Hole 3) Link LED (green) 5b) Hole 6) USB connection (type: mini-B) Properties Values Printer port logical: - 100BaseTX Fast Ethernet (IEEE 802.3) physical: - RJ-45 Network connector... - Page 16 LED Display The LEDs of the FC126 provide information about its status. Action Color Description Activity blinks at orange Indicates the exchange of network data packets. irregular intervals Link permanently green There is a connection to the optical fiber network.
-
Page 17: Mounting The Fiber Adapter
Mounting the Fiber Adapter Intended Purpose: The Fiber Adapter FC126 allows you to embed a Hewlett-Packard printer into an existing optical fiber network (100BaseFX to 100BaseTX). A list of supported printers can be found at: http://www.seh-technology.com/products/fiber-adapter.html Do not connect the Fiber Adapter to other printers! The Fiber Adapter is to be mounted from the outside over a pre-punched and removable cut-out in the printer panel. - Page 18 Preparing the Printer Proceed as follows: 1. Turn the printer off. 2. Disconnect the power cord from the printer. (Interrupt the power supply) 3. Disconnect the RJ-45 network cable from the printer. Dismounting the Printer Mainboard Sharp edges on the printer mainboard can cause injuries. Proceed as follows: 1.
- Page 19 Preparing the Printer Mainboard Proceed as follows: 1. Cover the circuit board of the printer mainboard and the edges of its housing with cardboard in order to avoid injuries to persons and damages to the device. 2. Remove the protective film above and next to the RJ-45 network connector on the printer mainboard.
- Page 20 Mounting the Fiber Adapter Proceed as follows: 1. Connect the included USB cable (mini-B connector) to the Fiber Adapter. 2. Put the unconnected end of the USB cable (connector A) from the outside through the hole in the panel and place it next to the printer mainboard.
- Page 21 Connecting the Fiber Adapter Proceed as follows: 1. Remove the protective cap of the SC connector. Do not throw away the protective cap! Put the protective cap on the SC connector if it is not in use. 2. Connect the fiber optic cable of your network (SC connector) to the network connector (SC, female) of the Fiber Adapter.
-
Page 22: Lieferumfang
Lieferumfang Bitte überprüfen Sie den Packungsinhalt auf Vollständigkeit, bevor Sie die Installation beginnen: Fiber Adapter FC126 Hardware Der Hardware Installation Guide beinhaltet Installation eine kurze Beschreibung der Installation des Guide FC126. (Dieses Dokument) USB-Kabel USB 2.0, A-Stecker auf Mini-B-Stecker... -
Page 23: Technische Daten
Bedienelemente und technische Daten 6 5b 1) Activity-LED (orange) 4) Druckeranschluss (RJ-45-Stecker) 2) Netzwerkanschluss (SC-Buchse) 5a) Bohrung 3) Link-LED (grün) 5b) Bohrung 6) USB-Anschluss (Typ: Mini-B) Eigenschaften Werte Druckeranschluss Logisch: - 100BaseTX Fast Ethernet (IEEE 802.3) Physikalisch: - RJ-45 Netzwerkanschluss Logisch: - 100BaseFX Fast Ethernet (IEEE 802.3) - Page 24 LED-Anzeige Durch die Interpretation des LED-Leuchtverhaltens kann der Zustand des FC126 ermittelt werden. Aktion Farbe Beschreibung Activity unregelmäßiges orange Signalisiert den Austausch von Netzwerk- Blinken Datenpaketen. Link Dauer-An grün Eine Verbindung zum Glasfaser-Netzwerk ist vorhanden. Dauer-Aus Es besteht keine Verbindung zum Glasfaser- Netzwerk.
-
Page 25: Einbau Des Fiber Adapters
Einbau des Fiber Adapters Verwendungszweck: Der Fiber Adapter FC126 ermöglicht es, einen Hewlett-Packard-Drucker in ein vorhandenes Glasfaser-Netzwerk einzubinden (100BaseFX zu 100BaseTX). Eine Liste der unterstützten Drucker finden Sie auf: http://www.seh.de/produkte/fiber-adapter.html Bauen Sie den Fiber Adapter nicht an andere Drucker an! Der Fiber Adapter wird außen über einen in der Druckerblende vorgestanzten und... - Page 26 Drucker vorbereiten Gehen Sie wie folgt vor: 1. Schalten Sie den Drucker aus. 2. Ziehen Sie das Netzkabel vom Drucker ab. (Stromzufuhr unterbrechen) 3. Ziehen Sie das RJ-45-Netzwerkkabel vom Drucker ab. Druckermainboard ausbauen Scharfe Kanten am Druckermainboard können zu Verletzungen führen. Gehen Sie wie folgt vor: 1.
- Page 27 Druckermainboard vorbereiten Gehen Sie wie folgt vor: 1. Decken Sie die Platine und die Gehäusekanten des Druckermainboards mit Pappe ab, um Verletzungen von Personen und Beschädigungen am Gerät zu vermeiden. 2. Ziehen Sie die Blendenfolie oberhalb und in der Umgebung des RJ-45-Netzwerkanschlusses am Druckermainboard ab.
- Page 28 Fiber Adapter einbauen Gehen Sie wie folgt vor: 1. Verbinden Sie das mitgelieferte USB-Kabel (Mini-B-Stecker) mit dem Fiber Adapter. 2. Führen Sie das unverbundene Ende des USB-Kabels (A- Stecker) von außen durch das Blendenloch und legen Sie es neben dem Druckermainboard ab. 3.
- Page 29 Druckermainboard einbauen Gehen Sie wie folgt vor: 1. Führen Sie das Druckermainboard zurück in den dafür vorgesehenen Steckplatz im Drucker. Das USB-Kabel darf nicht eingeklemmt werden. 2. Ziehen Sie die Rändelschrauben des Druckermainboards fest. Fiber Adapter anschließen Gehen Sie wie folgt vor: 1.
-
Page 30: Notifications
Notifcations The latest version of the EC declaration of conformity can be downloaded from the homepage of SEH Computertechnik GmbH: http://www.seh-technology.com/services/ce-notification Hardware Installation Guide... - Page 31 Hardware Installation Guide...
- Page 32 © 2015 SEH Computertechnik GmbH All trademarks, registered trademarks, logos and product names are property of their respective owners. This product uses ’Open Source Software’ . For further information, please contact http://www.seh.de. The product documentation gives you valuable information about your product.