Table of Contents
Advertisement
Quick Links
Advertisement
Table of Contents

Related Manuals for Refco DIGIMON-SE


Summary of Contents for Refco DIGIMON-SE
- Page 1 DIGIMON-SE DIGIMON4 Installation and operating guide Digital Manifold...
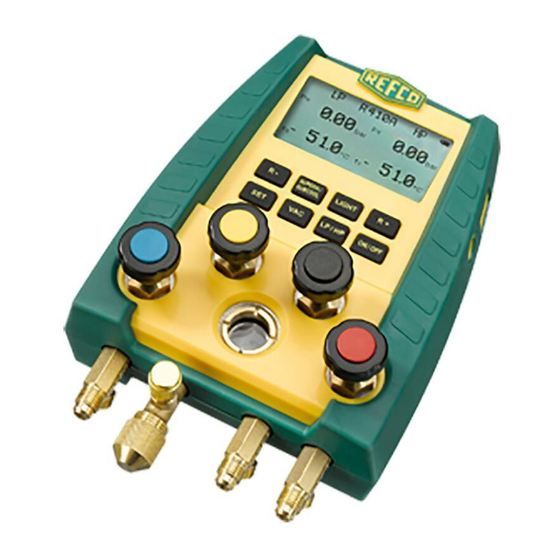
- Page 2 Instruction Manual DIGIMON-SE / DIGIMON4 English Instruction manual 2-way and 4-way digital manifolds DIGIMON-SE DIGIMON4 1. Low pressure anchor ¼“ SAE 2. High pressure anchor ¼“ SAE 3. Vacuum anchor ¼“ SAE or 3/8“ 4. Refrigerants anchor ¼“ SAE 5. Low pressure valve (blue) 6.
-
Page 3: Table Of Contents
English Instruction Manual DIGIMON-SE / DIGIMON4 Contents Important safety notice ....................3 Purpose and use ......................3 Scope of delivery ......................4 Transport ......................... 4 Important note ......................... 4 Technical description ..................... 4 Key functions ........................6 Battery charge level indicator ..................6 Application ........................ -
Page 4: Important Safety Notice
REFCO cannot be held liable or responsible for any accidents, injuries or deaths arising during use of the manifold. REFCO explicitly states that their products must only be sold to professionally trained experts. -
Page 5: Scope Of Delivery
English Instruction Manual DIGIMON-SE / DIGIMON4 Scope of delivery Information about the various models and variations of our products can be found in the REFCO catalogue or at www.refco.ch. Transport The manifolds are delivered from the factory in a plastic box, with or without filling hoses. - Page 6 Instruction Manual DIGIMON-SE / DIGIMON4 English Property Value Maximum working Low pressure: 60bar / 870psi / 6000kPa / 6MPa pressure: High pressure : 60bar / 870psi / 6000kPa / 6MPa Pressure 0.01 bar / 0.5psi / 1kPa / 0.001MPa resolution:...
-
Page 7: Key Functions
English Instruction Manual DIGIMON-SE / DIGIMON4 Vacuum display with external vacuum sensor Property Value Range: 0 to 10000 Microns Resolution: 0.1Pa / 1Micron / 0.001mbar / 0.001Torr / 1mTorr / 0.0001psi / 0.0001inHg Units: Pa / Micron / mbar / Torr / mTorr / psi / inHg... -
Page 8: Application
Instruction Manual DIGIMON-SE / DIGIMON4 English Application Set-up Insert 4 batteries in the battery compartment at the back of the device. Caution: Ensure the batteries are inserted observing the correct polarities. Do not leave empty batteries in the battery compartment. If you will not be using the DIGIMON for a longer period of time, remove the batteries from the battery compartment. - Page 9 English Instruction Manual DIGIMON-SE / DIGIMON4 Digital display Analogue display with memory function Select refrigerant Press the buttons to select the desired refrigerant from the list. During selection, you will see a flashing "R" on the display. Press the button to confirm selection of the desired refrigerant. The "R" no longer flashes on the display.
- Page 10 Instruction Manual DIGIMON-SE / DIGIMON4 English Select pressure unit Hold down the button. Use to select the desired unit. Release both buttons. Select temperature unit Hold down the button. Use to choose between °C and °F. Release both buttons. Important note: The device will save the last pressure and temperature units selected.
- Page 11 English Instruction Manual DIGIMON-SE / DIGIMON4 ------ SUPERH SUBC00L displays the difference "K" (F) between the temperature according to the vapour pressure table (to, tc) and the measured temperature (t1, t2) of the external thermocouples (9) or the clamp thermocouples (10).
- Page 12 Instruction Manual DIGIMON-SE / DIGIMON4 English External vacuum sensor (optional) The external vacuum sensor should be used to measure exact vacuum values. The sensor should be connected to the system. Vacuum display Select pressure unit Hold down the button. Use the button to select the desired unit.
-
Page 13: Connecting The Manifold
English Instruction Manual DIGIMON-SE / DIGIMON4 Connecting the manifold a) with DIGIMON-SE Connect blue hose (1) to suction pressure side of system Connect red hose (2) to high pressure side of system Connect yellow hose (3) to vacuum pump ... -
Page 14: Filling The System
Instruction Manual DIGIMON-SE / DIGIMON4 English Filling the system a) with DIGIMON-SE manifold Disconnect the yellow hose from the vacuum pump and screw it onto the refrigerant bottle or cylinder. Open the valve on the refrigerant bottle or cylinder. -
Page 15: Measuring Using The Superheat / Subcool Modes
In case of leaky valves, the piston should be replaced (M4-6-04-R/4). The special REFCO M4-6-11-T tool should be used to change the sight glass on the manifold. The manifold should be checked after the replacement of seals to ensure there are no leaks. -
Page 16: Environmental Issues
Instruction Manual DIGIMON-SE / DIGIMON4 English Environmental issues The DIGIMON manifold has been developed for long term use. REFCO takes energy saving and environmental impact into consideration when procuring materials and manufacturing its products. REFCO Manufacturing Ltd feels responsible for all of its products throughout their entire lifespan and has therefore been certified in accordance with DIN EN ISO 14001 : 2004. -
Page 17: Resetting Pressure Sensors
English Instruction Manual DIGIMON-SE / DIGIMON4 Resetting pressure sensors LIGHT By pressing the buttons the DIGIMON pressure displays are reset to zero, in order to avoid incorrect measurement values. To obtain a correct measurement value on the display, the DIGIMON should not be reset when pressurised or under a vacuum. -
Page 18: Calibrating Pressure Sensors
Instruction Manual DIGIMON-SE / DIGIMON4 English Calibrating pressure sensors A correct calibration requires a certified monitor. (e.g. REF-CLASS-GAUGE P/N 4682293) 1. Switch off the DIGIMON LIGHT ON/OFF 2. Press down the button and switch on the device using the button. -
Page 19: Calibrating The Temperature Display
English Instruction Manual DIGIMON-SE / DIGIMON4 Calibrating the K-Type sensors (using room temperature) 1. Switch off the DIGIMON 2. Plug in the thermocouples (K-type). Room and measurement temperatures must remain constant at 25 +/-3°C and be stable for at least 20 minutes. The thermocouple cables must be straight (unwound). - Page 20 Instruction Manual DIGIMON-SE / DIGIMON4 English Press the button to calibrate the high pressure side (HP) Repeat from Point 6 ON/OFF 10. Once both sensors are calibrated, press to exit the sensor calibration mode. Calibrating the temperature sensors / clamps (0°C / 32°F ice water) 1.
- Page 21 English Instruction Manual DIGIMON-SE / DIGIMON4 7. Put both K-Type thermocouples / clamps into (0°C /32°F ice water bath) Take your time, use lots of ice and stir water often. It can take up to 15 minutes for the ice water temperature to settle exactly at 0.0°C / 32.0°F Use separate accurate...
- Page 22 REFCO Manufacturing Ltd. Industriestrasse 11 6285 Hitzkirch - Switzerland Telefon +41 41 919 72 82 Telefax +41 41 919 72 83 info@refco.ch www.refco.ch...
Need help?
Do you have a question about the DIGIMON-SE and is the answer not in the manual?
Questions and answers