Table of Contents
Advertisement
Quick Links
Advertisement
Table of Contents

Related Manuals for Oracle Talari D2000

Summary of Contents for Oracle Talari D2000
- Page 1 Oracle® Talari D2000 Hardware Guide F29960-01 March 2020...
- Page 2 Oracle Corporation and its affiliates disclaim any liability for any damages caused by use of this software or hardware in dangerous applications. Oracle and Java are registered trademarks of Oracle and/or its affiliates. Other names may be trademarks of their respective owners.
-
Page 3: Table Of Contents
Contents About this Guide My Oracle Support Emergency Response Revision History Oracle Talari D2000 Hardware Guide Hardware and Software Requirements Overview Talari APN Overview Front Panel Configuration Rear Panel Configuration NIC Indicator Codes Hardware Specifications Installing the Talari Appliance Rack Mounting... -
Page 4: About This Guide
For Non-technical issues such as registration or assistance with My Oracle Support, select 2. You are connected to a live agent who can assist you with My Oracle Support registration and opening a support ticket. My Oracle Support is available 24 hours a day, 7 days a week, 365 days a year. - Page 5 About this Guide • Inability to perform maintenance or recovery operations • Inability to provide any required critical or major trouble notification • Any other problem severely affecting service, capacity, traffic, and billing. Maintenance capabilities may be defined as critical by prior discussion and agreement with the Tekelec Customer Care Center.
-
Page 6: Revision History
Revision History Table 1 Revision history table Date Change June 2019 • Initial Release October 2019 • Oracle Branding change March 2020 • Adds ILOM Snapshot setup and capture procedure • Adds Creating bootable USB drive (on Windows and Linux) procedure •... -
Page 7: Oracle Talari D2000 Hardware Guide
A minimum screen resolution of 1024 x 960 or greater is recommended. Overview The Oracle Talari D2000 is part of the D-series of Talari Appliances and intended for use in data centers that demand high performance and physical resiliency. The Oracle Talari D2000 supports WAN Optimization and Easy 1st Install. -
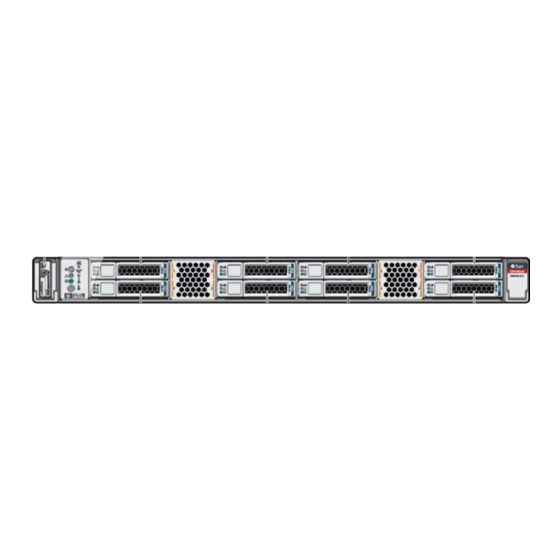
Page 8: Front Panel Configuration
WAN links and data transmitted across the Conduits is controlled and optimized to use network resources available across all WAN Links. Front Panel Configuration For more information on the front panel status indicators, please see the Oracle Server X7-2 Service Manual. Rear Panel Configuration... -
Page 9: Hardware Specifications
Chapter 1 Hardware Specifications Table 1-2 MGT Indicator Location Color Meaning Activity Left Green On: Link up Off: No activity Blinking: Packet Activity Link Speed Right Green Off: 10/100 Mbps On: 1Gbps Table 1-3 Ports 1 - 8 Indicator Location Color Meaning Activity... -
Page 10: Installing The Talari Appliance
Do not move racks by yourself; at least two people are recommended to move a rack. • Cables should be easily identifiable. Please refer to the Oracle® Servers X7-2 and X7-2L Installation Guide for additional appliance specifications and detailed rackmounting instructions: https://docs.oracle.com/cd/E72435_01/ html/E72440/index.html. -
Page 11: Cabling And Bypass Mode
Example instructions for some of the most common deployment scenarios are provided below: Router (Gateway, Fail to Block) The Oracle Talari D2000 is deployed as the WAN gateway for the site, and bypass pair is configured as Fail-To-Block. Use this option if you plan to use the Talari Appliance as the edge device for the site. -
Page 12: Installation Option: Easy 1St Install
Installation Option: Easy 1st Install For use with Oracle Talari D2000 as a Router (Gateway, Fail to Block), Layer 2 Fail to Wire (Overlay), MPLS & Internet Hybrid. Easy 1st Install Site Deployment Criteria NCN: •... -
Page 13: Installation Option: Manual Install
LAN switch. Installation Option: Manual Install For use with Oracle Talari D2000 as a Router (Gateway, Fail to Block), Layer 2 Fail to Wire (Overlay), MPLS and Internet Hybrid Manual Install Site Deployment Criteria Manual (Legacy) Install requires physical access to the appliance. -
Page 14: Collecting Ilom Diagnostics For D2000 And D6000
Enabling ILOM on your D2000 or D6000 appliance provides hardware support at the component level by means of an ILOM snapshot. Oracle's technical support center can analyze the snapshots and access data such as FMA reports to determine which components require replacement in a fault situation. - Page 15 Sign into ILOM again. bash-4.2# ssh root@169.254.182.76 Password: ******* Oracle(R) Integrated Lights Out Manager Version 4.0.4.33 r128860 Copyright (c) 2019, Oracle and/or its affiliates. All rights reserved. Warning: password is set to factory default. Warning: HTTPS certificate is set to factory default.
-
Page 16: Booting With The Usb Drive
Chapter 1 Booting with the USB Drive Hostname: ORACLESP-1907XC3025 -> In one command, initiate Snapshot and transfer the file to /tmp on host with the talariuser login credentials. -> set /SP/diag/snapshot dump_uri=sftp://talariuser@169.254.182.77/tmp Enter remote user password: ********* // Enter talariuser password Set 'dump_uri' to 'sftp://talariuser@169.254.182.77/tmp' ->... - Page 17 Detecting screen size; please wait...done Oracle(R) Integrated Lights Out Manager Version 4.0.4.33 r128860 Copyright (c) 2019, Oracle and/or its affiliates. All rights reserved. Warning: password is set to factory default. Warning: HTTPS certificate is set to factory default. Hostname: ORACLESP-1907XC3025 ->...
- Page 18 Chapter 1 Booting with the USB Drive Figure 1-4 Boot Pop Up Menu The Boot Device menu is displayed in about 2 minutes. Figure 1-5 Boot Device Menu Using the Up/Down arrows keys, position the cursor on your install USB boot device. Press the ENTER key to select the USB boot device.
- Page 19 Chapter 1 Booting with the USB Drive The GNU GRUB menu is displayed. It has a 5 second timeout. Figure 1-7 GNU GRUB Menu The system is now booting the USB. This process may take up to 5 minutes. After the process is complete, a login prompt is displayed.
- Page 20 Chapter 1 Booting with the USB Drive Figure 1-9 Device IP Address Configuration Note: After accepting the IP4 configuration, the installation script creates the partitions, formats the partitions, and loads the SDWAN OS and application software on the system. When this is complete, you are asked to type reboot and remove the USB drive.
-
Page 21: Creating A Bootable Usb Drive From On Linux
Chapter 1 Creating a Bootable USB Drive from on Linux Figure 1-11 Appliance Ready for Use The appliance is ready for use. Creating a Bootable USB Drive from on Linux Before starting this process, ensure that the capacity of your USB drive is at least 4 GB. To create a bootable USB drive from on Linux: Download the D2000 or D6000 image from MOS. -
Page 22: Creating A Bootable Usb Drive From On Windows 1-16
164415040 112140980 52274060 69% /home /dev/sdd2 2755604 2389404 222896 92% /run/media/oracle/USBBoot To unmount the partition on the drive, run the command: umount /run/media/oracle/ USBBoot. Run the command again to make sure that there are no mounts matching your USB device name ( in the example.) - Page 23 Chapter 1 Creating a Bootable USB Drive from on Windows Click Start. You will be asked if it is OK to destroy all the data in the device. Click Yes. The USB burn process on a USB3 device can take 15 minutes. It may take longer if the device or port is USB2.
Need help?
Do you have a question about the Talari D2000 and is the answer not in the manual?
Questions and answers