Table of Contents
Advertisement
Available languages
Available languages
Quick Links
Advertisement
Table of Contents

Related Manuals for LITELINE OnCloud LC-CRTL-SCENE-1


Summary of Contents for LITELINE OnCloud LC-CRTL-SCENE-1
- Page 1 ENGLISH MODEL: LC-CRTL-SCENE-1 Room Controller User Manual Limited 3-Year Warranty For complete warranty information, including details on consumer legal rights as well as warranty exclusions, visit www.liteline.com/warranty.
-
Page 2: Before You Start
Before you start IMPORTANT: Review this installation guide in its entirety before starting installation of your Room Controller or removal of your old switches. Installation and maintenance involving electrical wiring must be done by qualified person(s). Risk of Electric Shock: Electricity can cause personal injury and property damage if handled improperly. -
Page 3: Product Overview
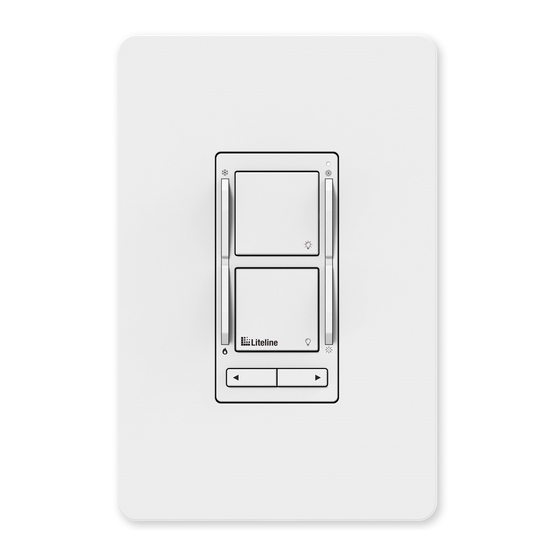
Product overview ON Switch LED Indicator Light Cooler Color Increase Temperature Brightness Warmer Color Decrease Temperature Brightness OFF Switch Previous Scene Next Scene Specifications Wireless Frequency: 2.4GHz Wireless Security: Counter with CBC-MAC (CCM) Input: 120VAC, 60Hz Output: 5A, 600W max Compatible Load(s): OnCloud or WiZ Connected products only... -
Page 4: What You Need
What you need Screwdrivers Pliers Wire Stripper Voltage Tester Switch Functions BUTTON LED COLOR ACTION Short press ON switch GREEN Lights turn ON Short press OFF switch GREEN Lights turn OFF GREEN Line voltage relay ON, lights ON Long press (7-10 seconds) turn ON Line voltage relay OFF, lights OFF Long press (7-10 seconds) -
Page 5: Installation
Installation 1. Turn OFF the power at the circuit breaker and confirm with the voltage tester at the switch before proceeding. Place voltage tester against the existing switch checking the wall plate, screws and switch at various points to determine that there is no power present. - Page 6 Single-Pole Wiring 4. Disconnect and remove the Load existing switch. Neutral (Required) 5. Connect the Room Controller as per the Single-Pole or 3-Way wiring (refer to diagrams). The ground wires must be connected to the electrical box. Live (Required) Ground 3-Way Wiring –...
- Page 7 3-Way Wiring – Diagram 2 Room Controller #1 Room Controller #2 2-Wire Cable (Master) (Slave) To Light Source 2-Wire Cable 3-Wire Cable Power Source NOTE: Only the above 3-way wiring configurations are supported. Excluded wiring configurations include power going straight to the load, and no neutral wire going to device boxes.
- Page 8 6. Mount the Room Controller in the existing gang box with the provided screws and attach the wall plate (press fit). 7. Turn on the power at the circuit breaker. 8. Test to see that the Room Controller is functioning by pressing and holding the ON switch for 7-10 seconds.
-
Page 9: Troubleshooting
Troubleshooting PROBLEM CAUSE SOLUTION Unable to find the Long Press the ON and OFF switch OnCloud / WiZ Connected Room Controller simultaneously for 5 seconds to enter light fixtures that are may not have into Connectivity Mode: Searching for hardwired to the Room initiated Wi-Fi Network. - Page 10 NOTE: Upon first boot-up, the firmware may need to be updated. Please allow up to 1 minute for the OnCloud / WiZ Connected light fixtures to update after completing WiZ app setup. For additional support, visit www.liteline.com/WiZsupport...
- Page 11 NOTE: In the WiZ App, any OnCloud / WiZ Connected fixture(s) must be added to a room prior to adding the Room Controller that will control them. Please refer to the Installation manual included with the OnCloud / WiZ Connected light fixtures for setup. Create a home or join an Name your home Tap the ‘Add room’...
- Page 12 FRENCH Mode d’emploi du Contrôleur de Pièce Garantie limitée de 3 ans Pour connaître le texte complet de la garantie, notamment les renseignements sur les droits des consommateurs ainsi que les exclusions au titre de la garantie, consultez www.liteline.com/warranty.
-
Page 13: Avant Tout
Avant tout IMPORTANT : Lisez ce guide d’installation en entier avant de débuter l’installation du contrôleur de pièce ou d’enlever les interrupteurs existants. Toute installation ou tout entretien impliquant un câblage électrique doit être effectué par une personne qualifiée. Risque de choc électrique : Si les mesures de précautions ne sont pas respectées, l’électricité... -
Page 14: Aperçu Du Produit
Aperçu du produit EN Circuit DEL Indicatrice Température Chromatique Augmenter la plus Fraîche Luminosité Température Chromatique Réduire la plus Chaude Luminosité Hors Circuit Scène Scène Précédente Suivante Spécifications Fréquence du sans fil : 2.4GHz Sécurité du sans fil : Counter with CBC-MAC (CCM) Entrée : 120 VCA, 60 Hz Sortie :... -
Page 15: Ce Dont Vous Avez Besoin
Ce dont vous avez besoin Tournevis Pinces Pince à dénuder Voltmètre Foncions de l’interrupteur BOUTON COULEUR DE ACTION LA LED Pression brève sur En circuit VERT Allume les lampes Pression brève sur Hors circuit VERT Éteint les lampes VERT Relais de tension en circuit, Longue pression sur En circuit 7-10 s) lampes allumées ROUGE... - Page 16 Installation 1. Avant de procéder, coupez le courant au disjoncteur du circuit et confirmez l’absence de courant à l’interrupteur à l’aide du voltmètre. Placez le voltmètre contre l’interrupteur existant, vérifiant la plaque murale, les vis et l’interrupteur divers points pour assurer l’absence de courant.
- Page 17 Câblage Unipolaire 4. Déconnectez et enlevez l’interrupteur existant. Neutre Charge (requis) 5. Connectez le contrôleur de pièce en suivant le câblage unipolaire ou 3 voies (consulter les schémas). Les fils de terre doivent être connectés à la boîte électrique. Tension (requis) Terre Câblage 3 Voies –...
- Page 18 Câblage 3 Voies – Schéma 2 Câble à 2 fils Contrôleur de pièce Contrôleur de pièce À la source lumineuse #2 (Satellite) #1 (Maître) Câble à 2 fils Câble à 3 fils Source électrique NOTE : Seul le câblage 3 voies est pris en charge. Les configurations exclues comprennent le courant qui se rend directement à...
- Page 19 6. Posez le contrôleur de pièce dans la boîte électrique à l’aide des vis fournies puis posez la plaque murale (fixation par pression). 7. Rétablissez le courant au disjoncteur. 8. Vérifiez le fonctionnement du contrôleur de pièce en tenant le bouton En circuit enfoncé...
-
Page 20: Dépannage
Dépannage PROBLÈME CAUSE SOLUTION Impossible de découvrir Appuyez longuement sur sur le réseau les l’interrupteur (5 secondes) pour Le contrôleur de pièce luminaires OnCloud / passer au mode de connectivité : n’est pas au mode de WiZ Connected câblés recherche du réseau Wi-Fi. connectivité... - Page 21 NOTE : Lors du démarrage initial, vous aurez peut-être à faire une mise à niveau du micrologiciel. Prévoyez autant qu’une minute pour que les luminaires OnCloud / WiZ Connected soient mis à jour une fois l’appli WiZ configurée. Pour une assistance supplémentaire, visitez www.liteline.com/WiZsupport...
- Page 22 NOTE : Dans l’appli WiZ, tous les luminaires OnCloud / WiZ Connected doivent être ajoutés à la pièce avant d’ajouter le contrôleur de pièce qui les contrôlera. Pour la configuration, consultez le manuel d’installation fourni avec les OnCloud / WiZ Connected.
- Page 23 The following importer is the responsible party: LLC Sales, Inc. DBA Liteline USA 1209 Orange Street, Wilmington, DE, 19801 liteline.com/contact-us Changes or modifications not expressly approved by the responsible party could void the user’s authority to operate the equipment. This device complies with part 15 of the FCC Rules. Operation is subject to the following two conditions: (1) This device may not cause harmful interference, and (2) this device must accept any interference received, including interference that may cause undesired operation.
- Page 24 Ce produit doit être installé selon le code d’installation pertinent, par une personne qui connaît bien le produit et son fonctionnement ainsi que les risques inhérents. LITELINE CORPORATION Telephone 1.866.730.7704 | Fax 1.888.738.9736 liteline.com UM_LC-CRTL-SCENE-1_3.22.21 Copyright © 2021, Liteline Corporation. All rights reserved.
Need help?
Do you have a question about the OnCloud LC-CRTL-SCENE-1 and is the answer not in the manual?
Questions and answers