
Related Manuals for Sedgwick 571


Summary of Contents for Sedgwick 571
- Page 1 HOLLOW CHISEL MORTICER OPERATION AND MAINTENANCE INSTRUCTIONS M. SEDGWICK & COMPANY LIMITED MACHINE SERIAL NO. 571AA Stanningley Field Close, Leeds, U.K. LS13 4QG Tel. +(44) 113 257 0637 Fax. +(44) 113 239 3412...
- Page 2 571 Operation/Maintenance Instructions Page 2 of 19 Manufacturers EC Declaration of Conformity The following machine has undergone ‘conformity assessment’ and has been self-assessed in accordance with: Schedule IV of the Supply of Machinery (Safety) Regulations 1992 and Amendment No. 2063 MANUFACTURER’S NAME AND ADDRESS:...
-
Page 3: Table Of Contents
571 Operation/Maintenance Instructions Page 3 of 19 List of Contents Page No. Design And Purpose Illustration Machine Specification Installation Handling Instructions Foundation Drawings Installation Instructions Electrical Installation Operating Instructions Switch Gear The Lever Chisel Head Table Clamp Table Movement Mortise Depth... -
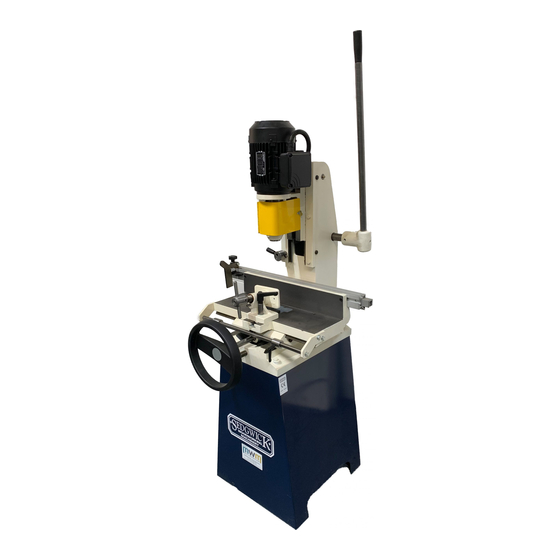
Page 4: Design And Purpose
Design and Purpose The Sedgwick Hollow Chisel Morticer Type 571 is a hand fed machine used for producing square cornered mortice holes of various lengths and widths. The machine is not designed for any other purposes except as set out above. The operator of the machine shall be solely liable for any damage that results from improper use of the machine. - Page 5 571 Operation/Maintenance Instructions Page 5 of 19 Illustration OPERATING LEVER CHUCK GUARD STOP/START BUTTONS CHISEL BRACKET ADJUSTMENT DEPTH AND HAUNCH STOPS TIMBER CLAMP LENGTHS STOPS LONGITUDINAL AND LATERAL ADJUSTMENT OF TABLE VIA SINGLE HANDWHEEL 1.2 Machine Specification MAXIMUM CHISEL SIZE - IN HARDWOOD...
- Page 6 571 Operation/Maintenance Instructions Page 6 of 19 1.4 Personal Protective Equipment (PPE) Operators of the machine should observe Health & Safety guidance as to use of PPE when operating the machine, in particular: Use of protective clothing e.g. tear-resistant sturdy overalls.
- Page 7 571 Operation/Maintenance Instructions Page 7 of 19 2.0 Machine Handling The following section offers a guide to transporting, assembling and installing the machine, which should be done following an adequate risk assessment. Movement, adjustment or installation of the machine should not be attempted without proper training in the handling of heavy machinery.
- Page 8 571 Operation/Maintenance Instructions Page 8 of 19 You must ensure that there is an ample power supply available to operate the machine, together with good lighting and ventilation. Do not operate or store the machine outdoors. Ensure the environment for operating woodworking machinery is kept clean and tidy and damp- free.
-
Page 9: Installation
571 Operation/Maintenance Instructions Page 9 of 19 3.0 Installation 1. Remove the protective rust preventative using turpentine or paraffin. Do not use any solvent, petrol or gas oil, which might dull or oxidise the paintwork. Lightly oil cleaned surfaces to prevent rusting. -
Page 10: Switch Gear
571 Operation/Maintenance Instructions Page 10 of 19 It is possible for 3 phase machines to Three phase machines only: operate with only 2 phases of the 1 fuse blown supply. This will create an overload situation and will eventually cause premature failure, this is known as single phasing. -
Page 11: The Lever
571 Operation/Maintenance Instructions Page 11 of 19 Controls THE LEVER The operating lever used to control the movement of the chisel bracket can be adjusted to suit the height of the operator as follows: Loosen the M8 allen screw in the lever boss, slide the bar into the correct position and re-tighten. - Page 12 571 Operation/Maintenance Instructions Page 12 of 19 Preparation for Use Before commencing any work on this machine it is recommended that a wooden sub table is made as illustrated below: 560mm 160mmm 105mm 25x25 Battens 12-16mm thick Setting Up For Hollow Chisel Mortising SEQUENCE: 1.
-
Page 13: Mortising Hard And Soft Woods
571 Operation/Maintenance Instructions Page 13 of 19 5. Clear all tools from the machine and position the clamp as previously described. Move the headstock down to the workpiece, to check the alignment of the chisel with the mortice position. Set the depth stop. - Page 14 571 Operation/Maintenance Instructions Page 14 of 19 8. Do not traverse the table when the chisel is in contact with the bottom of the mortise, as this could damage the auger and strain the mortise chisel. 9. In the interests of ease, for an extended life of mortise chisels, and for speedy working, it is preferable to use sharp but shallow strokes on the handle, i.e.
-
Page 15: Dust
571 Operation/Maintenance Instructions Page 15 of 19 this machine consideration must be given to the provision of adequate lighting and working space. Repairs and maintenance must only be undertaken by competent technicians. Ensure that all power supplies are isolated before maintenance work begins. Instructions for routine maintenance work are also included in this manual. - Page 16 571 Operation/Maintenance Instructions Page 16 of 19 The list below outlines some of the variables that directly affect the noise level of the machine: VARIABLE RELEVANT FACTOR EFFECT Timber Species Hard stiff timber can mean more noise (approx. 2dB(A) difference when cutting oak and pine) &...
- Page 17 571 Operation/Maintenance Instructions Page 17 of 19 Maintenance and Lubrication Electrically isolate the machine and ensure that all spindle movement has ceased before carrying out any maintenance operation. Since your morticer is constructed of cast iron, which is a porous metal, care should be taken when cleaning.
-
Page 18: Parts Diagram
571 Operation/Maintenance Instructions Page 18 of 19 Parts Diagram... -
Page 19: Parts List
571 Operation/Maintenance Instructions Page 19 of 19 Parts List Base & Cross Slide Assembly 571-42 DEPTH STOP POST 571-01 STAND PTD DK BLUE 571-43 DEPTH STOP CAP 'SEDGWICK' LOGO SCL027 571-44 DEPTH STOP LEVER 571-02 BASE HANDLE I.580/40 N-8 571-03 CROSS SLIDE...
Need help?
Do you have a question about the 571 and is the answer not in the manual?
Questions and answers