
Related Manuals for Phoenix 440-ML


Summary of Contents for Phoenix 440-ML
- Page 1 Phoenix 440-ML January 2020 OPERATING MANUAL Please read this manual carefully before starting operation!
-
Page 2: Table Of Contents
Phoenix 440-ML January 2020 Table of Contents Contents Page 1. Introduction …………………………………………………...........….2 2. Important Safety Instructions………………………………………………………………..2 3. Installation Safeguards …………………………………………………………………..3 4. Regulatory Compliance Statements …………………………………………………………3 5. General Safeguards…………………………………………………………………….…….5 6. Operating Conditions …………………………………………………………………….….6 7. Packing List …………………………………………………………..………….……..……7 8. Installation a. Uncrate the machine ……………..8 f. -
Page 3: Introduction
January 2020 1. Introduction Thank you for choosing a Phoenix 440-ML laminating machine. It has been designed and manufactured to provide years of continuous service. Please read this manual thoroughly before operating. Please inspect the box and the laminator for shipping damage. Damage should be... -
Page 4: Installation Safeguards
Phoenix 440-ML January 2020 3. Installation Safeguards • Shipping damage should be brought to the immediate attention of the delivering carrier • Avoid locating the laminator near sources of heat or cold. Avoid locating the laminator in the direct path of forced, heated or cooled air •... - Page 5 Phoenix 440-ML January 2020 compliance to published national standards and code requirements. The cTUVus mark is officially recognized as an equivalent and direct replacement of the UL and CSA marks. Federal Communications Commission (FCC) Compliance Statement This equipment has been tested and found to comply with the limits for a Class B digital device, pursuant to part 15 of the FCC Rules.
-
Page 6: General Safeguards
Phoenix 440-ML January 2020 5. General Safeguards ⚫ Keep hands, long hair, loose clothing, and articles such as neckties away from rollers to avoid entanglement and entrapment. The rollers have pinch points that can trap body parts or clothing and cause serious injury ⚫... -
Page 7: Operating Conditions
Phoenix 440-ML January 2020 6. Operating Conditions ⚫ Place machine on level surface ⚫ Environment requirements: Ambient temperature: 50⁰ F - 104⁰ F Humidity:30%—80%;ideal humidity:55% • Due to the static on film rolls, you should try to keep the environment clean. -
Page 8: Packing List
Phoenix 440-ML January 2020 7. Packing List Remove all parts from shipping create and boxes. Inspect parts and the machine carefully. Any missing parts should be reported to the shipper upon receipt of shipment. NOTE: Refer to the System Components section for hardware locations... -
Page 9: Installation
Phoenix 440-ML January 2020 8. Installation 8a. Uncrate the machine Upper cover Side frames 1. Remove all the screws holding the crate to the base, lift and set to the side. 2. Remove all the screws holding the lid to the crate and remove the stand side frames from the top of the crate. -
Page 10: Remove The Machine From Base
Phoenix 440-ML January 2020 8c. Remove the machine from base 1. Remove accessory boxes, shafts, and other components around the machine 2. Pull back plastic dust cover around the machine 1. Stand cross members 2. Rewind housing boxed 3. Machine 4. -
Page 11: Attach Upper Rewind Support Brackets
Phoenix 440-ML January 2020 8e. Attach rear platform 1. Secure the folding support of the rear platform to the rear of the machine by using bolts in the accessory box Securing screws 8f. Attach Upper Rewind supporting brackets 1. Use the Allen head screws to affix the rewind supporting plates to the machine side... -
Page 12: Attach Upper Shafts
Phoenix 440-ML January 2020 8g. Attach upper shafts 1. Rotate the locking outer sleeves in the direction of the arrow indicated in Figure 1, to their open position aligned with the inner sleeve as in Figure 2. 2. Insert slotted end of each upper shaft into the right shaft housing with tension adjustment knobs and drop shaft into place as in Figure 3. -
Page 13: Attach Safety Shield
Phoenix 440-ML January 2020 1. Hold the handles at both ends of the safety shield and align mounting block on safety shield with spring loaded pin in left side frame. Move shield in the direction of the arrow below 2. Align right mounting block on safety shield with locating pin on right side frame 3. -
Page 14: Control Panel
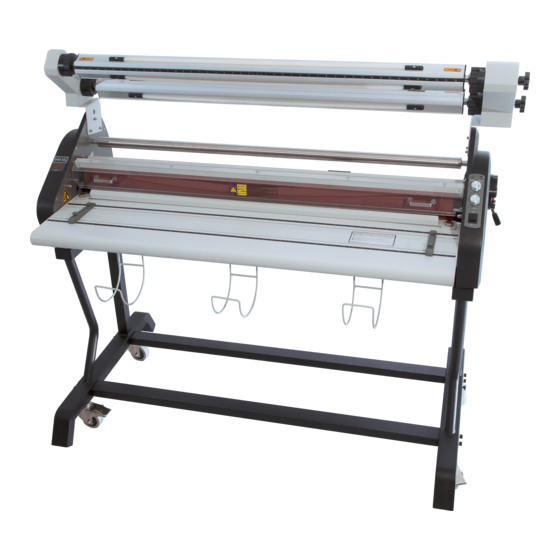
Phoenix 440-ML January 2020 Left Side Cover Feed tray Print roll hangers Stand Roller gap handle Right side cover Rewind housing Idler bar Safety shield 10. Rear exit panel 11. Rear Platform 12. Support hinges 13. Emergency stop switch 14. Left rewind housing 15. - Page 15 Phoenix 440-ML January 2020 Power indicator 4. Motor function switch 2. Temperature adjustment knob 5 Ready light 3. Speed adjustment knob 6. Temperature display screen Note: Reverse operation can only be utilized with the foot switch 1. When illuminated, indicates that the machine is turned on.
-
Page 16: Roller Gap Adjustment
Phoenix 440-ML January 2020 1. The roller gap adjustment handle (see Fig.) is located on the right-side cover of the laminator and is used to adjust the roller gap and pressure. 2. There are four mounting gap settings; 1/4” (6mm), 3/16” (5mm) ,1/8” (3mm)and 1/16”... -
Page 17: Loading Top Supply Roll
Phoenix 440-ML January 2020 1. Slide the top supply roll onto the rear Supply unwind shaft a. If using Liner-in film, the web should come off the bottom of the roll, for Liner-out film the web should come off the top of the roll 2. -
Page 18: Adjusting Brake Tension
Phoenix 440-ML January 2020 15. Adjusting Brake Tension 1. Adjust the brake tension so the film does not wind up on the rewind and the release liner does not get pulled into the rollers. 2. The release liner should have a small amount of sag as it releases from the overlaminate but not so much that it will be pulled into the nip area of the rollers. -
Page 19: Single Sheets Using A Sled
Phoenix 440-ML January 2020 16b. Single sheets using a sled 1. Load a roll of laminating film on the top roller (see Loading top Roll supply section 12) 2. Turn the roller gap handle to lift the upper roller. 3. Select a piece of Gatorboard or other PVC mounting board the width of the film web to use as a sled under the print to be laminated 4. -
Page 20: Thermal Film & Board
Phoenix 440-ML January 2020 17b. Thermal film and thermal boards 1. Load a roll of laminating film on the top roller (see Loading Top Roll supply section 12) 2. The recommended temperature setting is 10 on Temp dial (302° F) 3. -
Page 21: Mounting
Phoenix 440-ML January 2020 19. Mounting 19a. Mounting Adhesive back vinyl to boards 1. Load a roll of printed adhesive back vinyl on the top supply roller (see Loading top Roll supply section 13) 2. Turn the roller gap handle to lift the upper roller. -
Page 22: Heat Sensor Blocked Function
Phoenix 440-ML January 2020 20. Heat Sensor Blocked Function 1. If the heat sensor becomes blocked or has failed the power indicator will flicker. After one minute, the machine will automatically turn off its heating system. It is necessary to turn off the machine at once and check to see what is blocking the sensor, located directly behind the top roller in the center. -
Page 23: Photo Safety Eye
Phoenix 440-ML January 2020 23. Photo Safety Eye 1. When the machine switch is set to FWD, it is possible to normally adjust speed of the machine. If the photo safety eye is blocked, the motor will stop and the machine will not operate. -
Page 24: Troubleshooting
Phoenix 440-ML January 2020 24. Troubleshooting Problems Causes Solutions 1. No power supply 1. Plug in power cord 2. Main power switch is OFF 2. Place power switch to ON Machine does not turn on 3. Circuit breaker has tripped 3. -
Page 25: Specifications
Phoenix 440-ML January 2020 25. Specifications Model Phoenix 440-ML Specifications Applications PSA film, pouch boards, pouches, mounting boards Speed adjustment range 0~1.5m/min Temperature 100~302℉(37.7-150℃) Maximum width 44” (1120mm) Film gage 1.5 – 5 mil Gap/Pressure settings 0″, 1/16″, 1/8″, 3/16″ and 1/4″ respectively... -
Page 26: Warranty
The Applicable Warranty period for the New PHOENIX Laminators shall be one year on parts and three months on labor and rollers from date of purchase.
Need help?
Do you have a question about the 440-ML and is the answer not in the manual?
Questions and answers