Table of Contents
Advertisement
Quick Links
Advertisement
Table of Contents
Troubleshooting

Related Manuals for Sun21 MAX-M2024

Summary of Contents for Sun21 MAX-M2024
- Page 1 MPPT Solar Charge Controller User Manual Models: MAX-M2024 MAX-M3024 MAX-M4024...
- Page 2 Important Safety Instructions Please save this manual for future review. This manual contains safety, installation and operation for Maximum Power Point Tracking (MPPT) MAX series controller ("the controller" as referred to in this manual). General Safety Information Read carefully all the instructions and warnings in the manual before installation. No user serviceable components inside the controller.
-
Page 3: Table Of Contents
CONTENTS 1. General Information................1 1.1 Overview..........1 1.2 Characteristics.........2 1.3 Designations of Controller Models ..2 1.4 Maximum Power Point Tracking Technology ....2 1.5 Battery Charging Stage .........4 2. Installation Instructions ..............7 2.1 General Installation Notes .......7 2.2 PV Array Requirements .........7 2.3 Wire Size ..........9 2.4 Mounting..........10 3. -
Page 4: General Information
1. General Information 1.1 Overview Based on common negative design and advanced MPPT control algorithm, with LCD displaying running status, this product is artistic, economical and practical. Improving the MPPT control algorithm further, it can minimize the maximum power point loss rate and loss time, quickly track the maximum power point of the PV array and obtain the maximum energy from solar modules under any conditions;... -
Page 5: Characteristics
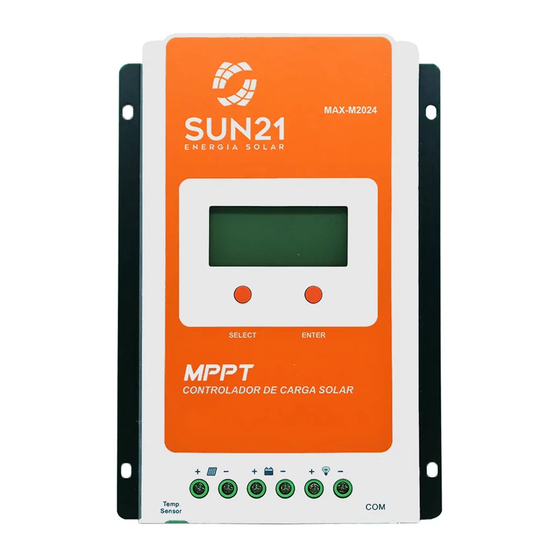
Full-load operation without any drop in capacity within the range of working environment temperature Extensive electronic protection 1.2 Characteristics Figure 1 Product Characteristics ❶ ❻ SELECT button RS485 communication interface ❷ ❼ ★ Mounting Hole Φ5mm Interface ❸ ❽... - Page 6 solar charge controller with Maximum Power Point Tracking (MPPT) Technology can lock on the point to harvest the maximum energy and deliver it to the battery. The MPPT algorithm of our company continuously compares and adjusts the operating points to attempt to locate the maximum power point of the array. The tracking process is fully automatic and does not need user adjustment.
-
Page 7: Battery Charging Stage
In actual application, as shading from cloud, tree and snow, the panel maybe appear Multi-MPP, but in actually there is only one real Maximum Power Point. As the below Figure 1-3 shows: Figure 1-3 Mutil-MPP Curve If the program works improperly after appearing Multi-MPP, the system will not work on the real max power point, which may waste most solar energy resources and seriously affect the normal operation of the system. - Page 8 In this stage, the battery voltage has not yet reached constant voltage (Equalize or Boost Voltage), the controller operates in constant current mode, delivering its maximum current to the batteries (MPPT Charging). B) Constant Charging When the battery voltage reaches the constant voltage setpoint, the controller will start to operate in constant charging mode, this process is no longer MPPT charging, and in the meantime the charging current will drop gradually, the process is not the MPPT charging.
- Page 9 2) If the controller time is not adjusted, the controller will equalize charge battery once every month following the inner time. C) Float Charging After the Constant voltage stage, the controller will reduce charging current to Float Voltage setpoint. This stage will have no more chemical reactions and all the charge current transforms into heat and gas at this time.
-
Page 10: Installation Instructions
2. Installation Instructions 2.1 General Installation Notes Please read the entire installation instructions to get familiar with the installation steps before installation. Be very careful when installing the batteries, especially flooded lead-acid battery. Please wear eye protection, and have fresh water available to wash and clean any contact with battery acid. - Page 11 MAX-M2024/3024/4024: 36 cell 48 cell 54 cell 60 cell System Voc<23V Voc<31V Voc<34V Voc<38V voltage Max. Best Max. Best Max. Best Max. Best Thin-Film 72 cell Voc<46V 96 cell Voc<62V System Module voltage Max. Best Max. Best Voc>80V NOTE: The above parameter values are calculated under standard test conditions ,Module Temperature 25℃,...
-
Page 12: Wire Size
PV array for this controller, please refer to the table below: Rated Charge Rated Charge Max. PV Array Max. PV open Model Current Power Power circuit voltage 260W/12V 390W/12V MAX-M2024 520W/24V 780W/24V ① 390W/12V 580W/12V ② MAX-M3024 100V 780W/24V 1170W/24V 520W/12V 780W/12V... -
Page 13: Mounting
* Model Max. PV input current Max. PV wire size MAX-M2024 /10AWG MAX-M3024 10mm /8AWG MAX-M4024 16mm /6AWG *These are the maximum wire sizes that will fit the controller terminals. CAUTION: When the PV modules connect in series, the open circuit voltage of the PV array must not exceed 92V at 25℃... - Page 14 CAUTION:The controller requires at least 150mm of clearance above and below for proper air flow. Ventilation is highly recommended if mounted in an enclosure. Installation Procedure: Figure 2-1 Mounting Step 1: Determination of Installation Location and Heat-dissipation Space Determination of installation location: The controller shall be installed in a place with sufficient air flow through the radiators of the controller and a minimum clearance of 150 mm from the upper and lower edges of the controller to ensure natural thermal convection.
- Page 15 Step 2:Connect the system in the order of ❶battery ❷ load ❸PV array in accordance with Figure 2-2,”Schematic Wiring Diagram” and disconnect the system in the reverse or der ❸❷❶. CAUTION: While wiring the controller do not close the circuit breaker or fuse and make sure that the leads of "+"...
- Page 16 to the interface ③ and place the other end close to the battery. CAUTION: If the remote temperature sensor is not connected to the controller,, the default setting for battery charging or discharging temperature is 25 °C without temperature compensation. ...
-
Page 17: Operation
3. Operation 3.1 Button Mode Note In load manual mode, it can turn the load On/Off of the load via Load ON/OFF the “ENTER” button. Press the “ENTER” button. Clear Fault Press the “SELECT” button. Browsing Mode Press the “ENTER” button. and hold on 5s to enter the setting mode Press the “SELECT”... - Page 18 Night No charging Charging PV Voltage, Current, Power Battery capacity, In Charging Battery Battery Voltage, Current, Temperature Battery Type Load ON Load Load OFF Load Voltage, Current, Load mode 2) Fault Indication Status Icon Description Battery over Battery level shows empty, battery frame blink, discharged fault icon blink Battery over...
-
Page 19: Setting
3) Browse interface 3.3 Setting 1)Clear the generated energy Operation: Step 1: Press the “ENTER” button and hold 5s under the PV power interface and the value is flashing. Step 2: Press the “ENTER” button to clear the generated energy.. 2)Switch the battery temperatureunit Press the “ENTER”... - Page 20 Item Lead-acid battery Lithium battery Sealed(default) (4s/12V; 8s/24V) LiFePO4 Li(NiCoMn)O2 (3s/12V; 6s/24V) Flooded User(9~34V) User(9~17V/12V; 18~34V/24V) CAUTION: When the default battery type is selected, the battery voltage control parameters will be set by default and can’t be changed. To change these parameters, select "User"...
- Page 21 CAUTION: Due to diversification of lithium battery types, its control voltage shall be confirmed with the engineer. ③ User settings (1)Setting the control voltage value The following rules must be observed when modifying the parameter values in User for lead-acid battery. Ⅰ...
- Page 22 Operation: Step1: Press the “ENTER” button and hold on 5s under the load mode interface. Step2: Press the “SELECT” button when the load mode interface is flashing. Step3: Press the “ENTER” button to the load mode.. NOTE:Please refer to 4.2 for the load working modes. ①Load working mode Timer 1 Timer 2...
-
Page 23: Protections, Troubleshooting And Maintenance
4. Protections, Troubleshooting and Maintenance 4.1 Protection When the charging current or power of the PV array exceeds its rated current or power, it will be charged at the rated current or power. Over NOTE: When the PV modules are in series, ensure that the open-circuit Current/power voltage of the PV array does not exceed the "maximum PV open-circuit voltage"... -
Page 24: Troubleshooting
★When the internal temperature is 81℃, the reducing power charging mode which reduce the charging power of 5%,10%,20%,40% every increase 1 ℃is turned on. If the internal temperature is greater than 85℃, the controller will stop charging. But while the temperature decline to be below 75 ºC, the controller will resume. 4.2 Troubleshooting Possible reasons Faults... -
Page 25: Maintenance
4.3 Maintenance The following inspections and maintenance tasks are recommended at least two times per year for best performance. Make sure controller firmly installed in a clean and dry ambient. Make sure no block on air-flow around the controller. Clear up any dirt and fragments on radiator. -
Page 26: Technical Specifications
5. Technical Specifications Electrical Parameters MAX-M2024 MAX-M3024 MAX-M4024 Item System nominal ① 12/24VDC Auto voltage Rated charge current Rated discharge current Battery voltage 8~32V range ② 100V Max. PV open ③ circuit voltage (Battery voltage +2V) ~72V MPP voltage range... - Page 27 Mechanical Parameters MAX-M2024 MAX-M3024 MAX-M4024 Item 220x154x 52mm 228x164x55mm 252x180x63mm Dimension Mounting 170x145mm 170x164mm 210x171mm dimension Mounting Φ5mm hole size 6AWG(16mm 6AW G(16mm 6AWG(16mm Terminal Recommende 10AWG(6mm 8AW G(10mm 6AWG(16mm d cable 0.94kg 1.26kg 1.65kg Weight...
-
Page 28: Annex I Conversion Efficiency Curves
Annex I Conversion Efficiency Curves Illumination Intensity: 1000W/m Temp: 25ºC Model: MAX-M2024 Solar Module MPP Voltage(17V, 34V) / Nominal System Voltage(12V) 2. Solar Module MPP Voltage(34V,45V,68V) / Nominal System Voltage(24V) - Page 29 Model: MAX-M3024 Solar Module MPP Voltage(17V, 34V) / Nominal System Voltage(12V) 2. Solar Module MPP Voltage(34V,45V,68V) / Nominal System Voltage(24V)
- Page 30 Model: MAX-M4024 Solar Module MPP Voltage(17V, 34V) / Nominal System Voltage(12V) 2. Solar Module MPP Voltage(34V,45V,68V) / Nominal System Voltage(24V)
-
Page 31: Annex Ii Dimensions
Annex II Dimensions MAX-M2024 (Unit: mm) - Page 32 MAX-M3024 (Unit: mm)
- Page 33 MAX-M4024 (Unit: mm) Any changes without prior notice! Version number: 1.0...
- Page 34 Conheça toda nossa linha de controladores de carga!
Need help?
Do you have a question about the MAX-M2024 and is the answer not in the manual?
Questions and answers